How To Cook Fatback In The Oven Fast With Crispy Results
Cooking fatback in the oven is one of the simplest ways to get crispy, delicious pork fat in minutes. This guide shows you exactly how to prepare, season, and bake fatback for perfect results every time. You will learn the best oven temperature, timing tricks, and seasoning ideas that turn plain fatback into a mouthwatering treat.
There is something deeply satisfying about cooking fatback in the oven. This humble cut of pork fat has been a staple in Southern kitchens for generations. It adds rich flavor to greens, beans, cornbread, and so many other dishes. Yet many people still do not know how easy it is to prepare at home.
If you have been looking for a fast way to get crispy fatback without standing over a hot stove, you are in the right place. This guide walks you through every step. You will learn the best oven temperature, how to slice it properly, and the simplest seasoning tricks. By the end, you will feel confident enough to make crispy oven-baked fatback like a pro.
Whether you are a seasoned cook or just starting out, this method is foolproof. No special equipment is needed. No long hours in the kitchen. Just simple ingredients and a hot oven. Let us get into it.
Key Takeaways
- Fast Cooking: Fatback takes only 25-35 minutes in a hot oven to become crispy and golden.
- Simple Preparation: All you need is salt, a knife, and a hot oven to get great results.
- Versatile Ingredient: Cooked fatback works in dozens of recipes from greens to cornbread.
- Oven Temperature Matters: 375°F to 400°F is the sweet spot for crispy fatback.
- No Special Equipment: You do not need any fancy tools, just a baking sheet and parchment paper.
- Customizable Flavor: Add pepper, garlic, or paprika to make your fatback your own.
📑 Table of Contents
What Is Fatback and Why Cook It in the Oven?
Fatback is a cut of pork fat taken from the back of the pig. It sits right beneath the skin and above the muscle. This pure fat layer is prized in Southern cooking and many other cuisines around the world. It renders beautifully when heated, releasing a rich, savory flavor that enhances almost any dish.
People use fatback in many ways. Some chop it up and drop it into pots of greens or beans. Others slice it thin and fry it until it curls and crisps. And some render it down into liquid lard for baking or frying. Each method has its charm, but the oven method stands out for one big reason: it is hands-off and fast.
Why Choose the Oven Over Stovetop Cooking?
Cooking fatback on the stovetop works, but it requires constant attention. You have to watch the pan, flip the slices, and manage the splattering grease. The oven does all the work for you. You place the slices on a sheet pan, pop them in, and let the heat do its magic.
Here are some reasons the oven method wins:
- Hands-off cooking: Set it and forget it while you prep other parts of your meal.
- Even rendering: The dry heat surrounds every piece, giving you uniform crispiness.
- Less mess: No splattering grease on your stovetop and countertops.
- Batch cooking: You can fit more pieces on a sheet pan and cook a large quantity at once.
- Easy cleanup: Just line the pan with parchment paper and you are done.
How to Prepare Fatback for the Oven
Good preparation makes all the difference when you cook fatback in the oven. Taking a few extra minutes to prep your meat properly ensures the best texture and flavor. Here is exactly what to do.
Step 1: Choose the Right Fatback
Start with a fresh piece of fatback from your butcher or grocery store. Look for a thick, even slab with a smooth surface. The fat should be white and firm, not yellow or soft. A good piece of pork fat will have a mild, clean smell. If it smells strong or off, pass on it.
You can buy fatback with the skin on or off. Both work well for oven cooking. If you leave the skin on, it adds extra crispiness. If you prefer to remove it, that is fine too. The choice is yours.
Step 2: Slice It Evenly
Use a sharp knife to cut the fatback into uniform slices. Aim for pieces about 1/4 inch thick. Even slices cook at the same rate, so you do not end up with some pieces burnt and others still chewy. If you want extra crispy results, slice the pork fat a bit thinner, around 1/8 inch.
For those who like a more rustic approach, you can also cut the fatback into small squares or strips. These work great as toppings for salads, soups, and baked potatoes. The shape does not matter much as long as the pieces are roughly the same size.
Step 3: Season Simply or Boldly
The beauty of oven-baked fatback is that it needs very little to taste amazing. A generous sprinkle of coarse salt is all you really need. But if you want to get creative, there are many directions you can go.
Here are some popular seasoning options:
- Classic Salt and Pepper: A simple blend that lets the natural pork flavor shine through.
- Smoky Paprika and Garlic: Adds a warm, savory depth that pairs well with beans and greens.
- Cajun Spice: For a bold, spicy kick that brings Southern flair to your plate.
- Brown Sugar and Cayenne: A sweet-heat combo that creates a sticky, caramelized crust.
- Plain and Simple: Just salt. Sometimes less really is more.
Pat the sliced fatback dry with paper towels before seasoning. Dry surfaces crisp up much better in the oven. Then lay the pieces out in a single layer on your prepared baking sheet.
The Best Oven Temperature and Timing
Getting the oven temperature right is the single most important factor when you cook fatback in the oven. Too low and the fat just melts away without crisping up. Too high and it burns before rendering properly. The sweet spot is between 375°F and 400°F.
Recommended Oven Settings
Preheat your oven to 375°F for a slower, more even render. This temperature gives you a nice balance of crispy edges and tender, melt-in-your-mouth centers. If you are in a hurry, bump the heat up to 400°F. Just keep a close eye on the pieces, as they can go from golden to burnt quickly at that higher temperature.
Here is a quick reference for cooking times:
- 375°F: 30 to 35 minutes, flipping halfway through.
- 400°F: 20 to 25 minutes, checking frequently after the 15-minute mark.
- 350°F: 35 to 40 minutes for thicker slices. Slower render, very gentle crisp.
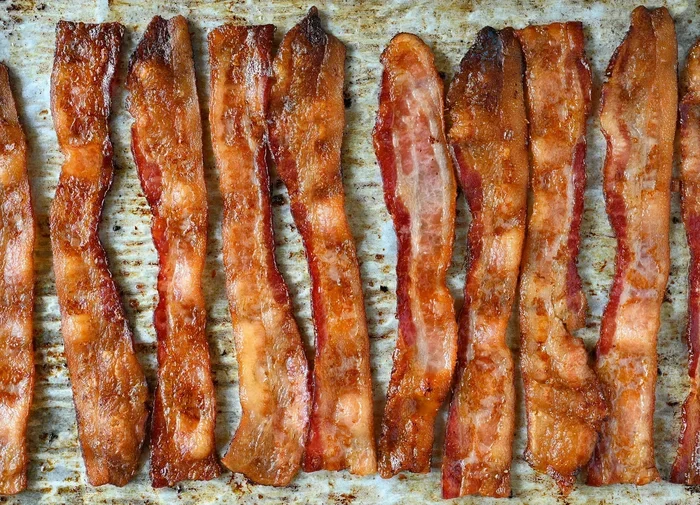
The goal is to cook the fatback until the edges turn golden brown and curl slightly. The center should be slightly translucent but firm. If you like it extra crispy, let it bake a few minutes longer. Just do not walk away from the oven entirely, because pork fat can go from perfect to burnt in a matter of moments.
Should You Flip the Pieces?
Flipping the fatback slices halfway through cooking helps both sides crisp up evenly. Use tongs to gently turn each piece. If you skip this step, the bottom side will be crisp while the top stays a bit softer. Both textures are delicious, but flipping gives you that satisfying crunch on every side.
For strips or squares, flipping is even more important since the pieces are smaller and can burn quickly on one side. Set a timer for 15 minutes, and when it goes off, give the pan a gentle shake or use tongs to turn each piece.
Common Mistakes to Avoid When Baking Fatback
Even though cooking fatback in the oven is simple, there are a few mistakes that can ruin your results. Learning what not to do is just as important as knowing the right steps.
Overcrowding the Pan
One of the biggest errors people make is placing too many slices on the baking sheet. When the pieces are crowded together, the steam gets trapped instead of escaping. This creates soggy fatback instead of crispy pork fat. Give each slice plenty of space. Use two sheet pans if you need to cook a large batch.
Skipping the Parchment Paper
Do not skip lining your baking sheet with parchment paper or a silicone mat. Rendered fat will pool on the pan and make cleanup a nightmare. Parchment paper also helps the bottom of each slice crisp up evenly. It is a small step that makes a big difference.
Using a Dull Knife
Cutting fatback with a dull knife is frustrating and dangerous. A dull blade tears the meat instead of slicing cleanly, which leads to uneven pieces. Keep your knife sharp and your cuts consistent. This one small habit improves both the look and the cooking results.
Not Letting It Rest
When the fatback comes out of the oven, resist the urge to eat it all immediately. Let the pieces rest on the pan for about 5 minutes. During this time, the texture firms up and the crispiness sets in. If you cut into it right away, the pieces may fall apart instead of holding their shape.
Forgetting to Check the Oven
Even with a timer, it is smart to peek at your fatback a few times during cooking. Ovens vary, and what works in one kitchen may not work exactly the same in another. Checking early and often helps you catch the perfect moment when the crispy pork fat is ready.
Delicious Ways to Use Cooked Fatback
Once your fatback is golden and crispy, the fun really begins. This versatile ingredient fits into a wide range of meals and snacks. Here are some of the best ways to enjoy your oven-baked creation.
Classic Southern Pairings
In traditional Southern cooking, fatback is often used to flavor pot liquor and greens. Chop up your crispy pieces and toss them into a pot of collard greens, mustard greens, or turnip greens. The rendered fat infuses the whole dish with a rich, savory depth that is hard to replicate any other way.
Fatback also pairs beautifully with black-eyed peas, butter beans, and hoppin’ john. Just drop a few pieces into the pot while the beans simmer. The fat melts into the cooking liquid and turns a simple pot of beans into something truly special.
Breakfast Boost
Start your morning with a handful of crispy oven-baked fatback alongside scrambled eggs and toast. It adds a satisfying crunch and a burst of pork flavor that elevates a simple breakfast. Some people crumble it over grits or fold it into cornbread batter before baking.
If you are a fan of pork rinds, homemade oven-baked fatback is a natural companion. The textures are similar, and the flavor is even better because you control the seasoning.
Snacks and Appetizers
Do not underestimate fatback as a standalone snack. A few pieces of crispy, salted pork fat make a surprisingly addictive nibble. Serve them alongside pickled vegetables, crackers, or cheese for a Southern-inspired appetizer spread.
You can also crumble your baked fatback over salads, baked potatoes, or roasted vegetables. The salty, crunchy topping adds a whole new dimension to simple dishes. It is a great way to use up any extra pieces after your main meal.
Expert Tips for the Crispiest Fatback Every Time
Getting restaurant-quality crispy results at home is easier than you think. A few pro tricks can take your oven-baked fatback from good to absolutely outstanding.
Dry the Slices Before Baking
Moisture is the enemy of crispiness. Before seasoning and baking, pat each slice of fatback thoroughly dry with paper towels. If you have time, let the slices sit uncovered in the refrigerator for an hour or two. This dries out the surface even more and leads to a noticeably crispier result.
Use a Wire Rack
Instead of placing your fatback directly on the baking sheet, set the slices on a wire rack placed over the pan. This allows air to circulate underneath each piece, promoting even crisping on all sides. The grease drips down into the pan below, keeping the bottom from getting soggy.
Add a Light Brush of Oil
While fatback is mostly fat itself, a very light brush of neutral oil on the surface can help kickstart the crisping process. Use just a tiny amount, barely a spray or a quick wipe with an oil-dipped paper towel. Too much oil will make the pieces greasy instead of crispy.
Experiment with Temperature
Every oven is slightly different. If your first batch does not come out exactly as you hoped, do not give up. Try adjusting the temperature by 10 or 15 degrees, or tweak the cooking time by a few minutes. Once you know your oven, you can dial in the perfect fatback recipe every single time.
Health and Nutrition Notes
It is worth mentioning that fatback is a high-fat food. It is rich in saturated fat and calories, so it is best enjoyed in moderation as part of a balanced diet. That said, a little pork fat goes a long way in adding flavor to vegetables, beans, and grains. You do not need much to make a big impact.
Many people who follow traditional Southern or rural diets rely on fatback as a primary cooking fat. Before the widespread availability of vegetable oils, rendered pork fat was the go-to choice for frying, baking, and seasoning. It has a long and proud history in American food culture, and that tradition continues today.
Conclusion
Cooking fatback in the oven is one of the easiest and most rewarding things you can do in the kitchen. With just a few simple steps, you can turn a humble cut of pork fat into a crispy, flavorful ingredient that enhances almost any meal. The method is fast, the cleanup is minimal, and the results are consistently delicious.
Remember to slice your fatback evenly, keep your oven between 375°F and 400°F, and do not overcrowd the pan. Season boldly or keep it simple, depending on your mood and the dish you are making. Whether you crumble it over greens, fold it into cornbread, or enjoy it as a crunchy snack on its own, crispy oven-baked fatback is a timeless ingredient that deserves a place in your kitchen.
Give this method a try the next time you have a piece of fatback in the fridge. You might just discover a new favorite way to cook and enjoy this classic pork product. Once you master the oven method, you will never go back to the stovetop again. Happy cooking!
Frequently Asked Questions
Can I cook fatback in the oven without salt?
Yes, you can cook fatback without salt, but adding salt enhances the flavor and helps draw out moisture for better crispiness. If you are watching your sodium intake, try using a small amount of salt or explore salt-free seasonings like garlic powder or smoked paprika for flavor.
How do I know when fatback is done in the oven?
Fatback is done when the edges turn golden brown and the pieces start to curl slightly. The fat should be firm but not hard, with a crispy exterior and a slightly soft center. If you cut into a piece and it is still translucent in the middle, give it a few more minutes.
Can I use frozen fatback for oven cooking?
It is best to thaw your fatback completely before oven cooking. Frozen pieces will cook unevenly, with the outside overcooking while the inside is still frozen. Let it sit in the refrigerator overnight to thaw safely, then pat it dry before seasoning and baking.
What is the difference between fatback and pork belly?
Fatback is pure fat from the back of the pig, while pork belly contains both fat and meat layers. Pork belly is richer and more flavorful due to the meat content, but fatback renders faster and produces a cleaner, crispier result when baked in the oven.
How long does cooked fatback last in the fridge?
Store your cooked fatback in an airtight container in the refrigerator for up to 5 days. It will lose some of its crispiness over time, but you can reheat it in the oven at 350°F for about 5 minutes to restore the crunch. Avoid storing it at room temperature for safety reasons.
Can I render fatback in the oven to make lard?
Yes, you can render fatback in the oven to make homemade lard. Cut the fatback into small cubes, spread them on a baking sheet, and bake at 250°F for 2 to 3 hours, stirring occasionally. The melted liquid fat that collects is pure lard, perfect for frying, baking, or cooking vegetables.