How To Clean Instant Coffee Maker And Keep It Fresh
Cleaning your instant coffee maker regularly keeps your coffee tasting fresh and your machine running smoothly. This guide covers everything from daily rinsing to deep descaling, with easy step-by-step instructions. You will learn how to remove buildup, prevent odors, and extend the life of your coffee maker.
Your instant coffee maker works hard every morning to deliver that quick cup of energy. But here is the thing most people overlook. A dirty coffee maker changes the taste of your coffee. It can even affect your health. If you have been wondering how to clean instant coffee maker properly, you are in the right place. This guide walks you through every step. You will learn simple methods that take just minutes. No fancy tools needed. Just basic supplies and a little time.
Keeping your coffee machine clean is not just about taste. It is about hygiene. Old coffee oils go rancid. Mineral deposits build up inside the heating element. Mold can grow in damp areas if you are not careful. The good news is that coffee maker maintenance does not have to be complicated. With the right approach, you can keep your machine running like new for years. Let us get into it.
Key Takeaways
- Daily cleaning prevents buildup: A quick rinse after each brew removes oils and residue that affect taste.
- Descaling is essential: Mineral deposits build up fast and can damage your machine if not removed regularly.
- Vinegar and citric acid work best: These natural cleaners are safe, effective, and affordable.
- Replace filters and parts on schedule: Worn parts reduce coffee quality and can harbor bacteria.
- A clean machine makes better coffee: Fresh coffee taste starts with a fresh coffee maker.
📑 Table of Contents
- Why Cleaning Your Instant Coffee Maker Matters
- What You Need Before You Start
- Step-by-Step Guide To Clean Instant Coffee Maker
- How To Descale Your Coffee Maker Properly
- Common Mistakes People Make When Cleaning
- How Often Should You Clean Your Coffee Maker
- Expert Tips To Keep Your Coffee Maker Fresh
- How A Clean Coffee Maker Improves Your Coffee Taste
- Troubleshooting Common Coffee Maker Problems After Cleaning
- Final Thoughts
Why Cleaning Your Instant Coffee Maker Matters
Many people skip cleaning their coffee maker. They brew, drink, and walk away. But over time, this neglect adds up. Here is what happens when you do not clean your machine.
First, old coffee oils stick to the inside of the water reservoir and the brewing components. These oils turn stale. They give your fresh cup a bitter, off taste. Second, hard water leaves mineral deposits called limescale. These deposits clog the heating element and slow down brewing. Third, moisture left sitting in the machine creates the perfect environment for bacteria and mold. None of these sound appetizing, right?
The good news is that coffee maker hygiene is easy to maintain. A few simple habits make a huge difference. Think of it like brushing your teeth. A little effort every day saves you from big problems later. When you clean your coffee maker regularly, you get better tasting coffee, better health, and a machine that lasts longer.
What You Need Before You Start
Before you dive into the cleaning process, gather your supplies. You do not need anything expensive. Most of these things are already in your kitchen.
Essential Cleaning Supplies
- White vinegar or citric acid for descaling
- Warm water
- A soft cloth or sponge
- A small brush (an old toothbrush works great)
- Mild dish soap
- Dry microfiber towel
Optional but Helpful Tools
- A cleaning pod designed for coffee machines
- A pipe cleaner for narrow parts
- A soft-bristled brush for the coffee maker filter
Having these items ready before you start makes the whole process smoother. You will not need to stop midway to find something. Once you have your supplies, you are ready to begin the actual cleaning.
Step-by-Step Guide To Clean Instant Coffee Maker
Now let us walk through the full cleaning process. Whether you have a basic model or a more advanced instant coffee machine, these steps apply. Follow along and your machine will thank you.
Step One: Unplug and Disassemble
Safety first. Always unplug your coffee maker before cleaning. Remove any removable parts. This includes the water reservoir, the coffee pot, the lid, and the coffee maker filter. Take everything apart gently. Do not force any pieces. Lay them out on a clean towel so you can see each part clearly.
This step is important because it lets you reach every nook and cranny. You cannot properly clean the inside while parts are still connected. Think of it like taking apart a puzzle. Each piece needs individual attention.
Step Two: Wash Removable Parts
Wash all removable parts with warm water and mild dish soap. Use a soft sponge to avoid scratching any surfaces. For the coffee maker filter, rinse it thoroughly under running water. If your filter is reusable, give it a gentle scrub to remove trapped coffee grounds.
Pay special attention to the water reservoir. This is where mineral deposits build up the most. Use a soft brush to reach corners and edges. Rinse everything well. Soap residue can affect the taste of your next brew, so make sure all parts are completely clean.
Step Three: Wipe Down the Exterior
While the parts are drying, wipe down the exterior of the machine. Use a damp cloth with a little warm water. For stubborn spots, add a drop of dish soap to the cloth. Dry everything with a microfiber towel afterward.
This simple step removes surface dust, splashes, and oils from handling. It keeps your machine looking new and prevents grime from entering the internal parts when you reassemble.
Step Four: Clean the Inside with Vinegar
Now for the deep clean. Fill the water reservoir with equal parts white vinegar and water. For example, use one cup of vinegar and one cup of water if your reservoir holds two cups. If you prefer not to use vinegar, citric acid descaling works just as well. Mix one tablespoon of citric acid with one cup of water.
Plug the machine back in and run a full brew cycle without coffee grounds. The vinegar solution will circulate through the brewing system and break down buildup inside. Once the cycle finishes, discard the liquid. Then run two more cycles with plain water to rinse out any vinegar taste. This is called coffee maker troubleshooting for taste issues.
Step Five: Reassemble and Test
Once all parts are dry, put everything back together. Make sure the filter is seated properly. Fill the reservoir with fresh water and run one more cycle. This final rinse ensures no cleaning solution remains. Brew a test cup and taste it. If it smells and tastes clean, you are done. Your machine is ready to make great coffee again.
How To Descale Your Coffee Maker Properly
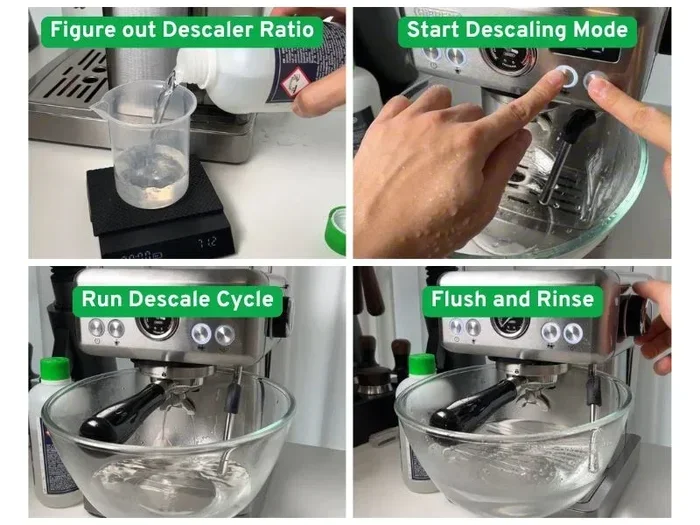
Descaling is one of the most important parts of coffee maker maintenance. Descaling means removing mineral deposits that build up from hard water. These deposits, also called limescale, can clog your machine and reduce its efficiency.
How often should you descale? That depends on how often you use your machine and how hard your water is. As a general rule, descale every one to three months. If you notice your coffee brewing slower than usual, that is a clear sign it is time to descale.
You can use store-bought descaling solutions, but white vinegar and citric acid work just as well. They are cheaper and completely natural. Simply follow the same process described in Step Four above. Run the vinegar or citric acid solution through a brew cycle, then rinse with plain water two to three times.
For those who want a hands-off approach, some modern machines have a built-in descaling indicator. When the light comes on, it is time to clean. If your machine does not have this feature, set a reminder on your phone every month or two. Staying on top of coffee appliance care saves you from costly repairs down the road.
Common Mistakes People Make When Cleaning
Even with the best intentions, people make mistakes when cleaning their coffee makers. Here are the most common ones and how to avoid them.
Using Too Much Vinegar
Vinegar is a great cleaner, but too much of it leaves a strong smell and taste. Always use equal parts vinegar and water. Never pour undiluted vinegar into your machine. After running the vinegar cycle, always rinse with plain water at least twice.
Skipping the Rinse Cycles
Some people run the vinegar solution and immediately brew coffee. This is a big mistake. The vinegar taste will ruin your cup. Always run two to three plain water cycles after using any cleaning solution. This ensures all residue is gone.
Using Harsh Chemicals
Do not use bleach, abrasive cleaners, or strong chemical solutions on your coffee maker. These can damage the internal parts and leave harmful residues. Stick to mild dish soap, vinegar, or citric acid. They are safe and effective.
Forgetting to Clean the Filter Regularly
The coffee maker filter traps oils and fine particles. If you do not clean or replace it regularly, these build up and affect taste. Replace disposable filters after each use. Clean reusable filters every week or so.
Not Drying Parts Before Reassembly
Moisture left inside the machine encourages mold growth. Always let parts air dry completely before putting them back together. Use a dry towel to pat everything down if needed.
How Often Should You Clean Your Coffee Maker
The frequency of cleaning depends on how often you use your machine. Here is a simple schedule to follow.
- After every use: Empty the used grounds, rinse the pot, and wipe down the exterior.
- Once a week: Wash all removable parts with soap and water. Run a water-only cycle.
- Every one to three months: Perform a full descale using vinegar or citric acid.
- Every six months: Do a thorough deep clean of all components, including hard-to-reach areas.
Following this schedule keeps your machine in top shape. It also ensures every cup of coffee tastes its best. Think of it as part of your daily coffee maker routine. Once it becomes a habit, it takes less than five minutes a day.
If you are also into cleaning other kitchen appliances, the same care principles apply. For instance, knowing how to clean the bottom tray of your toaster oven follows the same philosophy of regular maintenance. And just like learning how to self-clean a gas oven saves time and effort, establishing a routine for your coffee maker does the same.
When you invest in a new appliance, proper initial setup matters too. Just as you would carefully set up a brand new oven before first use, new coffee makers benefit from an initial cleaning before brewing your first cup.
Expert Tips To Keep Your Coffee Maker Fresh
Beyond the basic cleaning steps, there are a few expert tricks that take your coffee maker maintenance to the next level.
Tip One: Use filtered water. Hard water causes more mineral buildup than soft water. A simple filter pitcher can extend the time between descaling sessions and improve the taste of your coffee.
Tip Two: Leave the lid open after brewing. This allows the inside of the machine to air dry. Less moisture means less chance of mold and bacteria growth. It is a small habit with big benefits.
Tip Three: Clean the steam wand or spout regularly. Residue builds up around the dispensing area quickly. A quick wipe after each use and a deeper clean once a week keeps this area sanitary and free from coffee maker odor.
Tip Four: Run a baking soda cycle for tough odors. If your machine has developed a stale smell, add two tablespoons of baking soda to the water reservoir and run a brew cycle. Then rinse with plain water two times. This neutralizes odors naturally.
Tip Five: Store your machine properly. If you do not use your coffee maker every day, empty all water from the reservoir before storing. This prevents stagnant water from causing mold and mineral buildup.
Tip Six: Replace worn parts promptly. Over time, gaskets, seals, and filters wear out. Worn parts can cause leaks and reduce brewing performance. Check your user manual for replacement schedules and order parts when needed.
These tips might seem small, but they add up. Together, they form a complete coffee appliance care routine that keeps your machine performing at its best. A well-maintained machine also uses less energy and brews faster. That is a win for both your coffee and your electricity bill.
How A Clean Coffee Maker Improves Your Coffee Taste
You might be wondering if cleaning really makes that much of a difference. The answer is absolutely yes. Here is why.
Coffee is a delicate beverage. It picks up flavors from its surroundings. When your machine has old coffee oils and mineral deposits, those flavors transfer into your fresh brew. The result is a flat, bitter, or metallic taste that no amount of good beans can fix.
A clean machine lets the true flavors of your coffee shine through. You will notice brighter acidity, smoother body, and a cleaner finish. If you have been using vinegar cleaning methods or citric acid descaling and have not noticed a difference, it might be because you need to clean more thoroughly or more often.
Think about it this way. You would not cook a gourmet meal in a dirty pan. The same principle applies to your coffee maker. Clean equipment equals better food and drink. This is the foundation of good coffee maker hygiene.
Troubleshooting Common Coffee Maker Problems After Cleaning
Sometimes even after cleaning, your machine might not work perfectly. Here are a few common issues and quick fixes.
Problem One: The machine is slow to brew. This usually means mineral deposits are still present. Run another descaling cycle with a stronger vinegar solution. If the problem persists, check the water inlet for blockages.
Problem Two: There is a lingering vinegar smell. Run three to four plain water cycles. This should clear out any remaining vinegar residue. Adding a tablespoon of baking soda to one of the rinse cycles can help neutralize the smell faster.
Problem Three: Coffee tastes soapy. This happens when soap residue is left on parts. Wash all removable pieces again with warm water and rinse extremely well. No soap should remain on any surface.
Problem Four: Water leaks from the machine. Check that all parts are seated correctly. A misaligned reservoir or filter basket can cause leaks. If the problem continues, the seal or gasket may need replacing.
These coffee maker troubleshooting tips help you solve problems fast. Most issues are simple and fixable at home. You do not need to call a technician for minor problems.
Final Thoughts
Learning how to clean instant coffee maker is one of the simplest things you can do to improve your daily coffee experience. A clean machine brews better coffee, lasts longer, and keeps you healthy. The steps are easy. The supplies are affordable. And the results are immediate.
Make cleaning part of your routine. A quick rinse after each brew, a weekly wash of removable parts, and a monthly descale will keep your machine in excellent shape. Do not wait until you notice a problem. Preventive care is always easier than fixing issues after they develop.
Your instant coffee machine deserves the same attention you give to other kitchen appliances. With the tips and methods in this guide, you have everything you need to keep your coffee maker fresh, clean, and performing at its best. Start today. Your morning cup of coffee will taste the difference.
Frequently Asked Questions
How often should I clean my instant coffee maker?
You should rinse your coffee maker after every use and wash removable parts weekly. A full descale with vinegar or citric acid should be done every one to three months depending on how often you brew and how hard your water is.
Can I use lemon juice instead of vinegar to clean my coffee maker?
Yes, lemon juice works as a natural alternative to vinegar. It contains citric acid that helps break down mineral deposits. Use the same equal-parts method with lemon juice and water, then rinse thoroughly with plain water.
Is it safe to use vinegar in my coffee maker?
Yes, white vinegar is safe and effective for cleaning coffee makers. It removes mineral buildup, kills bacteria, and eliminates odors. Just make sure to rinse the machine with plain water two to three times after the vinegar cycle to remove any remaining taste.
What causes my coffee maker to smell bad?
Bad smells usually come from old coffee oils, mineral deposits, or mold growth. These build up over time if the machine is not cleaned regularly. Running a vinegar cycle and making sure all parts dry completely before reassembling will eliminate most odors.
How do I remove hard water stains from my coffee maker?
Hard water stains are mineral deposits that respond well to vinegar or citric acid. Fill the reservoir with equal parts vinegar and water, run a brew cycle, then rinse with plain water two to three times. For stubborn stains, let the vinegar solution sit in the reservoir for 30 minutes before brewing.
Can I put my coffee maker parts in the dishwasher?
Many removable coffee maker parts are dishwasher safe, but check your user manual first. The water reservoir and electronic components should always be hand washed. Dishwashers can be too harsh on certain plastic parts and may cause warping or cracking over time.