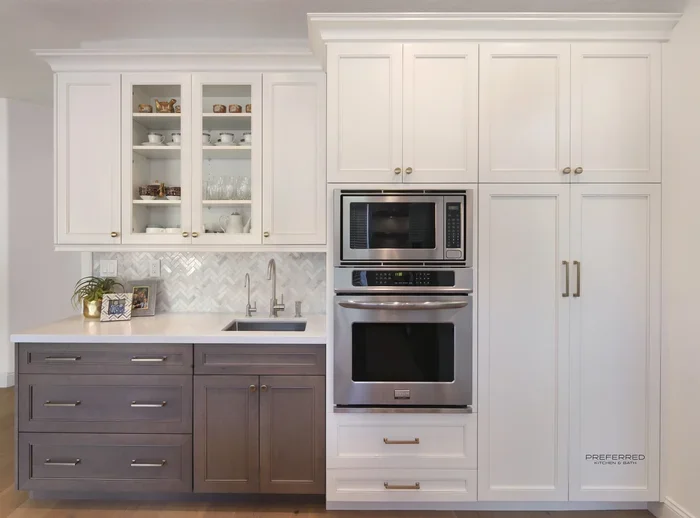
How To Modify Wall Oven Cabinet To Upgrade Your Kitchen
Modifying a wall oven cabinet transforms your kitchen into a modern, functional space. This guide walks you through every step, from planning and measuring to cutting, fitting, and finishing. You will learn how to adjust cabinet depth, add trim kits, and ensure proper ventilation for your wall oven cabinet modification.
Your kitchen is the heart of your home. And the wall oven cabinet sitting right in the middle of it? That cabinet shapes the entire look and feel of your cooking space. If your current setup feels outdated or just does not fit right, modifying that cabinet can change everything.
How to modify wall oven cabinet is a question many homeowners ask when they want a fresh kitchen without the huge price tag of a full remodel. The good news? It is totally doable. You do not need to be a professional carpenter. With the right plan, a few basic tools, and some patience, you can upgrade your wall oven cabinet to look brand new. This guide will show you exactly how.
Whether you want to adjust the depth, change the trim, or improve ventilation, this article covers it all. We will walk through every step in plain, simple language. By the end, you will feel confident enough to grab your tools and get started.
Key Takeaways
- Measure twice, cut once: Accurate measurements of your wall oven cabinet are the foundation of a successful modification.
- Choose the right materials: Matching your cabinet material ensures a seamless and durable upgrade.
- Prepare for ventilation and heat: Proper clearances and heat shields protect your cabinets and keep your kitchen safe.
- Follow a step-by-step process: Planning, cutting, fitting, and finishing each play a vital role in a clean result.
- Avoid common mistakes: Skipping permits, ignoring electrical clearance, and rushing the process can cause costly errors.
- Add finishing touches: Trim kits, tile backsplashes, and cabinet hardware elevate the final look.
📑 Table of Contents
Why Modify Your Wall Oven Cabinet?
Most people think about a kitchen upgrade and immediately picture new countertops or a fresh coat of paint. But the wall oven cabinet often gets overlooked. That is a big mistake. The cabinet around your oven takes a lot of daily wear and heat exposure. Over time, it can look tired, feel bulky, or simply not match your new appliances.
Here are some common reasons homeowners decide to modify their wall oven cabinet:
- Old or outdated design: Your cabinet style no longer matches your kitchen aesthetic.
- Poor fit: The oven does not sit flush or the door does not open fully.
- Ventilation issues: Heat gets trapped, which can damage the cabinet and reduce oven performance.
- Size mismatch: You upgraded your oven but the cabinet was never adjusted to fit properly.
- Aesthetic refresh: You want a built-in, seamless look that makes your kitchen feel high-end.
Modifying your cabinet solves all of these problems. It also adds real value to your home. A well-done kitchen cabinet upgrade catches the eye of potential buyers too.
Understanding Your Wall Oven Cabinet
Before you start any work, you need to understand what you are working with. A wall oven cabinet is the enclosure that houses your oven at a convenient standing height. It typically includes the cabinet box, the trim or surround, the countertop cutout, and sometimes a back panel or heat shield.
Most wall oven cabinets are made from plywood, MDF, or solid wood. Each material behaves differently when you cut or modify it. For example, plywood is sturdy but can splinter. MDF is smooth but sensitive to moisture. Knowing your material helps you choose the right blades and finishing techniques.
Also, pay attention to the oven cabinet dimensions. Standard wall ovens are about 24 to 30 inches wide and 27 to 29 inches tall. The cabinet opening needs to match these measurements closely. Even a half-inch difference can cause alignment problems.
Planning Your Wall Oven Cabinet Modification
Planning is where most DIY projects succeed or fail. Taking time to plan saves you money, prevents mistakes, and keeps your project on track. Here is how to plan a wall oven cabinet modification the right way.
Step 1: Measure Everything
Grab a tape measure and write down these key dimensions:
- The width and height of the cabinet opening.
- The depth of the cabinet from the wall to the front edge.
- The thickness of the cabinet material.
- The size of the oven unit itself.
- The space between the oven top and the countertop.
Write these numbers down twice. Tape them to your wall. Measure twice, cut once is not just a saying. It is the golden rule of any cabinet modification project.
Step 2: Decide What You Want to Change
Be specific about your goals. Do you want to:
- Reduce the cabinet depth for a sleeker built-in look?
- Add a trim kit or decorative surround?
- Install a heat shield for better protection?
- Adjust the cutout for a different oven size?
- Update the finish with paint or veneer?
Write down your goals. This simple step keeps you focused and prevents scope creep during the project.
Step 3: Check Local Building Codes
This part is easy to skip, but it matters. Some areas require permits for cabinet modifications, especially when electrical or ventilation changes are involved. Check with your local building department before you start. It is better to know now than to face a problem later.
Tools and Materials You Will Need
Having the right tools makes the job faster and cleaner. Here is a complete list of what you need for a cabinet modification project:
| Tool / Material | Purpose |
|---|---|
| Tape measure | Accurate measurements of the cabinet and oven |
| Circular saw or jigsaw | Cutting wood or MDF to size |
| Drill and drill bits | Making pilot holes and driving screws |
| Wood filler or putty | Filling gaps and smoothing surfaces |
| Sandpaper (120 and 220 grit) | Smoothing cut edges and prepping for paint |
| Paint or stain | Finishing the cabinet to match your kitchen |
| Trim kit or surround | Adding a decorative finish around the oven opening |
| Heat shield (optional) | Protecting cabinet material from oven heat |
| Level | Ensuring the oven sits flat and even |
| Safety glasses and gloves | Protecting your eyes and hands during cutting |
Invest in good-quality tools. A sharp blade on your saw makes a huge difference in the clean edges of your wall oven cabinet modification.
Step-by-Step Cabinet Modification Process
Now comes the fun part. Here is a detailed walkthrough of the actual modification process. Follow these steps in order for the best results.
Step 1: Remove the Oven and Existing Trim
First, turn off the power to the oven at the circuit breaker. Safety always comes first. Then carefully pull the oven out from the cabinet opening. Set it aside on a soft surface.
Next, remove any existing trim, surround, or decorative pieces around the oven opening. Use a pry bar gently to avoid damaging the cabinet box. Keep all hardware and screws in a labeled bag.
Step 2: Make Your Cuts
Now it is time to modify the cabinet to your planned dimensions. Use your measurements from the planning phase.
For depth adjustments, mark the new depth line on the inside of the cabinet. Use a circular saw with a fine-tooth blade for clean cuts. Go slow and steady. Let the tool do the work.
For width adjustments, measure and mark carefully on both sides of the cabinet. Cut evenly to keep the opening symmetrical. A jigsaw works well for curved or detailed cuts.
Quick Tip: Place painter’s tape along your cut line. This reduces splintering and gives you a clearer visual guide.
Step 3: Sand and Smooth All Edges
After cutting, you will have rough edges. Start with 120-grit sandpaper to level them out. Then switch to 220-grit for a smooth finish. This step is essential before painting or staining.
Also sand any surfaces you plan to refinish. Smooth surfaces accept paint and stain much better. They also look more professional in the final result.
Step 4: Apply Finish or Paint
Choose a finish that matches your kitchen style. If you have solid wood cabinets, stain and polyurethane work great. For MDF or painted cabinets, use a quality primer first, then apply your paint in thin, even coats.
Let each coat dry fully before adding the next. Two to three coats usually give the best coverage and durability.
Step 5: Install the Trim Kit or Surround
A trim kit is the decorative piece that frames the oven opening. It covers any gaps and gives the installation a polished, built-in look. Most modern ovens come with a trim kit, but you can also buy separate ones to match your kitchen style.
Position the trim around the opening. Use a level to make sure everything is even. Secure it with screws or adhesive, depending on the material.
Step 6: Reinstall the Oven
Carefully slide the oven back into the modified cabinet. Check that it sits level and flush. Reconnect the power and test the oven to make sure everything works properly.
Stand back and admire your work. A successful wall oven cabinet modification makes the entire kitchen feel more cohesive and updated.
Common Mistakes to Avoid
Even the best DIYers make mistakes. Here are the most common ones people make when modifying a wall oven cabinet, and how to avoid them.
- Skipping measurements: Guessing leads to uneven cuts and wasted material. Always measure three times if you need to.
- Ignoring heat clearance: Ovens generate a lot of heat. Not leaving enough space between the oven and cabinet walls can cause warping or fire risk.
- Using the wrong blade: A dull or wrong blade on your saw causes splintering and rough edges. Use a fine-tooth blade designed for wood.
- Forgetting the electrical clearance: Your oven needs proper electrical space behind it. Do not block vents or wiring with your modifications.
- Rushing the finish: Skipping sanding or using low-quality paint leads to an uneven, unprofessional look. Take your time here.
- Not checking for level: An oven that sits crooked can open and close poorly and may damage the cabinet over time.
Expert Insight: The Importance of Heat Shields
Pro tip: Consider installing a heat shield behind your oven. This is a thin metal or ceramic panel that protects your cabinet material from prolonged heat exposure. Many kitchen fires start because the cabinet material behind the oven degrades over time. A simple heat shield adds a layer of safety and extends the life of your modified cabinet.
Expert Tips for a Professional Finish
You do not need to be a professional to get professional-looking results. These tips from experienced kitchen renovators will elevate your project.
Match Your Cabinet Hardware
If your cabinet has handles or pulls, consider updating them as part of the modification. New hardware is an inexpensive way to tie the whole kitchen together. Look for finishes that match your faucet, refrigerator handles, or other metal accents in the room.
Add a Tile Backsplash
A tile backsplash behind the oven adds visual interest and protects the wall from grease and heat. Subway tiles are a classic choice. They are easy to install and work with almost any kitchen style. Pair them with a matching grout color for a clean, polished look.
Use a Laser Level
A regular bubble level works fine for most jobs. But a laser level gives you a perfect straight line across the entire cabinet opening. This small tool makes a big difference in how professional the final result looks.
Seal All Cut Edges
Any exposed cut edge on plywood or MDF should be sealed with edge banding or a coat of primer. This prevents moisture from seeping in and causing swelling or warping. It also gives a cleaner, more finished appearance.
Test the Fit Before Final Installation
Before you permanently secure anything, do a dry fit. Place the oven in the modified cabinet without fastening it. Check the door clearance, the ventilation gaps, and the overall alignment. Make any adjustments now. It is much easier to fix things before everything is in place.
Frequently Asked Questions
Can I modify a wall oven cabinet myself, or should I hire a professional?
Most homeowners can modify a wall oven cabinet themselves if they are comfortable using basic power tools. The project involves measuring, cutting, sanding, and finishing. It does not require advanced carpentry skills. However, if your modification involves electrical changes or major structural adjustments, hiring a licensed professional is a smart choice.
What is the standard depth for a wall oven cabinet?
The standard depth for a wall oven cabinet is about 24 to 25 inches. This provides enough space for the oven unit while leaving room for ventilation behind it. If you are modifying the depth, make sure you maintain at least 2 to 3 inches of clearance behind the oven for proper airflow and heat dissipation.
Do I need a heat shield when modifying my wall oven cabinet?
While not always required, a heat shield is highly recommended. It protects the cabinet material from the constant heat your oven produces. Over time, heat can warp wood, discolor finishes, or even pose a fire risk. A simple metal or ceramic heat shield is an inexpensive safety upgrade that extends the life of your modified cabinet.
What materials work best for a modified wall oven cabinet?
Plywood is the most common material for wall oven cabinets because it is strong and resists warping. MDF works well for a smooth, paint-ready surface but is less heat-resistant. Solid wood offers a premium look but requires more maintenance. Choose a material that matches your budget, style, and kitchen environment.
How much does it cost to modify a wall oven cabinet?
The cost depends on the scope of your project. A simple refinishing job might cost under $100 for paint and supplies. A more involved modification with a trim kit, heat shield, and new hardware could run between $200 and $500. Compared to a full kitchen remodel, modifying the wall oven cabinet is a budget-friendly way to refresh your space.
How long does a wall oven cabinet modification take?
Most homeowners complete the project in one to two weekends. The first weekend is usually for measuring, planning, and cutting. The second weekend covers sanding, finishing, and final installation. If you are painting or staining, factor in drying time between coats, which adds an extra day or two.
Conclusion
Modifying your wall oven cabinet is one of the most rewarding kitchen upgrades you can tackle. It is affordable, customizable, and delivers real results. Whether you want a sleeker built-in look, better ventilation, or simply a fresh new finish, this project puts you in control.
Start with careful planning and accurate measurements. Use the right tools and quality materials. Follow each step in order. And do not rush the finishing process. The difference between a good result and a great result is in the details.
Your kitchen deserves to look as good as the food you cook in it. Take on this wall oven cabinet modification project and enjoy a kitchen that feels updated, functional, and uniquely yours. Grab your tools, follow this guide, and watch your kitchen transform.