How To Dry Basil In Oven And Lock In All The Flavor
Drying basil in the oven is the fastest and easiest way to preserve your fresh harvest. This guide shows you exactly how to dry basil in oven settings that lock in every bit of flavor. You’ll learn preparation tips, temperature tricks, and storage methods that keep your dried herbs tasting incredible for months.
There is nothing quite like the smell of fresh basil. Whether you grew it in your garden or brought home a lush bunch from the farmers market, this aromatic herb adds magic to so many dishes. But here is the problem. Basil wilts fast. Within a few days, those beautiful green leaves turn dark and limp. You end up throwing away perfectly good herbs. That is exactly why learning how to dry basil in oven is such a game changer.
Oven drying is one of the simplest methods for herb preservation. It is fast, reliable, and does not require any fancy equipment. You probably already own everything you need. In this guide, we walk you through every single step. By the end, you will know exactly how to dry basil in oven settings that keep all the flavor locked in. You will also learn storage tips, common mistakes to avoid, and creative ways to use your dried herbs all year long.
Key Takeaways
- Low heat is key: Drying basil in oven works best at temperatures between 170°F and 200°F to preserve flavor and prevent burning.
- Prep matters: Washing, drying, and stripping leaves from stems before placing them on the baking sheet ensures even drying.
- Storage extends shelf life: Properly stored dried basil can last up to one year without losing its aromatic quality.
- Oven drying beats air drying in speed: You can have dried basil ready in just 2 to 4 hours using your kitchen oven.
- Crush right before use: Crumbling dried basil just before cooking releases the strongest flavor and aroma.
- Avoid common mistakes: Using too high heat or skipping the cooling step ruins the quality of oven-dried herbs.
📑 Table of Contents
- Why Drying Basil In The Oven Is Worth It
- How To Prepare Fresh Basil For Drying
- Step-By-Step Guide To Drying Basil In The Oven
- Best Oven Temperature And Time Settings
- How To Store Dried Basil Properly
- Creative Ways To Use Your Dried Basil
- Common Mistakes To Avoid When Drying Basil
- Frequently Asked Questions About Drying Basil
- Final Thoughts On Drying Basil In The Oven
Why Drying Basil In The Oven Is Worth It
Fresh basil is wonderful. But it has a short shelf life. You cannot always use it all before it goes bad. That is where drying basil comes in. Removing the moisture from the leaves stops decay and keeps the flavor intact for much longer.
There are several ways to dry herbs. You can air dry them. You can use a dehydrator. But drying basil in oven has some clear advantages. It is faster than air drying. It works even when the humidity is high. And it gives you consistent results every time. Here are some reasons why oven drying should be your go-to method.
Speed And Convenience
Air drying basil can take one to two weeks. You need to hang bundles in a warm dry spot and wait. With oven drying, you can have crispy dried leaves in just two to four hours. This makes it perfect when you have a big harvest and need to preserve it quickly.
Better Flavor Retention
When done correctly, oven drying locks in the essential oils that give basil its amazing taste. The low heat slowly removes moisture without destroying the flavor compounds. The result is dried basil that smells and tastes almost as good as fresh.
No Special Equipment Needed
You do not need a dehydrator or any fancy gadgets. Your regular kitchen oven handles the job perfectly. All you need is a baking sheet, some parchment paper, and your fresh basil leaves. That is it.
Works Year Round
Once you learn how to dry basil in oven, you can preserve herbs from every harvest. Winter cooking suddenly becomes much more flavorful when you have your own supply of dried herbs ready to go.
How To Prepare Fresh Basil For Drying
Proper preparation makes a huge difference in the final result. Taking a few extra minutes before drying ensures your oven dried basil turns out vibrant and full of flavor. Here is exactly what to do.
Step One: Harvest At The Right Time
Pick your basil in the morning after the dew has dried but before the sun gets too hot. This is when the essential oils are at their peak. Choose healthy leaves with no brown spots or insect damage. The fresher the starting material, the better your dried basil will taste.
Step Two: Wash Gently
Rinse the basil leaves under cool running water. Do not soak them. Gently shake off the excess water. Then pat the leaves dry with a clean kitchen towel or paper towels. Any remaining moisture can cause mold during the drying process.
Step Three: Remove Leaves From Stems
Strip the leaves from the stems. You can do this by holding the top of the stem and sliding your fingers down. The leaves should come off easily. Discard the stems or add them to your compost pile.
Step Four: Sort And Remove Damaged Leaves
Go through your pile of leaves and remove any that are yellowed, torn, or wilted. Only the best leaves should make it to the baking sheet. This small step improves the overall quality of your dried herb significantly.
Quick Tip For Busy Cooks
If you are short on time, you can dry whole small basil leaves without stripping them. Just make sure they are completely dry on the outside before placing them on the tray. Larger leaves work better when stripped because they dry more evenly.
Step-By-Step Guide To Drying Basil In The Oven
Now comes the fun part. This is where you actually dry basil in oven and turn fresh herbs into a pantry staple. Follow these steps carefully for the best results.
Step One: Preheat Your Oven
Set your oven to the lowest possible temperature. Most ovens can go as low as 170°F. If yours goes lower, even better. The goal is gentle heat. High heat will cook the basil instead of drying it, which destroys the flavor and turns the leaves brown.
Step Two: Line Your Baking Sheet
Cover a baking sheet with parchment paper. This prevents the leaves from sticking and makes cleanup a breeze. Do not use wax paper. It can melt at even low temperatures.
Step Three: Arrange The Leaves In A Single Layer
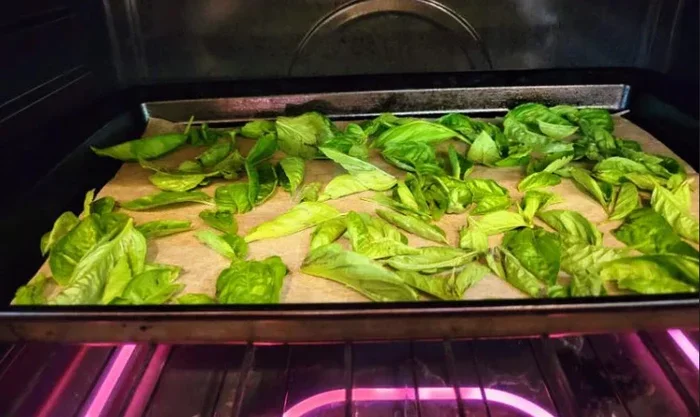
Place the basil leaves on the parchment paper. Spread them out in a single layer with no overlapping. Crowding the pan traps moisture and leads to uneven drying. If you have a lot of basil, use multiple baking sheets or work in batches.
Step Four: Place The Sheet In The Oven
Slide the baking sheet onto the middle rack. Leave the oven door slightly cracked open. This allows moisture to escape and helps the leaves dry faster. You can prop the door open with a wooden spoon or a folded oven mitt.
Step Five: Check And Flip Every 30 Minutes
Set a timer and check on your basil every half hour. After 30 minutes, open the oven and gently flip each leaf. This ensures both sides dry evenly. Keep an eye on the color. You want the leaves to become crispy and crumbly but not burned.
Step Six: Remove When Fully Dry
Most batches are done within two to four hours. The leaves should feel completely dry and crumble easily between your fingers. If they still feel soft or flexible, give them another 30 minutes. Do not rush this step. Proper drying is the key to long-lasting flavor.
Step Seven: Let Them Cool Completely
This step is easy to skip but very important. Remove the baking sheet from the oven and let the leaves cool on the counter. Cooling concentrates the flavor. If you crush warm leaves, you will lose precious aromatic oils. Patience here pays off big time.
Best Oven Temperature And Time Settings
Getting the temperature right is the single most important factor in drying basil in oven. Too hot and you burn the flavor. Too cool and the process takes forever. Here is a detailed breakdown of the best settings.
| Oven Temperature | Drying Time | Best For | Flavor Result |
|---|---|---|---|
| 170°F (77°C) | 3 to 4 hours | Thick-leaf basil varieties | Excellent flavor retention |
| 180°F (82°C) | 2.5 to 3.5 hours | Standard sweet basil | Very good flavor |
| 200°F (93°C) | 2 to 3 hours | Large batches, urgency | Good but slightly less intense |
| 250°F+ (121°C+) | 1 to 1.5 hours | Not recommended | Burnt, bitter flavor |
As you can see, staying between 170°F and 200°F gives you the best results. The lower temperature takes a bit longer but preserves more of the natural oils that make basil so delicious. Avoid going above 200°F. At higher temperatures, the leaves burn quickly and the flavor turns bitter and harsh.
How To Tell If Your Basil Is Fully Dried
There are a few simple ways to check. The leaves should feel completely crispy and crumble when you press them. They should not bend or flex at all. The color will darken from bright green to a deep olive green. If the center vein of the leaf still feels soft, it needs more time.
Expert Insight
Herb drying experts always recommend the lowest possible oven setting. Slow drying preserves more of the volatile compounds that create basil’s signature aroma. Think of it as a gentle dehydration process rather than cooking. The slower you go, the better the final product.
How To Store Dried Basil Properly
Drying is only half the battle. How you store your dried basil determines how long it stays flavorful. Improper storage can ruin even the best dried herbs. Follow these guidelines to get the longest shelf life possible.
Method One: Glass Jars
Crush the cooled leaves lightly with your fingers. Place them in a clean glass jar with an airtight lid. Glass is the best storage material because it does not absorb odors or moisture. Keep the jar in a cool dark cupboard away from direct sunlight.
Method Two: Vacuum Sealing
For maximum freshness, use a vacuum sealer. Remove all air from the bag before sealing. Vacuum-sealed dried basil can last well over a year without significant flavor loss. This method is especially great if you dry large batches.
Method Three: Freezer Storage
You can also freeze dried basil. Place the crushed leaves in a freezer-safe bag and press out all the air. Frozen dried basil stays flavorful for up to two years. When you need it, just scoop out what you need and close the bag quickly.
How Long Does Dried Basil Last?
When stored properly, dried basil retains its best flavor for about six to twelve months. After that, it is still safe to eat but the taste becomes weaker. Always smell your dried herbs before using them. If the aroma is faint, it is time to replace your supply.
Common Storage Mistakes To Avoid
- Storing in clear containers: Light degrades the flavor compounds over time. Use dark glass or opaque containers.
- Leaving the lid loose: Air exposure causes dried herbs to lose their potency quickly.
- Storing near the stove: Heat and steam ruin dried herbs. Keep them in a cool, dry spot.
- Crushing too early: Only crush what you need. Whole leaves retain flavor longer.
Creative Ways To Use Your Dried Basil
Once you have a batch of beautiful dried basil ready, the fun really begins. There are so many wonderful ways to use this concentrated herb in your everyday cooking. Here are some of our favorite ideas.
Homemade Italian Seasoning Blend
Mix your dried basil with dried oregano, thyme, rosemary, and garlic powder. Store the blend in a shaker jar. This homemade seasoning works beautifully on pasta, pizza, roasted vegetables, and grilled meats. It makes an excellent gift too.
Flavorful Basil Oil
Steep dried basil leaves in warm olive oil for a few days. Strain and use the infused oil on salads, bread, or roasted potatoes. The result is a deeply flavorful condiment that elevates any simple dish.
Basil Salt
Combine dried basil flakes with coarse sea salt in a three-to-one ratio. Grind them together in a mortar and pestle. This aromatic seasoning is perfect for sprinkling on popcorn, french fries, or grilled chicken.
Herb Butter
Mix crushed dried basil into softened butter with a pinch of garlic and salt. Roll the mixture into a log using plastic wrap and refrigerate. Herb butter makes everything from steak to toast taste restaurant quality.
Pasta And Soup Booster
Add a teaspoon of dried basil to soups, stews, and pasta sauces during cooking. Because the flavor is more concentrated than fresh basil, you need much less. Start with small amounts and taste as you go.
DIY Pizza Seasoning
Blend dried basil with dried marjoram, black pepper, onion powder, and a touch of red pepper flakes. Sprinkle this mix on homemade pizza for an instant flavor boost that tastes like it came from a wood-fired oven.
Common Mistakes To Avoid When Drying Basil
Even though drying basil in oven is straightforward, a few common mistakes can ruin your results. Knowing what to avoid saves you time, ingredients, and frustration.
Using Too High A Temperature
This is the number one mistake. High heat cooks the basil instead of drying it. The leaves turn brown, develop a burnt taste, and lose their aromatic oils. Always use the lowest heat setting your oven allows.
Overcrowding The Baking Sheet
Stacking or overlapping leaves traps moisture. The basil steams instead of drying, which leads to mold and poor flavor. Give each leaf space. If you need to, use two baking sheets and rotate them.
Skipping The Cooling Step
Crushing warm leaves releases flavor too early and wastes the aromatic oils. Always let your dried basil cool completely before storing or crushing. This one simple step makes a noticeable difference in quality.
Not Checking Frequently Enough
Every oven runs differently. Some hot spots can cause certain areas of the pan to burn. Check your basil every 30 minutes and rotate the pan if needed. Staying attentive prevents ruined batches.
Drying Basil With Wet Leaves
Any surface moisture on the leaves extends drying time and can lead to uneven results. Always make sure your basil is thoroughly dry before it goes on the baking sheet. Pat the leaves completely with a towel after washing.
Storing Dried Basil In The Wrong Container
Plastic bags and non-airtight containers let moisture and air in. This causes dried herbs to lose flavor quickly and may even introduce mold. Always use airtight glass jars for long-term storage.
Frequently Asked Questions About Drying Basil
Can I dry basil in the oven without parchment paper?
Yes, you can, but parchment paper makes the process much easier. It prevents the leaves from sticking to the baking sheet and simplifies cleanup. If you do not have parchment paper, a silicone baking mat works as a great alternative. Avoid using aluminum foil directly, as it can cause the leaves to stick and burn in spots.
How long does oven-dried basil last compared to air-dried basil?
When stored properly in airtight containers, oven-dried basil lasts just as long as air-dried basil. Both methods yield a shelf life of six to twelve months. The real difference is in speed and consistency. Oven drying takes a few hours while air drying takes one to two weeks. Oven drying also works better in humid climates where air drying can lead to mold.
Is it better to dry basil with or without the stems?
Always remove the leaves from the stems before drying. The stems take much longer to dry and do not crumble easily once dried. They can also create uneven drying on the baking sheet. Strip the leaves first, then arrange them in a single layer for the best and most consistent results.
Can I use a convection setting on my oven to dry basil?
Yes, convection ovens work wonderfully for drying herbs. The fan circulates hot air around the food, which speeds up the drying process and promotes even results. If using convection, reduce the temperature by about 20°F from the standard setting and check the basil more frequently since it may dry faster.
What is the difference between dried basil and dehydrated basil?
There is no real difference in the final product. Both methods remove moisture from the leaves to preserve them. The terms are often used interchangeably. Some people use “dehydrated” when referring to using a food dehydrator and “dried” for oven or air drying methods. The flavor and storage requirements are essentially the same regardless of the method used.
Can I dry other herbs using the same oven method?
Absolutely. The same low-temperature oven technique works beautifully for many culinary herbs including oregano, thyme, rosemary, sage, and mint. Each herb has slightly different drying times based on leaf thickness and moisture content. Thicker-leafed herbs like rosemary may take a bit longer, while thinner-leafed herbs like thyme dry faster. The general rule of 170°F to 200°F applies across the board for all culinary herbs.
Final Thoughts On Drying Basil In The Oven
Learning how to dry basil in oven is one of the simplest kitchen skills you can develop. It takes just a few hours, costs nothing extra, and delivers outstanding results. You get to preserve the incredible flavor of fresh basil and enjoy it long after the growing season ends.
The process is forgiving and beginner-friendly. Even if your first batch is not perfect, you will still end up with usable dried herbs that taste far better than anything from a store-bought jar. With a little practice, you will get the timing and temperature dialed in perfectly for your specific oven.
Start with a small batch from your next basil harvest. Follow the steps in this guide carefully. Pay attention to the temperature, give the leaves enough space, and be patient during the cooling phase. You will be amazed at how much flavor a simple batch of oven-dried basil can bring to your everyday cooking.
Once you experience the difference between store-bought dried herbs and homemade oven-dried basil, you will never go back. The flavor is deeper, the aroma is richer, and the satisfaction of using herbs you preserved yourself is unbeatable. So go ahead, grab that fresh basil, preheat your oven, and start drying. Your future self and your taste buds will thank you.
Now that you know exactly how to dry basil in oven and lock in all the flavor, you have everything you need to make the most of every harvest. Try it this week and taste the difference for yourself.