What Temp To Cook Pumpkin Seeds In Oven For Crispy Results
Learn the exact temp to cook pumpkin seeds in oven for perfectly crispy results every single time. This guide covers everything from the ideal pumpkin seed roasting temperature to timing, seasoning, and common mistakes. You will find a simple pumpkin seed recipe that delivers oven-baked pumpkin seeds with maximum crunch and flavor.
There is something deeply satisfying about pulling a tray of crispy pumpkin seeds out of the oven. The smell fills your kitchen. The sound of each seed crunching is pure comfort. And the best part? Making them is incredibly easy.
If you have ever wondered what temp to cook pumpkin seeds in oven, you are in the right place. This guide walks you through every step of the process. From cleaning the seeds to choosing the right pumpkin seed seasoning, we cover it all. By the end, you will know exactly how to make oven-baked pumpkin seeds that are golden, crunchy, and absolutely delicious.
Whether you are working with homegrown pumpkin seeds from a Halloween carving or a bag from the store, the principles stay the same. A little patience and the right pumpkin seed temperature make all the difference. Let us dive in and get those seeds perfectly roasted.
Key Takeaways
- Optimal Temperature: Roast pumpkin seeds at 300°F to 325°F for the best crispy pumpkin seeds without burning.
- Cooking Time Matters: Most oven-baked pumpkin seeds need 25 to 45 minutes depending on your oven and seed size.
- Dry Seeds First: Always make sure your clean pumpkin seeds are completely dry before they go into the oven.
- Seasoning Is Easy: A little oil, salt, and your favorite spices turn plain seeds into a pumpkin seed snack everyone loves.
- Avoid Common Mistakes: Overcrowding the pan and skipping the drying step are the top reasons seeds turn out soggy.
- Storage Keeps Them Crispy: Store your roasted pumpkin seeds in an airtight container for up to two weeks.
- Experiment with Flavors: Try sweet, savory, and spicy pumpkin seed seasoning ideas to find your favorite combo.
📑 Table of Contents
- The Ideal Temperature To Cook Pumpkin Seeds In Oven
- How Long To Roast Pumpkin Seeds For Perfect Crunch
- Step-by-Step Guide To Oven-Baked Pumpkin Seeds
- Seasoning Ideas For Delicious Pumpkin Seeds
- Common Mistakes To Avoid When Roasting Pumpkin Seeds
- Expert Tips For The Crispiest Pumpkin Seeds Every Time
- Frequently Asked Questions
- Conclusion
The Ideal Temperature To Cook Pumpkin Seeds In Oven
Why Temperature Matters So Much
The pumpkin seed roasting temperature is the single most important factor. Too hot and the seeds burn on the outside while staying raw inside. Too cool and they take forever and never get crispy. Finding the sweet spot is everything.
Most experts agree that a moderate oven works best for bake pumpkin seeds evenly. High heat can scorch the outer shell quickly, leaving the inside chewy and unappetizing. Low heat dries them out too slowly and can make them tough.
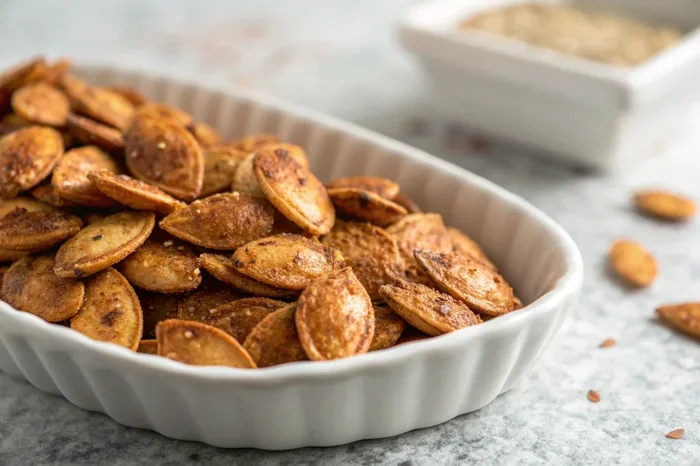
The goal is gentle, steady heat. This allows the moisture to escape slowly. It also helps the natural oils in the seeds toast evenly. The result is crunchy pumpkin seeds with a beautiful golden color throughout.
Recommended Temperature Range
The sweet spot for what temp to cook pumpkin seeds in oven is between 300°F and 325°F. Here is a quick look at what each temperature does:
- 300°F: This is the safest and most forgiving temperature. It produces very even results and is hard to mess up. Perfect for beginners.
- 325°F: A slightly higher option that saves a few minutes of cooking time. Still very safe and produces excellent crispy pumpkin seeds.
- 350°F: Works in a pinch but requires close monitoring. Seeds can go from golden to burnt quickly at this heat.
For most home cooks, 325°F is the ideal pumpkin seed temperature. It strikes the perfect balance between speed and control. Your seeds will come out evenly toasted with a satisfying crunch every time.
How Long To Roast Pumpkin Seeds For Perfect Crunch
Timing At Different Temperatures
Cooking time and temperature go hand in hand. If you roast at a lower temperature, the seeds need more time. If you go higher, they cook faster. Understanding this relationship helps you plan your pumpkin seed recipe more effectively.
At 300°F, expect your oven-baked pumpkin seeds to take about 35 to 45 minutes. At 325°F, the pumpkin seed cooking time drops to around 25 to 35 minutes. These ranges can vary based on seed size, moisture content, and your specific oven.
Here is a simple breakdown of how long to roast pumpkin seeds at common temperatures:
- 300°F: 35 to 45 minutes. Best for very even results and large batches.
- 325°F: 25 to 35 minutes. The most popular choice for home roasting.
- 350°F: 15 to 25 minutes. Requires constant stirring to prevent burning.
How To Tell When They Are Done
Timing gives you a general guide, but your senses are the best tools. Here is how to know your roasted pumpkin seeds are ready:
- Color: Look for a deep golden brown. If they are still pale, they need more time.
- Sound: Open the oven and listen. If you hear gentle popping, they are almost done.
- Texture: Shake the pan gently. When the seeds move freely and sound dry, they are ready.
- Smell: A warm, nutty aroma means they are done. If they smell burnt, pull them out immediately.
Remember that seeds continue to crisp as they cool. So pull them out when they look just slightly underdone. They will reach perfection as they dry pumpkin seeds on the counter.
Step-by-Step Guide To Oven-Baked Pumpkin Seeds
Cleaning And Drying The Seeds
Before anything goes into the oven, your seeds need proper prep. This step is non-negotiable if you want crispy pumpkin seeds. Wet seeds will steam instead of roast, and that leads to soggy results.
Start by scooping the seeds out of your pumpkin. Place them in a large bowl of cold water. Use your hands to separate the seeds from the stringy pulp. The good seeds will sink, and the pulp will float.
Once separated, rinse the seeds thoroughly under running water. Pick out any remaining bits of pumpkin flesh. Then spread the seeds on a clean kitchen towel or paper towels.
The drying step is crucial. Let the seeds air dry for at least one hour. For best results, pat them completely dry and then leave them out for another hour. You want zero moisture on the surface. This is the secret behind perfectly oven-baked pumpkin seeds.
Tossing With Oil And Salt
Now it is time to prepare the seeds for the oven. Place your dry pumpkin seeds in a medium bowl. Add about one tablespoon of neutral oil per cup of seeds. Olive oil, vegetable oil, or melted coconut oil all work well.
Toss the seeds gently until every piece is lightly coated. The oil serves two purposes. It helps the pumpkin seed seasoning stick to the surface. It also promotes even browning and crunch.
Add salt at this stage. Fine sea salt or kosher salt works best. Start with about half a teaspoon per cup of seeds. You can always add more later. Toss again to distribute the salt evenly.
Spreading On The Baking Sheet
This step is where many people go wrong. Do not pile the seeds on top of each other. Spread them in a single layer on a parchment-lined baking sheet. Use a spatula or your hands to separate any clumps.
The key to crispy pumpkin seeds is maximum surface exposure to the heat. If seeds overlap, the bottom ones will steam and turn chewy. Use two baking sheets if you have a large batch. Your sheet pan pumpkin seeds will thank you for the space.
Place the baking sheet on the center rack of your oven. This ensures even heat distribution. Avoid opening the oven door too often, as it releases heat and can extend the cooking time.
Seasoning Ideas For Delicious Pumpkin Seeds
Sweet And Savory Options
One of the best things about making roasted pumpkin seeds at home is the flavor flexibility. You are not stuck with plain salt. There is a whole world of pumpkin seed seasoning to explore.
For a classic savory option, try this simple combo:
- One teaspoon garlic powder
- Half a teaspoon onion powder
- Half a teaspoon smoked paprika
- A pinch of cayenne pepper
- Salt to taste
For something sweet, mix these spices into your oil before tossing:
- One tablespoon brown sugar
- Half a teaspoon cinnamon
- A pinch of nutmeg
- A tiny pinch of sea salt
The sweet and salty combination is a crowd favorite. Kids and adults both love these pumpkin seed snacks. They work great as a party treat or a simple afternoon nibble.
Creative Flavor Combinations
Feeling adventurous? Try these creative seasoned pumpkin seeds ideas:
- Ranch Style: Add dried dill, onion powder, garlic powder, and a touch of dried parsley.
- Taco Seasoning: Use store-bought taco seasoning for a spicy kick.
- Everything Bagel: Sesame seeds, poppy seeds, garlic, onion, and salt. Sounds fancy but is super easy.
- Maple Cinnamon: Maple syrup, cinnamon, and a pinch of salt. Great for fall gatherings.
- Spicy Korean: Gochugaru, soy sauce, sesame oil, and a touch of sugar.
When experimenting with flavors, always add the seasoning after the seeds are oiled but before they go on the pan. This ensures every seed gets an even coating of pumpkin seed seasoning.
Common Mistakes To Avoid When Roasting Pumpkin Seeds
Skipping The Drying Step
This is the number one mistake people make. If your seeds are not completely dry before roasting, they will steam in the oven. The result is chewy, soft seeds instead of the crunchy pumpkin seeds you are after.
Even if the seeds look dry on the outside, moisture can hide in the folds. Take the extra time to pat them thoroughly. You can even let them sit uncovered on a towel for a few hours. This guarantees every seed is ready for the oven.
Overcrowding The Pan
It is tempting to fit as many seeds as possible on one sheet. Resist that urge. Overcrowding traps steam and prevents proper pumpkin seed roasting. The seeds at the bottom will get soggy while the top ones may burn.
Give each seed room to breathe. A single layer with space between each seed is the goal. If you need to roast a large batch, use multiple pans and rotate them in the oven.
Forgetting To Stir
Even with perfect spacing, seeds can stick and burn in spots. Stirring halfway through the pumpkin seed cooking time prevents this. Use a spatula to gently toss the seeds around the pan.
Set a timer for the halfway point. This small habit makes a big difference in the final texture. Your oven-baked pumpkin seeds will brown evenly on all sides.
Using Too Much Oil
A little oil goes a long way. Too much oil creates a greasy coating that never fully crisps up. The seeds can also stick together in a sticky mess.
Start with a small amount and add more only if needed. One tablespoon per cup of seeds is usually plenty. You want a light sheen, not a pool of oil on the pan.
Expert Tips For The Crispiest Pumpkin Seeds Every Time
The Low And Slow Method
Professional cooks often swear by the low and slow roasting method for pumpkin seed roasting. This means keeping the oven at the lower end of the temperature range and giving the seeds extra time.
At 300°F, the heat penetrates gently and evenly. The moisture escapes slowly, leaving behind a light, airy crunch. The natural flavor of the seeds shines through without any burnt or bitter notes.
This method is especially great for large batches. You can walk away from the oven without worrying about burning. Just check on them at the 30-minute mark and stir if needed.
Storing Your Roasted Seeds Properly
Once your crispy pumpkin seeds are done and cooled, proper storage keeps them at their best. Store them in an airtight container at room temperature. A glass jar with a tight lid works perfectly.
Well-stored roasted pumpkin seeds stay crunchy for up to two weeks. If you live in a humid climate, you can extend their shelf life by storing them in the refrigerator.
Avoid storing warm seeds in a sealed container. The trapped moisture will make them soft. Always let them cool completely on the counter before sealing them up. This simple step preserves that satisfying crunch.
Adding Extra Crunch
Want an extra level of crunch? Try this pro trick. After the seeds come out of the oven, spread them on a wire rack instead of leaving them on the hot pan. The air circulation underneath prevents steam from softening the bottom seeds.
You can also increase the crunch by salting the seeds while they are still warm. The salt sticks better and absorbs into the shell slightly. This creates a more flavorful bite in every pumpkin seed snack.
Using A Variety Of Pumpkins
Not all pumpkin seeds are created equal. Sugar pie pumpkins produce small, tender seeds that roast quickly. Large carving pumpkins yield bigger seeds with a thicker shell. Both work well, but the cooking times differ slightly.
If you are using homegrown pumpkin seeds, save seeds from multiple pumpkins and mix them together. The variety in size creates an interesting texture in every bite. Plus, it is a great way to use seeds from your entire harvest.
Frequently Asked Questions
Can I roast pumpkin seeds at a higher temperature to save time?
Yes, you can roast at 350°F, but you must watch them closely. Higher temperatures increase the risk of burning. Stir more frequently and check the seeds every five minutes. The pumpkin seed temperature of 300°F to 325°F is recommended for the safest and most consistent results.
Do I need to boil pumpkin seeds before roasting them?
Boiling is an optional step that some people swear by. It softens the shell and helps the seeds cook more evenly. However, it is not necessary for crispy pumpkin seeds. The key is simply drying the seeds thoroughly before they go into the oven.
Can I use pumpkin seeds straight from the pumpkin without drying them?
No. Always dry your seeds before roasting. Wet seeds will steam in the oven and turn out chewy instead of crispy. Take the time to rinse, pat dry, and let them air dry for at least one hour. This step makes all the difference in your oven-baked pumpkin seeds.
How long do homemade roasted pumpkin seeds last?
Stored in an airtight container at room temperature, roasted pumpkin seeds stay fresh for up to two weeks. In humid climates, the refrigerator is a better option. Never store them while still warm, as trapped moisture will soften them quickly.
Can I make pumpkin seeds without oil?
Yes, you can roast seeds dry, but the results are different. Without oil, the seeds will not brown as evenly and may not get as crispy. A light coating of oil helps the pumpkin seed seasoning stick and promotes even pumpkin seed roasting. If you prefer oil-free, use a non-stick baking sheet and expect a slightly different texture.
What is the best way to season pumpkin seeds for kids?
Kids love simple flavors. A light coating of salt and a tiny bit of melted butter is a hit with most children. You can also try a sprinkle of cinnamon and a touch of brown sugar for a sweet treat. Keep the seasoning mild and fun to encourage kids to enjoy their pumpkin seed snack.
Conclusion
Now you know everything there is to know about what temp to cook pumpkin seeds in oven. The ideal range is 300°F to 325°F, with most people finding 325°F to be the perfect balance of speed and control. A cooking time of 25 to 45 minutes, depending on your oven, delivers crispy pumpkin seeds every single time.
The process is simple but the results are impressive. Clean and dry your clean pumpkin seeds thoroughly. Toss them with a light coating of oil and salt. Spread them in a single layer on a baking sheet. Roast at the right pumpkin seed temperature and stir halfway through. Finish with your favorite pumpkin seed seasoning and enjoy.
Once you master this basic pumpkin seed recipe, you will never buy store-bought versions again. Homemade oven-baked pumpkin seeds are healthier, tastier, and more satisfying. They make a great snack, a fun activity with kids, and a wonderful addition to fall gatherings.
So the next time you carve a pumpkin or buy one for cooking, save those seeds. Follow this guide and make the best roasted pumpkin seeds of your life. Your taste buds will thank you.