How To Make Crispy Chivda In Your Air Fryer At Home
Making crispy chivda in an air fryer is one of the simplest ways to enjoy this beloved Indian snack at home. This guide walks you through every step, from picking the right ingredients to achieving that perfect golden crunch. You will learn how to use your air fryer chivda recipe to create a healthy, flavorful snack without any deep frying. Whether you are prepping for monsoon season or want a quick munchie, this method works every time.
Chivda is one of the most popular Indian snack mixes out there. It is crunchy, flavorful, and incredibly easy to make. If you have been wondering how to make chivda in air fryer, you are in the right place. This article covers everything you need to know about making crispy chivda at home using an air fryer. From the ingredients list to step-by-step instructions, you will find all the details here.
Air frying has changed the way we prepare snacks at home. It uses hot air circulation to cook food evenly with minimal oil. This makes it perfect for preparing crispy chivda without the guilt of deep frying. Whether you are a beginner or an experienced cook, this method is simple and forgiving. Let us dive into the complete guide.
Key Takeaways
- Air fryer chivda uses little to no oil, making it a healthier alternative to traditional deep-fried versions.
- Homemade chivda lets you control the spice levels and ingredients based on your preference.
- Prep time is under 15 minutes, and cooking takes about 10-15 minutes in most air fryers.
- Storing tips keep your chivda crispy for up to two weeks in an airtight container.
- Multiple flavor variations let you customize sweet, spicy, or tangy chivda mixes easily.
📑 Table of Contents
- What Is Chivda And Why Make It In An Air Fryer?
- Ingredients You Need For Crispy Chivda
- Step-By-Step Instructions To Make Chivda In Air Fryer
- Tips For Perfectly Crispy Air Fryer Chivda
- Variations And Flavor Ideas For Chivda
- How To Store Your Homemade Chivda
- Health Benefits Of Air Fryer Chivda
- Common Mistakes To Avoid When Making Chivda In Air Fryer
- Frequently Asked Questions
- Conclusion
What Is Chivda And Why Make It In An Air Fryer?
Chivda is a traditional Indian snack mix made from flattened rice, nuts, spices, and sometimes dried fruits. It is a staple during monsoon season and festival celebrations in India. The beauty of chivda is that you can customize it to suit your taste. Some people like it spicy, while others prefer a milder, sweeter version.
Using an air fryer to make chivda offers several advantages. First, it cuts down on oil significantly. Traditional chivda recipes involve deep frying each component separately, which adds a lot of calories. An air fryer achieves the same crispy texture using just a thin coating of oil or sometimes none at all. Second, it saves time because you can roast everything in one batch. Third, cleanup is much easier compared to dealing with a hot oil stove.
If you already own an air fryer, you are halfway there. Models like the Farberware Air Fryer Toaster Oven or the Breville Smart Oven Air Fryer work great for chivda preparation. Any standard air fryer with a baking tray will do the job nicely.
Why People Love Homemade Chivda
- Healthier than store-bought: You control the amount of salt, oil, and spices.
- Cost-effective: Making a large batch costs much less than buying packaged versions.
- Customizable: Add or remove ingredients based on what you like or what you have on hand.
- Great for gifting: Packed in nice jars, homemade chivda makes a thoughtful gift.
- No preservatives: Everything is fresh and natural when you make it yourself.
Ingredients You Need For Crispy Chivda
The ingredients for air fryer chivda are simple and easy to find. You probably already have most of them in your kitchen pantry. Here is a complete list of what you will need to make a delicious batch of crispy chivda.
Base Ingredients
- Flattened rice (poha): This is the star of any chivda recipe. Use medium or thick poha for the best crunch.
- Roasted peanuts: Adds protein and a nutty flavor. You can use raw peanuts and roast them yourself.
- Curry leaves: These give chivda its signature aromatic flavor. Fresh is best but dried works too.
- Chopped onions: Adds a savory depth. Use red or white onions, finely diced.
- Green chilies: Adjust the quantity based on your spice tolerance.
Spices And Seasonings
- Turmeric powder: Adds color and a mild earthy flavor.
- Red chili powder: Gives heat. Use Kashmiri chili for color or cayenne for more spice.
- Chaat masala: This tangy spice blend is a game changer for chivda.
- Cumin seeds: Adds a warm, nutty aroma.
- Salt: Adjust to taste. Keep in mind peanuts and curry leaves add some saltiness too.
Optional Add-Ins
- Cashews or almonds: For extra crunch and richness.
- Raisins or dried cranberries: Adds a touch of sweetness.
- Sev: Thin crispy noodles that add texture.
- Coconut flakes: For a tropical twist.
Step-By-Step Instructions To Make Chivda In Air Fryer
Now that you have your ingredients ready, let us get into the actual cooking process. Making chivda in an air fryer is straightforward and does not require any special skills. Follow these steps for perfect results every time.
Step 1: Prepare Your Ingredients
Start by rinsing the poha gently in water. Do not soak it for too long, or it will become mushy. Drain it well and spread it on a kitchen towel to remove excess moisture. Roughly chop the peanuts, dice the onions, and slit the green chilies. Having everything prepped before you start cooking makes the process smooth and fast.
Step 2: Lightly Coat With Oil
Place the poha in a large mixing bowl. Drizzle about one to two teaspoons of oil over it and toss gently. You want each piece lightly coated, not drenched. This small amount of oil helps the poha crisp up beautifully in the air fryer. If you prefer an oil-free version, you can skip this step, but the crunch may be slightly less pronounced.
Step 3: Season The Mix
Add turmeric powder, red chili powder, chaat masala, cumin seeds, and salt to the poha. Toss everything together until the spices are evenly distributed. This is where you can get creative with flavors. Add more chili powder for extra heat or more chaat masala for a tangy kick.
Step 4: Load The Air Fryer
Transfer the seasoned poha mixture into the air fryer basket or tray. Spread it out in a single layer. Avoid overcrowding the basket because air needs to circulate freely around each piece. If you have a lot of mix, cook it in two batches for the best results.
Step 5: Air Fry At The Right Temperature
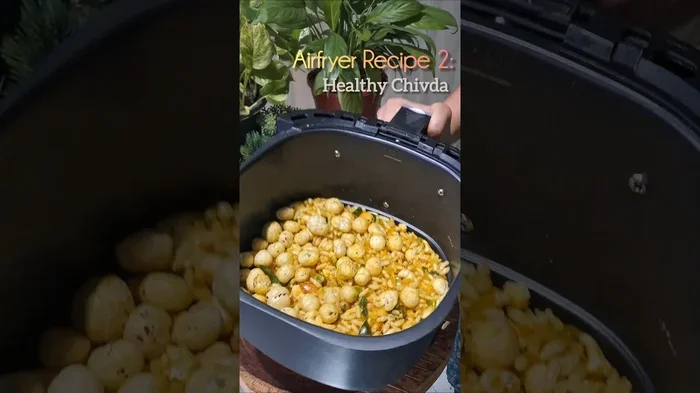
Set your air fryer to 160°C (320°F). Cook for 8 to 10 minutes, shaking the basket or stirring the mix halfway through. The poha should turn golden and crispy. Keep a close eye on it during the last two minutes to prevent burning. Every air fryer model runs a bit differently, so adjust the time as needed.
Step 6: Add The Finishing Touches
Once the poha is crispy, remove it from the air fryer and let it cool completely. While it is still warm, add the roasted peanuts, curry leaves, and any optional add-ins you like. Toss everything together. The residual heat will help the flavors meld together beautifully.
Step 7: Store And Serve
Let the chivda cool fully before storing it in an airtight container. It is best served at room temperature. Pair it with a hot cup of chai for the perfect snacking experience.
Tips For Perfectly Crispy Air Fryer Chivda
Getting the perfect crunch in your chivda comes down to a few key techniques. These tips will help you nail the texture and flavor every single time you make this snack.
Use dry poha: Moisture is the enemy of crispiness. Make sure your poha is well-drained and dry before it goes into the air fryer. If needed, pat it gently with a kitchen towel.
Do not skip the shaking: Shaking the basket or stirring the mix halfway through ensures even cooking. Every piece gets exposed to the hot air equally, which prevents some bits from burning while others stay soft.
Toast your peanuts separately: If you are using raw peanuts, roast them in the air fryer for 3-4 minutes at 160°C before adding them to the poha mix. This brings out their natural oils and enhances the flavor.
Cool completely before storing: This is a common mistake people make. If you store warm chivda, condensation builds up inside the container and makes everything soggy. Always let it cool to room temperature first.
Adjust spice levels gradually: Start with less spice and taste as you go. You can always add more, but you cannot take it away once it is mixed in.
Use parchment paper: Lining the air fryer basket with parchment paper makes cleanup a breeze and prevents small pieces from falling through the holes.
For more inspiration on oven-based snack recipes, you might enjoy learning how to make nachos at home in the oven using similar techniques for achieving maximum crispiness.
Variations And Flavor Ideas For Chivda
One of the best things about making chivda at home is that you can experiment with flavors endlessly. Here are some popular variations to try once you have mastered the basic recipe.
Spicy Chivda
For those who love heat, increase the red chili powder and add chopped green chilies generously. You can also toss in some dried red chili flakes and a pinch of garam masala. This version pairs perfectly with a cold drink on a hot day.
Sweet Chivda
Yes, chivda can be sweet too! Reduce the spices and add sugar or jaggery powder along with raisins, cashews, and shredded coconut. This variation is especially popular during Diwali and other festive occasions.
Coconut Chivda
Add plenty of fresh or dried coconut flakes to the mix. The coconut adds a beautiful texture and a subtle sweetness that balances the spices wonderfully. This version is especially refreshing during summer months.
Trail Mix Chivda
Combine poha with dried fruits like raisins, cranberries, and apricots along with nuts and seeds. This version works great as a healthy breakfast option or a hiking trail snack. It is nutritious, filling, and delicious.
For a similar crispy oven technique, you can also explore how to make smashed potatoes in the oven for another delicious crunchy snack option.
How To Store Your Homemade Chivda
Proper storage is key to keeping your chivda crispy and flavorful for an extended period. Follow these simple guidelines to make your homemade chivda last as long as possible.
- Airtight container: This is the most important storage rule. Any air exposure will make the chivda lose its crunch over time.
- Room temperature storage: Homemade chivda stays fresh for up to two weeks when stored at room temperature in a sealed container.
- Avoid moisture: Never store chivda in a damp environment. Keep it away from steam and humidity.
- Freezer storage: For longer shelf life, you can freeze chivda in a zip-lock bag for up to one month. Let it come to room temperature before serving.
- Do not refrigerate: Refrigeration introduces moisture that will make your chivda soft and lose its crunch.
If you are preparing chivda for a party or gathering, make it a day in advance. This gives the flavors time to develop and meld together beautifully. The chivda will taste even better the next day.
Health Benefits Of Air Fryer Chivda
Making chivda in an air fryer is not just about convenience. It also offers real health benefits compared to traditional methods. Here is why air fryer chivda is a smart choice for your snacking habits.
- Lower in calories: Air frying uses up to 70-80% less oil than deep frying. This significantly reduces the calorie content of your snack.
- Better for heart health: Less oil means less saturated fat, which is better for cardiovascular health.
- Rich in nutrients: Poha is a good source of iron and carbohydrates. Peanuts add protein and healthy fats.
- No trans fats: Store-bought chivda often contains trans fats from repeated frying. Homemade air fryer chivda eliminates this concern entirely.
- Supports weight management: When eaten in moderation, air fryer chivda is a satisfying snack that does not derail your health goals.
The beauty of this homemade chivda recipe is that you get all the flavor without the guilt. It is proof that healthy snacking does not have to be boring or bland.
Common Mistakes To Avoid When Making Chivda In Air Fryer
Even with a simple recipe like this, there are a few pitfalls to watch out for. Avoiding these common mistakes will save you from a less-than-perfect batch of chivda.
- Overcrowding the air fryer basket: This is the number one mistake. When you pack too much in, the hot air cannot circulate properly, and you end up with soggy chivda instead of crispy chivda.
- Using wet poha: Excess moisture prevents crisping. Always drain and dry your poha thoroughly before cooking.
- Adding ingredients too early: Curry leaves, peanuts, and sev should be added after cooking, not before. They can burn or become too soft if cooked for too long.
- Setting the temperature too high: High heat can burn the outer layer while leaving the inside soft. Stick to 160°C for even results.
- Skipping the resting time: Chivda needs time to cool and crisp up after cooking. Do not dig in while it is still hot.
By keeping these tips in mind, you will consistently make perfect batches of chivda every single time.
Frequently Asked Questions
Can I make chivda without an air fryer?
Yes, you can make chivda on a stovetop pan or in a conventional oven. The air fryer simply makes the process faster and more consistent with less oil. If you do not have an air fryer, a regular oven set to 160°C works well too. Just spread the mix on a baking sheet and bake for 10-15 minutes, stirring halfway through.
How long does air fryer chivda stay crispy?
When stored properly in an airtight container at room temperature, air fryer chivda stays crispy for up to two weeks. The key is keeping moisture out. Always make sure the chivda is completely cool before sealing it in the container.
Can I use instant poha for chivda?
Yes, instant poha works fine for making chivda. However, thick or medium poha gives a better crunch. If using instant poha, rinse it briefly and drain it very well to remove excess moisture before cooking.
Is air fryer chivda good for kids?
Absolutely. Air fryer chivda is a healthy, homemade snack that is much better than packaged alternatives. You can adjust the spice level to suit children’s preferences and add ingredients like raisins or mild peanuts that kids love.
Can I make a large batch of chivda in the air fryer?
Yes, but cook in smaller batches for the best results. Overcrowding the basket leads to uneven cooking. If you need to make a very large quantity, simply run multiple batches and combine everything in a large bowl once done.
What is the best time to serve chivda?
Chivda is versatile and can be served anytime. It is especially popular during monsoon season with evening tea, at festive gatherings, or as a quick snack during work breaks. It also travels well, making it perfect for picnics and road trips.
Conclusion
Making crispy chivda in your air fryer is easier than you might think. With just a handful of ingredients and about 20 minutes of your time, you can create a delicious, healthy snack that beats anything from the store. This air fryer chivda recipe gives you full control over the ingredients, spice levels, and texture.
The process is simple, the results are fantastic, and the health benefits are real. Whether you are a chivda lover looking for a better way to make it or someone new to this wonderful Indian snack, the air fryer method is perfect for you. Start with the basic recipe and then experiment with different flavors to find your favorite version.
Once you try making chivda in your air fryer, you will never go back to store-bought versions. It is one of those recipes that quickly becomes a staple in your kitchen. So go ahead, gather your ingredients, and enjoy the process of creating something delicious and wholesome right at home.