How To Make Beer Chicken In The Oven With Crispy Skin
Beer chicken in the oven is one of the easiest and most delicious ways to cook chicken at home. This recipe gives you crispy skin and juicy meat with minimal effort. You only need a few simple ingredients and a hot oven. The beer adds a unique depth of flavor that makes the chicken stand out. Follow these steps and you will have a show-stopping meal on your table in under an hour.
There is something magical about beer chicken in the oven. It smells incredible while it cooks, and the results are always juicy and full of flavor. Whether you are cooking for a family dinner or a weekend gathering, this dish never fails to impress.
The best part? You do not need any fancy equipment. A basic oven, a baking sheet, and a few simple ingredients are all you need. The beer does the heavy lifting, adding a rich, malty depth that makes the chicken taste like it has been cooking for hours. And the crispy skin? That is the cherry on top.
If you have been looking for a crispy chicken recipe that is also easy to make, you are in the right place. This guide walks you through every step with clear instructions and helpful tips. By the end, you will wonder why you ever cooked chicken any other way.
Key Takeaways
- Beer chicken in the oven is simple, fast, and incredibly flavorful.
- Crispy skin comes from a hot oven and proper drying of the chicken.
- You only need a few pantry staples to make this dish shine.
- The beer adds a subtle malt flavor that enhances the meat beautifully.
- This recipe works with bone-in thighs, drumsticks, and whole chicken pieces.
- You can customize the seasoning to match your taste preferences easily.
- Leftover beer chicken makes great sandwiches and salads the next day.
📑 Table of Contents
- Why Beer Chicken in the Oven Is a Game Changer
- What You Will Need
- Step-by-Step Instructions
- Tips for Perfect Crispy Skin
- Common Mistakes to Avoid
- Variations to Try
- How Does This Compare to Other Methods
- Expert Tips for Better Results
- Serving Suggestions
- Storing and Reheating Leftovers
- Frequently Asked Questions
- Final Thoughts
Why Beer Chicken in the Oven Is a Game Changer
Oven-baked beer chicken has become one of the most popular home-cooked meals. And for good reason. It is simple, forgiving, and produces restaurant-quality results. Let us break down why this dish deserves a spot in your regular rotation.
It Is Incredibly Easy
Unlike stovetop cooking, oven-baked chicken gives you freedom. You can prep it, pop it in the oven, and focus on other things. There is no need to stand over a hot stove flipping pieces constantly. The oven does all the work for you.
The beer marinade tenderizes the meat while it cooks. This means less time marinating and more time enjoying. You can even prep the chicken the night before and bake it fresh the next day.
The Flavor Is Unmatched
Beer brings a unique flavor profile to chicken. The hops and malt add a subtle bitterness that balances the richness of the meat. Combined with herbs and spices, the result is a complex flavor that is hard to achieve with simple salt and pepper alone.
When you bake beer chicken in the oven, the juices from the chicken mix with the beer to create a natural pan sauce. This keeps every piece moist and flavorful. No dry, bland chicken here.
Crispy Skin Without Frying
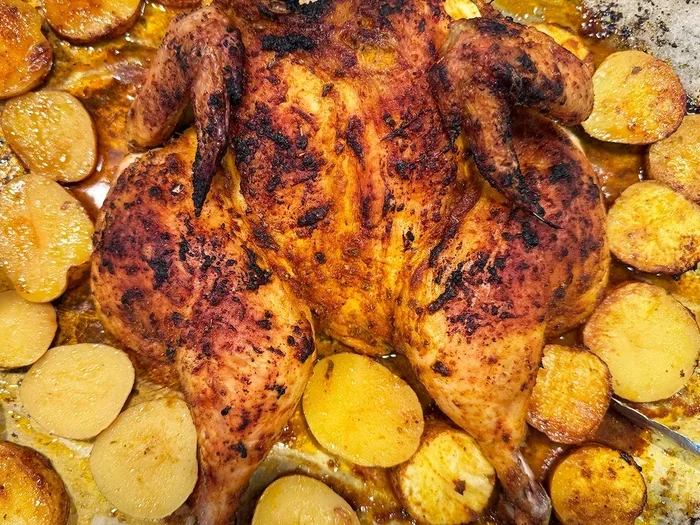
One of the biggest advantages of oven-baked beer chicken is the crispy skin. You get that satisfying crunch without the mess and health concerns of deep frying. A hot oven and a well-dried surface are all you need to achieve golden, crackling skin.
This makes beer chicken in the oven a healthier alternative to fried chicken. You still get the crunch and flavor, but with far less oil. It is a win-win for anyone who loves crispy chicken but wants a lighter option.
What You Will Need
Before you start, gather your ingredients and tools. Having everything ready makes the process smooth and enjoyable. Here is what you need for this recipe.
Ingredients
- Bone-in chicken thighs or drumsticks (about 2 pounds)
- One 12-ounce can of beer (a lager or pale ale works best)
- Two tablespoons of olive oil
- One teaspoon of garlic powder
- One teaspoon of smoked paprika
- Half a teaspoon of onion powder
- One teaspoon of dried thyme
- Half a teaspoon of black pepper
- One teaspoon of salt
- One tablespoon of brown sugar (optional, for extra caramelization)
Tools You Need
- A large mixing bowl
- A baking sheet or roasting pan
- Parchment paper or aluminum foil
- A wire cooling rack (optional but helpful)
- Tongs for flipping the chicken
Choosing the Right Beer
The type of beer you use matters more than you might think. A light lager gives a clean, mild flavor that lets the chicken shine. A pale ale adds a bit more hop character and bitterness. Dark beers like stouts or porters create a richer, deeper flavor profile.
For beginners, a simple lager or pilsner is the safest choice. It complements the chicken without overpowering it. As you get more comfortable, feel free to experiment with different styles.
Step-by-Step Instructions
Now for the fun part. Follow these steps to make perfect beer chicken in the oven with crispy skin every single time.
Step 1: Prep the Chicken
Start by patting the chicken pieces completely dry with paper towels. This is the most important step for getting crispy skin. Moisture is the enemy of crunch, so remove as much surface water as possible.
Remove any excess fat or loose skin flaps. These can burn in the oven and create unpleasant smoke. A clean, trimmed piece of chicken cooks more evenly and looks better on the plate.
Step 2: Make the Beer Marinade
Pour the beer into a large mixing bowl. Add the olive oil, garlic powder, smoked paprika, onion powder, thyme, black pepper, salt, and brown sugar. Whisk everything together until the salt and sugar dissolve.
The beer marinade should smell fragrant and well-seasoned. Taste a tiny drop to check the salt level. It should be slightly saltier than you want the final dish to be, since the chicken will absorb some of the seasoning.
Step 3: Marinate the Chicken
Add the chicken pieces to the marinade. Use your hands or tongs to coat every piece evenly. Cover the bowl with plastic wrap and refrigerate for at least one hour. For the best flavor, marinate for two to four hours.
If you are short on time, even 30 minutes of marinating makes a difference. The beer starts working on the meat right away, tenderizing the fibers and adding flavor from the outside in.
Step 4: Preheat and Set Up
Preheat your oven to 425 degrees Fahrenheit. This high temperature is key to achieving crispy skin. While the oven heats up, line a baking sheet with parchment paper and place a wire rack on top if you have one.
The wire rack allows air to circulate around the chicken. This promotes even cooking and helps the skin crisp up on all sides. If you do not have a rack, you can bake directly on the parchment paper, but the bottom pieces may not get as crispy.
Step 5: Bake the Chicken
Place the marinated chicken pieces on the rack or baking sheet. Leave some space between each piece so the hot air can flow freely. Do not crowd the pan, or the chicken will steam instead of roast.
Bake for 35 to 45 minutes. The chicken is done when the internal temperature reaches 165 degrees Fahrenheit. The skin should be deep golden brown and visibly crispy. Use a meat thermometer to check for accuracy.
Step 6: Rest and Serve
Once the chicken is out of the oven, let it rest for five to ten minutes. This allows the juices to redistribute throughout the meat. Cutting too soon releases those juices onto the cutting board instead of keeping them in the chicken.
Serve your beer chicken in the oven with a side of roasted vegetables, mashed potatoes, or a fresh salad. The crispy skin pairs beautifully with creamy sides like coleslaw or potato salad.
Tips for Perfect Crispy Skin
Getting crispy skin on oven-baked chicken takes a little know-how. These tips will help you achieve that satisfying crunch every time you make beer chicken in the oven.
Dry the Skin Thoroughly
This cannot be stressed enough. Pat the chicken dry with paper towels before marinating. Then, after marinating, pat it dry again before placing it on the baking sheet. The drier the surface, the crispier the result.
Some cooks even refrigerate the marinated chicken uncovered for a few hours. This lets the skin air-dry further, which dramatically improves crispiness. It is a small extra step that makes a huge difference.
Use a Hot Oven
A temperature of 425 degrees Fahrenheit is the sweet spot for crispy skin. Lower temperatures will steam the skin instead of crisping it. If your oven runs cool, consider increasing the temperature by 10 to 15 degrees.
Do not open the oven door too often during baking. Each time you open it, the temperature drops and the cooking process slows down. Trust the process and let the oven do its job.
Season the Skin Directly
After marinating, sprinkle a light coating of salt directly on the skin. This draws out residual moisture and adds flavor right where you want it most. A little baking powder mixed with salt can also help the skin puff up and become extra crispy.
Just a pinch of baking powder makes a noticeable difference. It raises the skin’s pH level, which speeds up the Maillard reaction. This is the chemical process that creates that beautiful golden-brown color and crunch.
Common Mistakes to Avoid
Even easy recipes can go wrong if you make common mistakes. Here are the pitfalls to watch out for when making beer chicken in the oven.
Skipping the Drying Step
The number one reason for soggy chicken skin is moisture. If you skip the drying step, your skin will steam instead of crisp. Always pat the chicken dry thoroughly, both before and after marinating.
Overcrowding the Pan
It can be tempting to fit as much chicken as possible on one sheet pan. But crowding traps steam and prevents proper air circulation. The chicken will cook unevenly and the skin will not crisp up properly.
If you need to cook a large batch, use two sheet pans or bake in shifts. The extra dishwashing is worth perfectly crispy chicken.
Using the Wrong Beer
Not all beers work equally well for this recipe. Avoid very bitter or heavily flavored beers like IPAs or stouts if you are a beginner. These can make the chicken taste overly bitter or heavy. Stick with a simple lager or pilsner for the best results.
Undercooking or Overcooking
Undercooked chicken is a food safety risk, and overcooked chicken is dry and tough. Use a meat thermometer to check the internal temperature. 165 degrees Fahrenheit is the target for safe, juicy chicken.
Oven temperatures can vary, so start checking a few minutes early. It is better to pull the chicken out slightly early and let it rest than to overcook it by a few minutes.
Variations to Try
Once you master the basic recipe, you can get creative with different flavors. Here are some delicious variations of beer chicken in the oven to try.
Honey Beer Chicken
Add two tablespoons of honey to the marinade for a sweet and savory twist. The honey caramelizes in the oven and creates a beautiful glaze on the chicken skin. This variation pairs wonderfully with a spicy mustard dipping sauce.
Spicy Beer Chicken
If you like heat, add half a teaspoon of cayenne pepper and a teaspoon of chili powder to the marinade. You can also toss in a few crushed red pepper flakes. The beer tempers the heat slightly, creating a balanced spicy flavor.
Herb-Forward Beer Chicken
Double the amount of fresh herbs in the recipe. Rosemary, sage, and oregano work beautifully with beer. This variation tastes rustic and earthy, perfect for fall and winter meals.
Beer Chicken Wings
This recipe works just as well with chicken wings. Use the same marinade and baking method, but reduce the cooking time to 25 to 30 minutes. Wings are smaller and cook faster, so keep an eye on them.
How Does This Compare to Other Methods
There are several ways to cook beer chicken. Each method has its strengths and weaknesses. Here is how oven-baked beer chicken compares to other popular methods.
| Method | Ease of Use | Crispiness | Flavor | Health Factor |
|---|---|---|---|---|
| Oven-Baked Beer Chicken | Very Easy | High | Rich and Malty | Healthy (minimal oil) |
| Beer Can Chicken (Grill) | Moderate | Medium | Smoky and Deep | Healthy (no added oil) |
| Beer Battered (Fried) | Moderate | Very High | Crispy and Bold | Higher in fat and calories |
| Stovetop Beer Braised | Easy | Low | Tender and Saucy | Healthy (minimal oil) |
As you can see, oven-baked beer chicken offers the best balance of ease, crispiness, flavor, and health. It is the most convenient method for everyday cooking, and the results rival more complicated techniques.
Expert Tips for Better Results
Professional cooks share a few tricks that take beer chicken in the oven from good to great. Here are some insights worth knowing.
Brine Before Marinating
If you want extra juicy chicken, brine the pieces for 30 minutes before marinating. A simple brine of water, salt, and sugar helps the chicken retain moisture during cooking. This is especially helpful for leaner cuts like chicken breasts.
Let the Chicken Come to Room Temperature
Take the chicken out of the refrigerator 20 to 30 minutes before baking. Room-temperature chicken cooks more evenly than cold chicken straight from the fridge. This simple step prevents overcooked edges and undercooked centers.
Add Aromatics to the Pan
Toss a few onion wedges, garlic cloves, and lemon slices onto the baking sheet. As the chicken roasts, these aromatics infuse the kitchen with a wonderful smell and add subtle flavor to the meat. You can also place lemon halves under the chicken pieces for extra moisture.
Serving Suggestions
Beer chicken in the oven is versatile and pairs well with many sides. Here are some serving ideas that round out the meal perfectly.
- Roasted potatoes – Toss baby potatoes in olive oil and roast alongside the chicken for a complete one-pan meal.
- Steamed rice – The crispy chicken skin and beer marinade pair beautifully with plain white or brown rice.
- Fresh salad – A light green salad with a tangy vinaigrette balances the richness of the chicken.
- Grilled vegetables – Asparagus, zucchini, and bell peppers roasted in the same oven make a great side.
- Coleslaw – Creamy coleslaw is a classic pairing that adds crunch and freshness to the plate.
For a casual dinner, serve the chicken on a platter with a variety of sides and let everyone help themselves. This makes for a relaxed, family-friendly meal that everyone will enjoy.
Storing and Reheating Leftovers
Beer chicken stores well in the refrigerator for up to three days. Place the cooled chicken in an airtight container to keep it fresh. The crispy skin may soften slightly in the fridge, but it will still taste great.
To reheat, place the chicken in a 350-degree Fahrenheit oven for 10 to 15 minutes. This warms the meat through while helping the skin regain some of its crispiness. Avoid microwaving, as it will make the skin soggy and rubbery.
Leftover beer chicken also makes fantastic sandwiches. Pull the meat off the bone, pile it onto a bun, and add your favorite toppings. It is a great way to enjoy this dish a second time around.
Frequently Asked Questions
Can I use any type of beer for this recipe?
Yes, you can use any beer you like, but lighter beers like lagers and pilsners produce the most balanced flavor. Darker beers like stouts and porters create a richer taste that works well with hearty seasonings. Avoid non-alcoholic beer if you want the best flavor, as it lacks the complexity of regular beer.
How long does it take to make beer chicken in the oven?
The total time is about one hour, including marinating and baking. The actual marinating time can range from 30 minutes to overnight. Baking at 425 degrees Fahrenheit takes 35 to 45 minutes depending on the size of the chicken pieces. Larger pieces like whole legs may need a few extra minutes.
Can I use chicken breasts instead of thighs?
Yes, you can use chicken breasts, but they cook faster and can dry out more easily. Boneless, skinless breasts will need only 20 to 25 minutes at 425 degrees. Bone-in, skin-on breasts work better and stay juicier, but may need 30 to 35 minutes of baking time.
Do I need to remove the beer from the chicken before baking?
No, you do not need to remove the beer. The chicken absorbs the beer flavor during marinating, and any excess liquid in the pan creates a natural pan sauce as it cooks. The alcohol cooks off in the oven, leaving behind only the rich, malty flavor.
Is beer chicken in the oven healthy?
Compared to fried chicken, oven-baked beer chicken is a much healthier option. It uses little to no added oil and relies on the oven’s dry heat to crisp the skin. The beer adds flavor without extra calories. Pairing the chicken with vegetables and whole grains makes it a well-balanced meal.
Can I freeze beer chicken for later?
Yes, you can freeze cooked beer chicken for up to three months. Let it cool completely, then store it in an airtight container or freezer bag. Reheat in the oven at 350 degrees Fahrenheit until warmed through. The skin may lose some crispiness, but the meat will remain flavorful and tender.
Final Thoughts
Beer chicken in the oven is one of those recipes that earns a permanent place in your cookbook. It is simple enough for a busy weeknight dinner but impressive enough for a weekend gathering. The crispy skin, juicy meat, and rich beer flavor make every bite satisfying.
Once you master this basic recipe, you will find yourself making it again and again. The variations offer endless possibilities, and the leftovers make great next-day meals. It is the kind of dish that brings people together and makes the kitchen smell amazing.
So grab a can of beer, some chicken, and your favorite spices. Preheat that oven and get ready for a meal that will have everyone asking for seconds. Beer chicken in the oven with crispy skin is easier than you think, and the results are absolutely worth it.