How To Dry Apples In The Oven For Stunning Decoration
Drying apples in the oven for decoration is one of the easiest and most rewarding craft projects you can do at home. Whether you want to create beautiful apple slice ornaments for your holiday table or craft a rustic dried apple garland, this method gives you professional results every time. With just a few simple tools and some fresh fruit, you can produce oven-dried apple slices that last for months. This guide walks you through every step, from picking the right apples to displaying your finished decorative apple slices. You will learn proven fruit drying techniques that save time and deliver stunning visual impact.
There is something truly magical about drying apples in the oven for decoration. It is a simple craft that transforms ordinary fruit into stunning pieces of art. You do not need any fancy equipment or years of experience. All you need is an oven, some fresh apples, and a little patience. The result is beautiful oven-dried apple slices that can elevate your home décor in ways you never imagined.
People have been using dried fruit for decoration for centuries. From rustic farmhouse kitchens to elegant holiday tables, dried apple décor adds warmth and charm to any space. Whether you are preparing for Thanksgiving, Christmas, or simply want to refresh your home styling, dried apple slices offer endless creative possibilities. This guide will show you exactly how to achieve gorgeous results every single time.
The beauty of this project lies in its simplicity. You do not need a dehydrator or special tools. Your kitchen oven works perfectly. The process is straightforward, affordable, and incredibly satisfying. By the end of this article, you will feel confident enough to create your own apple slice craft projects at home. Let us dive in and explore everything you need to know.
Key Takeaways
- Low heat is essential: Drying apples at 200°F or lower preserves color and prevents burning.
- Slice thickness matters: Aim for 1/8 to 1/4 inch slices for the best drying results and decorative appeal.
- Lemon juice prevents browning: A simple soak keeps your dried apple slices looking fresh and vibrant.
- Multiple display options exist: Use dried apples for wreaths, garlands, centerpieces, and wall art.
- Proper storage extends life: Airtight containers and cool, dark places keep dried apple décor looking great for weeks.
- Avoid common mistakes: Overcrowding the oven and skipping the lemon soak are the top errors to avoid.
📑 Table of Contents
- Why Dry Apples in the Oven for Decoration
- Choosing the Best Apples for Drying
- Step-by-Step Process to Dry Apples in the Oven
- Tips for Perfect Oven-Dried Apple Slices
- Creative Decoration Ideas with Dried Apples
- Storing and Preserving Your Dried Apple Decorations
- Common Mistakes to Avoid When Drying Apples
- Expert Insights on Fruit Drying Techniques
- Key Takeaways
Why Dry Apples in the Oven for Decoration
Before we get into the how-to, let us talk about why this method works so well. Oven drying fruit has several advantages that make it the go-to choice for crafters and home décor enthusiasts alike. Understanding these benefits will keep you motivated throughout the process.
Convenience and Accessibility
Most people already have an oven in their kitchen. You do not need to buy a separate appliance like a food dehydrator. This makes oven drying fruit incredibly accessible. You can start a batch of decorative apple slices on a lazy Sunday afternoon with items you already own. The oven provides consistent, controlled heat that dries apples evenly.
Beautiful, Natural Results
When you dehydrate apples in the oven, they develop a lovely translucent quality. The edges curl slightly, creating a natural charm that is hard to replicate with artificial decorations. Dried fruit decor has a warmth and authenticity that plastic or synthetic alternatives simply cannot match. Each slice tells a story of real fruit transformed through gentle heat.
Cost-Effective Crafting
Fresh apples are affordable and widely available year-round. Compared to buying pre-made apple ornaments or dried apple garland kits from craft stores, doing it yourself saves a significant amount of money. A bag of apples can produce dozens of decorative pieces. This makes oven-dried apples one of the most budget-friendly home décor projects you can tackle.
Versatile Creative Potential
The real power of drying apples in the oven for decoration lies in versatility. You can use the dried slices in countless ways. Make a wreath for your front door. String them into a garland for your mantle. Create a centerpiece for your dining table. The possibilities are truly endless. Once you master the basic technique, your imagination becomes the only limit.
Choosing the Best Apples for Drying
Not all apples are created equal when it comes to oven drying fruit. The variety you choose directly affects the final look and durability of your decorative apple slices. Selecting the right apples is the first step toward success.
Best Apple Varieties for Drying
Certain apple varieties dry better than others. Here are the top choices for apple slices decoration:
- Granny Smith: These green apples hold their shape beautifully and resist browning well. They create a striking contrast against warm autumn décor.
- Honeycrisp: Known for their sweet flavor and firm texture, Honeycrisp apples dry into gorgeous translucent slices.
- Fuji: Fuji apples are naturally sweet and dense, making them excellent candidates for preserving apple slices.
- Gala: A good all-around choice that dries evenly and has a mild, pleasant sweetness.
- Golden Delicious: These apples dry quickly and develop a beautiful golden hue that looks stunning in displays.
What to Look for When Buying Apples
When shopping for apples to dehydrate, choose fruits that are firm and free of bruises or blemishes. Organic apples work great, but conventional ones are perfectly fine too. Wash them thoroughly before you begin. Avoid apples that are overly ripe or soft, as they tend to become mushy during the drying process. Firm, crisp apples yield the best baked apple décor results.
How Many Apples Do You Need?
A good rule of thumb is that one medium apple produces about two to three decorative slices. If you are making a full wreath, plan on using 8 to 12 apples. For a simple garland, 4 to 6 apples should be plenty. Always buy a few extra apples in case some break during slicing or drying.
Step-by-Step Process to Dry Apples in the Oven
Now for the part you have been waiting for. Here is the complete process for drying apples in the oven for decoration. Follow these steps carefully, and you will achieve professional-quality results right in your own kitchen.
Step 1: Gather Your Supplies
Before you start, make sure you have everything ready. You will need fresh apples, a sharp knife or apple corer, a cutting board, lemon juice, a baking sheet, parchment paper, and an oven. Having all supplies within reach makes the process smooth and enjoyable.
Step 2: Wash and Prepare the Apples
Rinse each apple thoroughly under cool running water. Pat them dry with a clean towel. Remove any stems or stickers. This simple prep work ensures clean, beautiful dried apple garland pieces later on.
Step 3: Slice the Apples Evenly
This step is crucial for even drying. Use a sharp knife to cut each apple into uniform slices about 1/8 to 1/4 inch thick. Consistency in thickness ensures that all slices dry at the same rate. Too thick, and the center may stay moist. Too thin, and the slices may become brittle and hard to handle. An apple slicer corer can make this step faster and more consistent.
Step 4: Soak Slices in Lemon Juice
Fill a large bowl with cold water and squeeze in the juice of one lemon. Submerge your apple slices in the lemon water for about 5 to 10 minutes. This prevents oven-dried apples from turning brown. The citric acid acts as a natural preservative that keeps your decorative apple slices looking fresh and vibrant.
Step 5: Pat Dry and Arrange on Baking Sheets
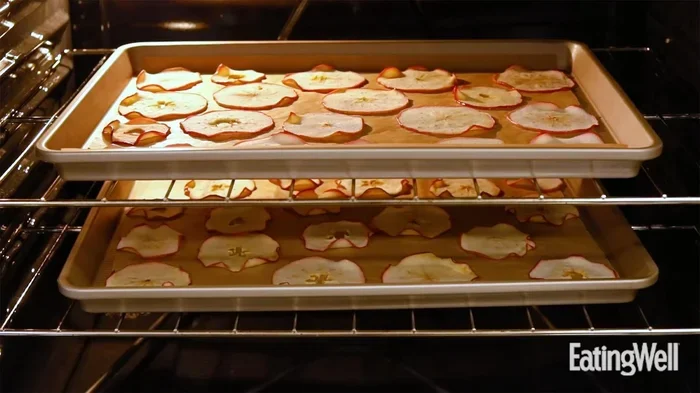
Remove the slices from the lemon water and pat them completely dry with paper towels. Lay them out in a single layer on parchment-lined baking sheets. Do not overlap the slices. Airflow is essential for even drying, so give each piece plenty of space.
Step 6: Bake at Low Temperature
Preheat your oven to 200°F. Place the baking sheets on the middle rack. Baking apples at low temperature is the key to successful food dehydration. Higher temperatures will cook the apples instead of drying them, resulting in a chewy texture rather than the crisp, flat slices you want for decoration.
Bake for 2 to 3 hours, flipping the slices halfway through. The exact time depends on your oven and the thickness of your slices. Check periodically. The slices are done when they feel dry and slightly crispy at the edges but still flexible enough not to snap in half.
Step 7: Cool Completely Before Handling
Remove the baking sheets from the oven and let the slices cool on a wire rack. Dried apple décor pieces become more fragile once fully cooled, so handle them gently. Cooling usually takes about 30 to 60 minutes.
Tips for Perfect Oven-Dried Apple Slices
Even with a straightforward process like this, small details make a big difference. These tips will help you achieve the best possible results with your dry apples in oven for decoration projects.
Use Parchment Paper or Silicone Mats
Never place apple slices directly on bare baking sheets. Parchment paper or silicone baking mats prevent sticking and make cleanup a breeze. They also promote even airflow underneath each slice, which is essential for uniform drying.
Rotate Baking Sheets Halfway Through
Most ovens have hot spots that can cause uneven drying. Rotating your baking sheets halfway through the baking time ensures all slices dry consistently. This simple habit takes seconds but makes a noticeable difference in your final apple slice craft results.
Do Not Rush the Process
It can be tempting to increase the oven temperature to speed things up, but resist that urge. High heat cooks the apples rather than drying them. This leads to brown, curled, and unevenly dried slices that do not look as polished for apple decorations for holidays. Patience is your best friend here.
Experiment with Flavors
For an extra touch of elegance, try sprinkling a light dusting of cinnamon or nutmeg on your apple slices before baking. You can also dip the edges in a thin layer of honey before drying. These small additions add fragrance and visual interest to your dried fruit decor. Just keep the flavors light so they do not overpower the natural beauty of the apple.
Check for Doneness Frequently
Every oven is different. Start checking your slices after the first 90 minutes. The goal is slices that are dry to the touch but still slightly pliable. Over-dried slices become too brittle and may crack during handling. Under-dried slices may develop mold during storage. Finding the sweet spot is key.
Creative Decoration Ideas with Dried Apples
Once you have mastered the drying process, the real fun begins. Dried apple décor opens up a world of creative possibilities. Here are some of the most popular and visually striking ways to use your oven-dried apple slices.
Apple Wreaths
A dried apple wreath makes a stunning front door decoration. Use a grapevine or straw wreath form as your base. Attach the dried apple slices using hot glue or thin wire, overlapping them in a circular pattern. Add some cinnamon sticks, pine cones, or dried orange slices for extra texture and color. This type of dried fruit decor welcomes guests with rustic warmth.
Dried Apple Garland
Stringing dried apple slices onto twine or ribbon creates a beautiful dried apple garland. drape it across your fireplace mantel, staircase railing, or holiday table. You can alternate apple slices with cranberries, popcorn, or small pine cones for a festive touch. This apple slice craft is simple enough for kids to help with, making it a wonderful family activity.
Centerpiece Displays
Create an eye-catching table centerpiece by arranging dried apple slices in a shallow wooden bowl or on a wooden platter. Add taper candles, scattered cinnamon sticks, and small autumn leaves. This kind of decorative fruit display works beautifully for Thanksgiving dinners, harvest celebrations, or autumn-themed dinner parties.
Wall Art and Ornaments
Frame a collection of decorative apple slices between two pieces of wooden dowels for a rustic wall hanging. You can also use dried apple slices to decorate plain glass ornaments for your Christmas tree. Simply glue the slices inside clear ball ornaments and add a ribbon for hanging. These apple ornaments make thoughtful handmade gifts.
Window Displays
Place dried apple slices in clear glass vases or jars and set them on windowsills. Natural light illuminates the translucent slices beautifully, creating a warm glow in any room. This simple baked apple décor idea adds charm without any effort. It works especially well during the fall season.
Storing and Preserving Your Dried Apple Decorations
Proper storage is the final piece of the puzzle. Your oven-dried apples can last for months if you store them correctly. Follow these guidelines to keep your dried fruit decor looking fresh long after the drying process.
Store dried apple decorations in airtight containers. Glass jars with tight-fitting lids work perfectly. Keep them in a cool, dark, and dry place. Avoid areas with high humidity, as moisture can cause mold to develop. If you live in a particularly humid climate, consider adding a small packet of silica gel inside the storage container to absorb excess moisture.
For long-term display pieces, you can lightly seal the slices with a clear acrylic spray sealant. This adds a protective layer that helps prevent moisture absorption and keeps the color vibrant. Spray from about 12 inches away in a well-ventilated area. Allow the sealant to dry completely before handling the slices.
With proper care, your dry apples in oven for decoration projects can last 4 to 6 weeks or even longer. This makes them perfect for seasonal displays that you can reuse year after year. Simply store them carefully between uses, and they will be ready whenever you need them.
Common Mistakes to Avoid When Drying Apples
Even simple projects come with pitfalls. Knowing what to avoid saves time, apples, and frustration. Here are the most common mistakes people make when they dehydrate apples for decorative purposes.
- Skipping the lemon juice soak: This is the number one mistake. Without lemon juice, your oven-dried apples will turn brown within hours of drying, ruining their visual appeal.
- Overcrowding the baking sheet: Stacking or overlapping slices blocks airflow and leads to uneven drying. Always give each piece space to breathe.
- Setting the oven too high: Temperatures above 200°F cook the apples instead of drying them. Low and slow is the golden rule of food dehydration.
- Inconsistent slice thickness: Varying thickness means some slices dry too fast while others stay moist. Use a ruler or apple slicer for uniform results.
- Not checking for doneness: Every oven behaves differently. Relying solely on time rather than visual and tactile cues leads to under-dried or over-dried slices.
- Storing while still warm: Placing warm slices into airtight containers traps moisture and promotes mold growth. Always cool completely before storing.
Avoiding these simple errors ensures that your dry apples in oven for decoration turn out beautifully every time. A little attention to detail goes a long way.
Expert Insights on Fruit Drying Techniques
Professional crafters and home economists agree that oven drying fruit is one of the most reliable methods for creating decorative dried apple pieces. The key is understanding your specific oven and adjusting accordingly. Some ovens run hotter than others, so investing in an oven thermometer can be a game-changer. Place it inside your oven to verify the actual temperature matches what the dial says.
Experts also recommend working in batches. Drying too many slices at once reduces airflow and extends drying time. Two to three baking sheets at a time is the sweet spot for most home ovens. If you need to dry a large quantity, plan for multiple rounds rather than trying to fit everything in at once.
Another pro tip involves the post-drying treatment. Some crafters lightly brush their decorative apple slices with a thin coat of white acrylic sealant to give them a matte finish that resists dust and handling marks. This technique is especially useful for pieces that will be handled frequently, like ornaments or wreath elements.
The beauty of drying apples in the oven for decoration is that there is always something new to learn. Each batch teaches you something about your oven, your apples, and your personal style. Embrace the process and enjoy the creative journey.
Key Takeaways
- Low and slow wins: Drying at 200°F preserves color and texture for the best decorative results.
- Uniform slicing is critical: Consistent 1/8 to 1/4 inch thickness ensures even drying across all slices.
- Lemon juice is non-negotiable: It prevents browning and keeps your dried apple slices looking fresh and vibrant.
- Give slices space on the pan: Proper airflow prevents moisture buildup and ensures uniform drying.
- Cool completely before storing: Trapped heat creates condensation that leads to mold and spoilage.
- Get creative with displays: Wreaths, garlands, centerpieces, and ornaments all showcase dried apples beautifully.
- Seal for longevity: A light coat of acrylic sealant protects your dried fruit decor for extended display.