How Long To Put Steak In Oven For Reverse Sear Guide
Discover the exact time and temperature for how long to put steak in oven for reverse sear. This method slowly cooks your steak at a low heat, then finishes it with a blazing hot sear. You will learn the perfect oven-baked steak technique for a flawless, edge-to-edge pink result every single time.
There is something deeply satisfying about a perfectly cooked steak. The outside is crispy and caramelized. The inside is juicy and tender. And the color? That beautiful, even pink from edge to edge. If you have been searching for how long to put steak in oven for reverse sear, you are in the right place.
The reverse sear method has taken the steak world by storm. It is simple, forgiving, and produces incredible results every time. Instead of starting with a hot pan, you start with a cool oven. This gentle approach gives you full control over the steak cooking temperature. The result? A steak that is evenly cooked from crust to center.
In this guide, we will walk through every step of the process. You will learn the exact times, temperatures, and techniques that make reverse sear steak so special. Whether you are a beginner or a seasoned home cook, this guide will level up your steak game. Let us dive in.
Key Takeaways
- Low and slow is the key: Cooking steak in the oven at 200-275°F ensures even doneness from edge to edge.
- Time depends on thickness: A 1.5-inch steak takes about 20-25 minutes, while a 2-inch cut needs 30-40 minutes.
- A meat thermometer is essential: Pull the steak at 110-115°F for medium-rare to account for carryover cooking.
- The sear should be fast: Use a screaming hot cast iron skillet for 60-90 seconds per side.
- Resting matters: Let your steak rest for 5-8 minutes after searing for juicy, tender results.
- Reverse sear works best on thick cuts: Ribeye, New York strip, and filet mignon are ideal choices.
- Season simply and well: Salt, pepper, and garlic are all you need for a restaurant-quality steak.
📑 Table of Contents
What Is Reverse Sear and Why Does It Work
The reverse sear is a two-step cooking method. First, you slowly heat the steak in the oven. Then, you finish it with a quick, intense sear in a hot skillet. This approach flips the traditional method on its head. Instead of searing first and cooking second, you do the opposite.
The Science Behind Low and Slow Cooking
When you cook steak at a low temperature, something magical happens. The heat moves slowly and evenly through the meat. There is no temperature gradient. The outside does not overcook while waiting for the center to catch up. This is why reverse sear steak has that perfect edge-to-edge pink color.
The low and slow approach also dries the surface of the steak. A dry surface is essential for a great crust. When you finally hit that steak with a screaming hot pan, the moisture evaporates instantly. This triggers the Maillard reaction. That is the chemical process that creates that deep, savory, brown crust you love.
Why Oven-Baked Steak Wins Every Time
Oven-baked steak gives you precision. You set the temperature and walk away. There is no need to flip or monitor constantly. The oven surrounds the steak with gentle, consistent heat. This is especially helpful for thick cuts that are tricky to cook on a stovetop alone.
Another big win is convenience. You can prep the steak and put it in the oven well before guests arrive. The steak holds its temperature for a while. This makes reverse sear one of the most stress-free ways to cook steak for a crowd.
How Long To Put Steak In Oven For Reverse Sear
This is the question at the heart of this guide. The answer depends on a few factors. Steak thickness is the biggest one. But oven temperature and your desired doneness also play a role. Let us break it all down.
Time by Steak Thickness
Here is a simple guide for how long to put steak in oven for reverse sear based on thickness:
- 1-inch steak: 15-20 minutes at 275°F
- 1.5-inch steak: 20-25 minutes at 275°F
- 2-inch steak: 30-40 minutes at 250°F
- 2.5-inch steak: 40-50 minutes at 250°F
- 3-inch steak: 50-60 minutes at 225°F
These times are estimates. Your oven may run hot or cold. The steak starting temperature matters too. A frozen steak takes much longer than a refrigerated one. Always use a meat thermometer to check progress.
Temperature Settings for Perfect Results
Most experts agree that 250°F is the sweet spot for reverse sear. This temperature is low enough to cook the steak gently. It is high enough to make the process reasonably quick. Some cooks prefer 275°F for thinner steaks. Others go as low as 225°F for very thick cuts.
The key is consistency. Avoid opening the oven door too often. Every time you open it, the temperature drops. This extends the cook time and can lead to uneven results. Trust the process and let the oven do its work.
Here is a quick reference table for oven temperatures and their best uses:
- 225°F: Best for very thick steaks (2.5 inches and above). Slower cook, more even results.
- 250°F: The all-purpose temperature. Works great for most steak thicknesses.
- 275°F: Good for thinner steaks (1 to 1.5 inches). Faster cook time.
- 300°F: Use only in emergencies. Higher risk of uneven cooking.
Target Internal Temperatures by Doneness
Knowing your target steak internal temperature is crucial. Pull the steak from the oven before it reaches your final desired doneness. This is because of carryover cooking. The temperature will rise 5-10 degrees during the sear and resting phase.
Here are the pull temperatures you should aim for:
- Rare: Pull at 110°F (final temp ~120°F)
- Medium Rare: Pull at 115°F (final temp ~130°F)
- Medium: Pull at 125°F (final temp ~135°F)
- Medium Well: Pull at 135°F (final temp ~145°F)
Most steak lovers aim for medium-rare. It offers the best balance of flavor, juiciness, and tenderness. If you are new to reverse sear, start with medium-rare. You can always adjust next time.
Best Steaks for Reverse Sear
Not all steaks are created equal when it comes to reverse sear. Some cuts shine brighter than others. The best steaks for this method are thick, well-marbled, and uniform in shape. Let us look at the top choices.
Thick Cuts That Shine
Ribeye is the king of reverse sear. Its rich marbling melts during the slow cook, creating incredible flavor and juiciness. A bone-in ribeye also looks stunning on the plate.
New York Strip is another excellent choice. It has a good balance of fat and meat. The reverse sear method brings out its natural beefy flavor beautifully.
Filet Mignon is leaner but still works wonderfully. The gentle oven cooking keeps it tender and prevents it from drying out. This is a great option for those who prefer a leaner cut.
Budget-Friendly Options
You do not need an expensive cut to nail the reverse sear. Chuck Eye Steak and Petite Tender are affordable alternatives that respond beautifully to this method. The slow cooking helps develop flavor and tenderness in these less expensive cuts.
Flat Iron Steak is another great budget pick. It is tender and flavorful. The reverse sear ensures it cooks evenly, which can be tricky with this cut on a hot grill.
Pro Tip: No matter which cut you choose, look for steaks that are at least 1 inch thick. Thinner steaks can dry out during the longer oven phase. The ideal thickness for reverse sear is 1.5 inches or more.
Step-by-Step Reverse Sear Method
Now that you understand the theory, let us get into the practical steps. This is where the magic happens. Follow along and you will have a restaurant-quality steak on your plate.
Step 1: Prep and Seasoning
Start by removing the steak from the refrigerator 30-60 minutes before cooking. Let it come to room temperature. This reduces the cooking time and promotes even doneness.
Pat the steak dry with paper towels. Moisture is the enemy of a great crust. The drier the surface, the better the sear will be.
Season generously with coarse salt and freshly cracked black pepper. You can also add garlic powder or smoked paprika for extra flavor. Keep it simple. Great steak does not need a complicated seasoning blend.
Quick Tip: Salt the steak at least 40 minutes before cooking. This draws out moisture, which then gets reabsorbed. The result is a more tender and flavorful steak.
Step 2: The Oven Phase
Preheat your oven to 250°F. Place a wire rack on top of a baking sheet. This allows air to circulate around the steak, promoting even cooking.
Place the seasoned steak on the rack. Put it in the oven and set a timer. Use a meat thermometer to monitor the internal temperature. Check the steak every 10 minutes after the first 15 minutes.
When the steak is 10-15 degrees below your target doneness temperature, it is time to pull it out. For medium-rare, that means pulling at 115°F. For medium, pull at 125°F.
While the steak is in the oven, place a cast iron skillet on the stove. You want it to get ripping hot. Turn the burner to high and let the pan heat for at least 5 minutes.
Step 3: The Sear Finish
This is the dramatic part. Add a high smoke-point oil to the cast iron skillet. Avocado oil or vegetable oil work great. Do not use olive oil. It has a low smoke point and will burn.
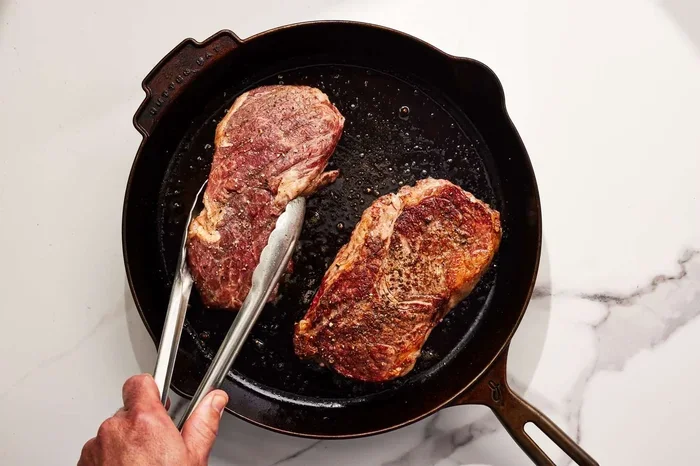
Carefully place the steak in the hot pan. You should hear a loud sizzle immediately. If you do not, the pan is not hot enough. Let the steak sear undisturbed for 60-90 seconds.
Flip the steak and sear the other side for another 60-90 seconds. If you want a crust on the edges, use tongs to hold the steak on its sides for 15-20 seconds per edge.
Add a tablespoon of butter, crushed garlic, and fresh thyme to the pan during the final 30 seconds. Spoon the melted butter over the steak. This adds incredible flavor and richness.
Once seared, transfer the steak to a cutting board. Let it rest for 5-8 minutes. This allows the juices to redistribute throughout the meat. Cutting too early will result in a loss of juices and a less flavorful steak.
Common Mistakes to Avoid
Even with a great recipe, mistakes can happen. Here are the most common errors people make when learning how long to put steak in oven for reverse sear, and how to avoid them.
Skipping the Meat Thermometer
This is the number one mistake. You cannot guess the internal temperature of a steak accurately. Touch tests and time estimates are unreliable. A digital meat thermometer costs under $15 and takes the guesswork out completely. Invest in one and use it every single time.
Starting with a Cold Steak
Putting a fridge-cold steak straight into the oven creates problems. The outside may overcook before the center warms up. Always let the steak temper at room temperature for at least 30 minutes before cooking.
Overcooking During the Sear
The sear should be fast and intense. If you leave the steak in the pan too long, you will overcook the center. Remember, the oven phase does most of the work. The sear is just for flavor and crust. Keep it to 60-90 seconds per side.
Using the Wrong Pan
Not all skillets are created equal for searing. A thin, flimsy pan will not hold enough heat. You need a heavy cast iron skillet or a thick stainless steel pan. These retain heat and deliver that perfect crust.
Skipping the Rest
Resting the steak is non-negotiable. When you cut into a hot steak immediately, the juices run out onto the cutting board. Give it time. The meat will be juicier and more flavorful after resting.
Pro Tips for Perfect Reverse Sear Steak
You have the basics down. Now let us take your steak to the next level with these expert tips.
Resting and Carryover Cooking
Carryover cooking is your secret weapon. After you pull the steak from the oven, the internal temperature continues to rise. This is because the outer layers are hotter than the center. The heat gradually equalizes throughout the steak.
Plan for a 5-10 degree temperature rise during the sear and resting phase. This means pulling the steak earlier than you think. If you want a final temperature of 130°F for medium-rare, pull the steak at 115°F from the oven.
Seasoning Blends and Finishing Touches
While salt and pepper are classic, you can get creative. A rub with smoked paprika, onion powder, and a touch of cayenne adds depth. Some cooks like to add a thin layer of mustard powder before cooking. It creates an incredibly flavorful crust.
After resting, you can finish with a sprinkle of flaky sea salt. This adds a delightful crunch and bursts of salinity with each bite. A drizzle of high-quality finishing oil or a compound butter on top takes it to restaurant-level.
Make Ahead and Meal Prep
One of the best things about reverse sear is that it is meal-prep friendly. You can slow-cook the steak in the oven up to a day in advance. Store it in the refrigerator. When you are ready to eat, simply sear it in a hot pan for 60 seconds per side.
This makes it perfect for dinner parties or meal prep. You do the heavy lifting ahead of time. The final sear takes less than two minutes. Your guests will think you spent all day cooking.
Oven-Baked Steak vs. Grill vs. Sous Vide
Each cooking method has its strengths. Here is how reverse sear oven-baked steak compares to other popular methods:
- Reverse Sear (Oven): Most even doneness, easiest to control, great for thick cuts.
- Grill: Adds smoky flavor, requires more attention, harder to control edge-to-edge doneness.
- Sous Vide: Most precise temperature control, requires special equipment, longer cook time.
For most home cooks, reverse sear offers the best balance of results and simplicity. You do not need special equipment. You do not need to stand over a hot grill. Just an oven and a hot skillet.
Frequently Asked Questions
Can you reverse sear a thin steak?
Reverse sear works best on steaks that are at least 1 inch thick. Thinner steaks can dry out during the slow oven phase. If you only have a thin steak, stick with the traditional method of searing first and finishing in the oven briefly. The reverse sear truly shines with thicker cuts that need even cooking throughout.
What is the best oven temperature for reverse sear steak?
250°F is the most recommended temperature for reverse sear. It provides a gentle, even cook without drying out the steak. You can go as low as 225°F for very thick cuts or as high as 275°F for thinner ones. The key is to keep the temperature low and consistent throughout the cooking process.
How do you know when the steak is ready to sear?
Use a meat thermometer. Pull the steak from the oven when it is 10-15 degrees below your target final doneness temperature. For medium-rare, that means pulling at 115°F. The steak will continue to cook during the sear and resting phase. This carryover cooking is essential to get right.
Do you need to rest the steak after reverse sear?
Absolutely. Resting is just as important as the sear itself. After searing, let the steak rest on a cutting board for 5-8 minutes. This allows the juices to redistribute evenly throughout the meat. If you cut too early, those juices will flood the cutting board instead of staying in the steak where they belong.
Can you reverse sear steak in an air fryer?
Yes, you can. An air fryer works similarly to an oven for the low-and-slow phase. Set it to 250°F and cook for about 10-15 minutes for a 1.5-inch steak. Check the internal temperature regularly. Once it is 10-15 degrees below your target, increase the temperature to 400°F for a quick sear. The results are very similar to oven reverse sear.
Why is my reverse sear steak gray instead of pink?
A gray steak usually means the oven temperature was too high or the cook time was too long. You overcooked the outer layers before the center reached the desired temperature. Lower the oven temperature to 225-250°F and use a meat thermometer to monitor progress closely. The goal is a gentle, slow cook that brings the steak up to temperature without cooking the edges past medium-rare.
Final Thoughts
Mastering how long to put steak in oven for reverse sear opens up a world of culinary possibilities. This method gives you control, consistency, and incredible results. You do not need to be a professional chef to cook a steak this good.
Start with a thick, well-marbled cut. Season it simply. Cook it low and slow in the oven. Finish it with a blazing hot sear. Let it rest. And then enjoy every single bite.
The reverse sear method is forgiving. It gives you a wide window of time to work with. You do not need to be precise down to the second. This makes it perfect for beginners and a reliable go-to for experienced cooks.
Next time you are craving a perfect steak, skip the grill and try the oven instead. Your steak will thank you. And your dinner guests definitely will too. Happy cooking.