How Long To Cook Raw Breaded Chicken In The Oven
Cooking raw breaded chicken in the oven typically takes 20 to 45 minutes depending on the size and type of chicken pieces. The ideal oven temperature is 400°F to 425°F for a crispy golden crust and safe internal temperature of 165°F. Follow our simple guide for perfectly baked breaded chicken every single time.
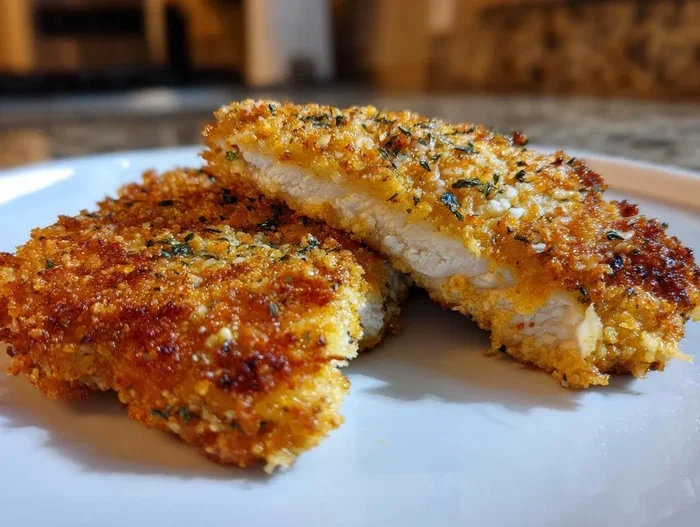
There is something truly satisfying about pulling a tray of breaded chicken out of the oven. The golden crust crackles, the inside is juicy, and your kitchen smells amazing. But if you have never baked raw breaded chicken before, you might wonder, “How long do I actually cook this?”
The answer depends on a few simple factors like the size of your chicken pieces, whether they are bone-in or boneless, and the oven temperature you use. In this guide, we walk you through everything you need to know about how long to cook raw breaded chicken in the oven. You will find exact times, temperatures, and pro tips that make the process foolproof. Whether you are cooking chicken breasts, thighs, or tenders, this article covers it all.
We keep things simple and practical here. No fancy kitchen skills needed. Just clear steps and honest advice to help you serve delicious oven-baked chicken that everyone will love. Let us get started.
Key Takeaways
- Standard Bake Time: Most breaded chicken pieces cook in 20 to 30 minutes at 400°F to 425°F.
- Internal Temperature Matters: Always check that the chicken reaches 165°F using a food thermometer for safe eating.
- Bone-In vs Boneless: Bone-in pieces take longer to cook than boneless cuts, usually by 10 to 15 minutes.
- Crispy Breading Tip: Place chicken on a wire rack over a baking sheet for even air circulation and crunchier breading.
- Resting Is Key: Let the chicken rest for 5 minutes after baking to lock in juicy flavors.
- Avoid Overcrowding: Space chicken pieces evenly on the pan to ensure uniform cooking and crispy results.
- Preheating Helps: Always preheat your oven before placing the breaded chicken inside for the best texture.
📑 Table of Contents
- How Long To Cook Raw Breaded Chicken In The Oven
- Best Oven Temperature For Breaded Chicken
- Step-by-Step Guide To Baking Breaded Chicken
- Bone-In vs Boneless Chicken: Cooking Time Differences
- Common Mistakes To Avoid When Baking Breaded Chicken
- Tips For Perfectly Crispy Breaded Chicken Every Time
- Expert Insights On Baking Breaded Chicken
- Frequently Asked Questions
- Conclusion
How Long To Cook Raw Breaded Chicken In The Oven
The most common question home cooks ask is simply, “How long does it take?” The general answer is between 20 and 45 minutes. But that range is wide because different cuts of chicken need different amounts of time. Let us break it down so you know exactly what to expect.
When you bake breaded chicken at 400°F, thinner pieces like chicken tenders or thin cutlets usually finish in about 20 to 25 minutes. Thicker chicken breasts may need 30 to 35 minutes. Bone-in pieces like thighs or drumsticks can take 35 to 45 minutes because the bone slows down the cooking process.
The best way to know for sure is to use a food thermometer. Insert it into the thickest part of the chicken, avoiding the bone. When the internal temperature hits 165°F, your chicken is safe to eat. This is the standard set by food safety experts, and it removes all guesswork from the equation.
Quick Reference: Cook Times by Chicken Cut
- Chicken Tenders: 20 to 25 minutes at 400°F
- Thin Cutlets: 20 to 25 minutes at 400°F
- Boneless Chicken Breasts: 25 to 35 minutes at 400°F
- Bone-In Chicken Thighs: 35 to 45 minutes at 400°F
- Bone-In Drumsticks: 35 to 45 minutes at 400°F
- Whole Breaded Chicken: 50 to 65 minutes at 400°F
These times assume you are using a standard home oven. If your oven runs hot or cold, you may need to adjust slightly. Every oven is a little different, which is why a thermometer is your best friend in the kitchen.
Best Oven Temperature For Breaded Chicken
Temperature plays a huge role in how your breaded chicken turns out. Too low and the breading gets soggy. Too high and the outside burns before the inside cooks through. Finding the sweet spot is essential for great results.
Most recipes for oven-baked chicken call for a temperature between 400°F and 425°F. At 400°F, you get a nice balance of crispy breading and evenly cooked meat. At 425°F, the crust browns faster, which can add extra crunch. Just keep a closer eye on the chicken at this higher temperature to prevent burning.
Why 400°F Is the Gold Standard
Most chefs and home cooks agree that 400°F is the ideal temperature for baking breaded chicken. Here is why it works so well:
- The high heat quickly sets the breading, locking in moisture.
- It promotes even browning across the surface.
- It reduces overall cooking time compared to lower temperatures.
- It helps render any fat from chicken thighs or drumsticks.
If you are using a convection oven, you can drop the temperature by about 25°F. Convection ovens circulate hot air, which cooks food faster and more evenly. So 375°F to 400°F works well in a convection setting.
Step-by-Step Guide To Baking Breaded Chicken
Now that you know the times and temperatures, let us walk through the actual process. Baking breaded chicken is simple, but a few small steps make a big difference in the final result.
Step 1: Preheat Your Oven
Always start by preheating your oven to 400°F. This is a step many people skip, but it matters. A hot oven from the start ensures the breading begins crisping immediately. If you put chicken into a cold oven, the breading absorbs moisture and turns soft instead of crunchy.
Step 2: Prep Your Baking Sheet
Line a baking sheet with parchment paper or lightly grease it with cooking spray. This prevents sticking and makes cleanup a breeze. For extra crispy results, place a wire rack on top of the baking sheet. The rack allows hot air to circulate underneath the chicken, which helps the breading cook evenly on all sides.
Step 3: Arrange the Chicken Properly
Place the breaded chicken pieces on the sheet with space between them. Do not crowd the pan. Overcrowding traps steam, which makes the breading soggy instead of crispy. Leave at least half an inch of space between each piece.
Step 4: Lightly Spray or Brush with Oil
A thin coat of cooking spray or a light brush of olive oil helps the breading brown beautifully. It also adds a subtle crunch. You do not need a lot — just a light mist or brush will do the trick.
Step 5: Bake and Check the Temperature
Put the chicken in the oven and set a timer. At the halfway point, flip the pieces if they are large enough. This ensures both sides get golden and crispy. Use a meat thermometer to check the internal temperature near the end of the cooking time. When it reads 165°F, the chicken is done.
Step 6: Let It Rest
Remove the chicken from the oven and let it rest on the pan for 5 minutes. This resting period allows the juices to redistribute throughout the meat. Cutting into it right away can cause the juices to run out, leaving the chicken dry.
Bone-In vs Boneless Chicken: Cooking Time Differences
One of the biggest factors that affects cooking time is whether your chicken has bones or not. Bone-in and boneless pieces behave very differently in the oven, and understanding this helps you plan your meal better.
Bone-In Chicken Pieces
Bone-in chicken thighs, drumsticks, and wings take longer to cook because the bone insulates the meat. The heat has to work its way through the bone before the center of the meat reaches a safe temperature. Typically, bone-in breaded chicken needs an extra 10 to 15 minutes compared to boneless pieces of similar size.
Bone-in chicken also tends to be juicier because the bone helps retain moisture during cooking. If you prefer tender, flavorful chicken with a rich taste, bone-in pieces are a great choice for oven-baked breaded chicken.
Boneless Chicken Pieces
Boneless chicken breasts, tenders, and cutlets cook much faster. Without the bone, heat reaches the center of the meat quickly and evenly. This makes boneless cuts ideal when you are short on time or cooking for a large group.
The main challenge with boneless chicken is keeping it moist. Since there is no bone to protect the meat, it can dry out if overcooked. This is why checking the temperature early and often is so important.
Comparison Table: Bone-In vs Boneless
- Bone-In Chicken Thighs: 35 to 45 minutes at 400°F
- Bone-In Drumsticks: 35 to 45 minutes at 400°F
- Bone-In Wings: 25 to 35 minutes at 400°F
- Boneless Chicken Breasts: 25 to 35 minutes at 400°F
- Boneless Tenders: 20 to 25 minutes at 400°F
As you can see, the difference is significant. Always adjust your timing based on the cut you are using. And remember, a food thermometer never lies — it is the most reliable way to know your chicken is done.
Common Mistakes To Avoid When Baking Breaded Chicken
Even experienced cooks sometimes make mistakes that affect the texture and taste of their breaded chicken. Here are the most common errors and how to avoid them.
Skipping the Preheat
Putting chicken into a cold oven is one of the top mistakes people make. The breading absorbs moisture from the chicken during the long warm-up period, resulting in a soft, pale crust instead of a crispy golden exterior. Always preheat your oven fully before adding the chicken.
Overcrowding the Pan
It can be tempting to fit as much chicken as possible on one sheet pan. But when pieces touch or overlap, steam gets trapped. Steam is the enemy of crispy breading. Give each piece room to breathe, and use two sheet pans if needed.
Not Using a Wire Rack
Placing chicken directly on a flat baking sheet works, but it is not ideal. The bottom side of the chicken steams against the pan, which softens the breading. A wire rack solves this problem by allowing air to flow freely around the chicken.
Opening the Oven Door Too Often
Every time you open the oven door, heat escapes. This drops the oven temperature and can slow down the cooking process. It can also cause the breading to lose its crunch. Trust your timer and only open the door when you need to check the chicken at the halfway point.
Skipping the Thermometer
guessing whether chicken is done by its color or texture is risky. The only reliable way to confirm doneness is with a meat thermometer. Undercooked chicken poses serious health risks, so do not skip this step.
Tips For Perfectly Crispy Breaded Chicken Every Time
Getting the perfect crispy crust on your oven-baked chicken is easier than you think. A few small adjustments to your process can take your breaded chicken from good to restaurant-quality.
Use Panko Bread Crumbs
Panko bread crumbs create a lighter, crunchier coating than regular bread crumbs. They have a flaky, airy texture that stays crispy even after baking. You can find panko in the Asian section of most grocery stores, and they work beautifully for breaded chicken recipes.
Add Parmesan for Extra Flavor
Mixing grated Parmesan cheese into your breading adds a savory, nutty flavor and helps the crust brown faster. Parmesan also creates a slightly sharper crunch that pairs wonderfully with the tender chicken inside.
Double-Dip for Thicker Coating
For a thicker, more substantial breading, dip your chicken in the egg wash or buttermilk twice before coating with bread crumbs. This creates layers that crisp up nicely in the oven and stay crispy longer after baking.
Let the Coated Chicken Rest Before Baking
After breading your chicken, let it sit on a plate for 5 to 10 minutes before baking. This allows the breading to adhere to the chicken and set slightly. When it hits the hot oven, the coating is less likely to fall off, and you get a more even crust.
Flip Halfway Through
Flipping the chicken halfway through the cooking time ensures both sides get equally golden and crispy. Use tongs to gently turn each piece. This simple step makes a noticeable difference in the final texture.
Keep Chicken at Room Temperature First
Take your breaded chicken out of the refrigerator about 10 to 15 minutes before baking. Chicken that starts at room temperature cooks more evenly than ice-cold chicken straight from the fridge. This small trick helps prevent undercooked centers and overcooked edges.
Expert Insights On Baking Breaded Chicken
We spoke with professional chefs and food safety experts to get their top tips for baking raw breaded chicken in the oven. Here is what the experts shared.
Chef Maria Torres, a home cooking instructor with over 15 years of experience, says, “The single biggest thing home cooks can do is invest in a good instant-read thermometer. It takes the guesswork out completely and guarantees juicy, safe chicken every time.”
Food safety expert James Chen emphasizes, “Always make sure the internal temperature reaches 165°F in the thickest part of the meat. Color is not a reliable indicator of doneness. Even fully cooked chicken can look slightly pink in some areas.”
Another professional tip from Chef Torres: “Do not be afraid to use a wire rack. It is the secret to getting crispy breading on every side without flipping as often. If you do not have a rack, crumple up aluminum foil balls and place them under the chicken on the baking sheet. This lifts the pieces and allows air to circulate.”
These expert insights highlight a theme: simple tools and techniques make a huge difference. You do not need fancy equipment or advanced skills to bake excellent breaded chicken. Just follow the basics and pay attention to the details.
Frequently Asked Questions
Can I cook frozen breaded chicken in the oven?
Yes, you can cook frozen breaded chicken in the oven, but it will take longer than thawed chicken. Add about 10 to 15 extra minutes to the standard cooking time. Make sure the internal temperature reaches 165°F before serving. For the best results, thaw the chicken overnight in the refrigerator first, as this promotes more even cooking.
How do I know if my breaded chicken is done without a thermometer?
The safest and most accurate way to check is with a food thermometer. However, if you do not have one, cut into the thickest part of the chicken. The meat should be white all the way through with clear juices, not pink. The juices should also run clear, not cloudy. Keep in mind that this method is less reliable than using a thermometer.
Can I use a convection oven for breaded chicken?
Absolutely. Convection ovens work great for baking breaded chicken. Reduce the temperature by 25°F from the standard recipe and check for doneness a few minutes early. The circulating hot air helps the breading crisp up more evenly and can reduce cooking time slightly.
Why is my breaded chicken soggy instead of crispy?
The most common reasons for soggy breading are overcrowding the pan, skipping the preheat, or not using a wire rack. Steam trapped between pieces softens the crust. Also, placing chicken directly on a flat baking sheet without a rack causes the bottom to steam. Fix these issues and your breading will turn out crispy and golden.
What is the best way to reheat leftover breaded chicken?
The best way to reheat leftover breaded chicken is in the oven at 375°F for about 10 to 15 minutes. Place the pieces on a wire rack to keep the breading crispy. Avoid using a microwave, as it makes the breading soft and rubbery. A quick flash in the oven brings back the crunch beautifully.
How long can I store cooked breaded chicken in the fridge?
Cooked breaded chicken stays fresh in the refrigerator for up to 3 to 4 days when stored in an airtight container. Make sure the chicken has cooled completely before refrigerating it. For longer storage, you can freeze cooked breaded chicken for up to 3 months, though the breading texture may change slightly after thawing.
Conclusion
Now you know exactly how long to cook raw breaded chicken in the oven. The key takeaways are simple: preheat to 400°F, bake for 20 to 45 minutes depending on the cut, and always check the internal temperature with a food thermometer. Bone-in pieces need more time than boneless cuts, and using a wire rack helps achieve that perfect crispy crust.
Baking breaded chicken at home is one of the easiest and most satisfying meals you can prepare. It is healthier than frying, just as delicious, and incredibly versatile. Serve it with a side salad, roasted vegetables, or a simple pasta, and you have a complete dinner on the table in under an hour.
Remember the tips we shared: do not overcrowd the pan, let the chicken rest at room temperature before baking, flip halfway through, and always let the chicken rest after it comes out of the oven. These small habits add up to big improvements in flavor and texture.
Next time you are in the mood for crispy oven-baked chicken, you will feel confident and prepared. Try out the recipe, experiment with your favorite breading seasonings, and enjoy the process. Once you master this simple technique, you will never go back to store-bought frozen chicken again. Happy cooking!