Why Is My Coffee Maker Not Dispensing Water And How To Fix
A coffee maker not dispensing water is a frustrating but usually fixable problem. Mineral buildup, clogged lines, air locks, and faulty pumps are the most common culprits behind this issue. This guide walks you through each cause step by step with practical solutions you can try at home. You will learn how to diagnose the problem, fix it yourself, and prevent it from happening again. Most repairs take less than 30 minutes and require no special tools.
There is nothing worse than pressing the brew button and watching your coffee maker sit there silently. You expect hot water to flow through the grounds and fill your cup. Instead, nothing happens. A coffee maker not dispensing water can ruin your morning routine faster than almost anything else in the kitchen.
The good news is that this problem is usually easy to fix. In most cases, you do not need to call a repair technician or buy a new machine. A little troubleshooting can get your coffee maker water flow back to normal in under 30 minutes. This guide covers every common cause and walks you through the fix step by step.
Whether you own a drip coffee machine, a single-serve pod system, or a premium espresso maker, the reasons for water not dispensing are often similar. We will break them down in plain language so anyone can follow along. Let us get your morning brew back on track.
Key Takeaways
- Mineral buildup is the number one cause of water flow issues in coffee makers
- Regular descaling prevents most dispensing problems before they start
- Air locks can be cleared with simple manual reset steps
- Water filters need regular replacement to maintain proper flow
- Knowing when to call a pro saves time and prevents further damage
📑 Table of Contents
How Your Coffee Maker Dispenses Water
Before we dive into the fixes, it helps to understand how your machine moves water. A basic coffee maker dispensing water system has three main parts working together. Knowing what each part does makes troubleshooting much easier.
The Water Reservoir
The reservoir is the removable tank at the back or top of your machine. This is where you pour fresh water before each brew. The reservoir holds the water until the heating element warms it up. From there, the water moves through tubes toward the brew basket.
Most reservoirs have a maximum fill line. Overfilling can cause water to leak or back up. Always check that the reservoir is seated properly in its slot. A loose reservoir is one of the simplest reasons a machine will not dispense water.
The Pump System
The pump is the heart of your coffee maker water flow system. It pushes water from the reservoir through the heating tube and into the brew head. In drip machines, this pump is usually small and electric. In espresso machines, the pump is more powerful.
When the pump fails, water cannot move through the system. You might hear a humming sound but see no water coming out. A stuck pump or a burnt-out motor needs a closer look, which we will cover below.
The Brew Path
The brew path is the route water takes from the pump to your cup. It passes through tubes, valves, and the coffee grounds or pod holder. Over time, this path can become blocked. Mineral deposits, coffee oils, and old grounds can all narrow or clog the tubes.
A blocked brew path is the most common reason for a coffee maker not dispensing water. The good news is that clearing it is usually straightforward. Let us look at each cause in detail now.
Common Reasons Your Coffee Maker Stops Dispensing Water
Several issues can stop water from flowing through your machine. Here are the most common ones and what to look for.
Mineral Buildup and Scale
Hard water is the enemy of every coffee machine. Over weeks and months, minerals like calcium and magnesium build up inside the tubes and heating elements. This white, chalky deposit is called scale. Scale narrows the inside of water lines and can completely block water flow.
If you live in an area with hard water, scale buildup is probably the cause of your coffee maker not dispensing water. You may notice slower brewing times or weaker coffee before the problem gets worse. A full blockage means no water at all.
The fix is simple: descale your machine. You can use a commercial descaling solution or a mix of white vinegar and water. Run a full cycle with the cleaning solution, then follow up with two to three plain water cycles to rinse out any residue.
Clogged Water Lines
Even if you do not have hard water, debris can clog your tubes. Coffee grounds, dust, and small particles can find their way into the water path. A clogged line stops water from reaching the brew basket.
To check for clogs, remove the water reservoir and look inside the tubes. Use a long, thin brush or a pipe cleaner to gently clear any blockage. Running a mixture of warm water and a small amount of dish soap through the system can also help loosen debris.
Regular coffee maker cleaning prevents clogs from building up. Make it a habit to rinse the reservoir and tubes once a week.
Faulty Water Pump
If the pump is not working, water simply cannot move through the machine. You might hear a clicking or buzzing noise when you press the brew button. Or you might hear nothing at all.
A faulty pump can happen for several reasons. The motor may have burned out after years of use. A small object like a coffee bean or a piece of debris might be jamming the pump mechanism. In some cases, the electrical connection to the pump becomes loose.
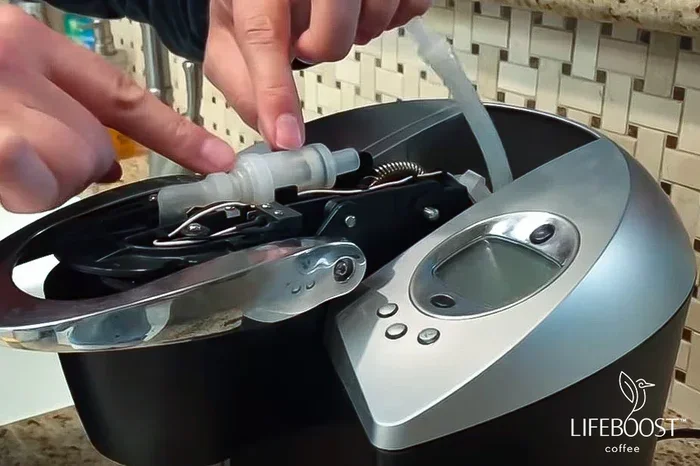
For a coffee maker repair involving the pump, you may need to open the machine and inspect the pump directly. If you are not comfortable doing this, it is perfectly fine to contact a professional. Trying to fix electrical parts without proper knowledge can be dangerous.
Air Locks in the System
Air locks happen when air bubbles get trapped inside the water tubes. This is more common in machines that have been sitting unused for a while or after you refill the reservoir too quickly.
An air lock prevents water from flowing even if the pump is working fine. The machine may gurgle or make noise but produce no output. To fix this, try tapping the side of the machine gently to dislodge air bubbles. You can also try running a brew cycle with just water and no coffee grounds to push the air out.
Broken Water Filter or Valve
Many coffee makers have a small water filter or a one-way valve inside the water path. These parts keep impurities out and ensure water flows in the right direction. Over time, the filter can become saturated or the valve can get stuck.
A stuck valve will block water from moving forward. A clogged filter slows the flow to a trickle. Check your machine’s manual to find out where these parts are located. Replacing a filter or valve is usually inexpensive and takes just a few minutes.
Step-by-Step Troubleshooting Guide
Now that you know the common causes, here is a systematic way to troubleshoot your coffee maker water flow problem. Follow these steps in order.
Step One: Check the Water Reservoir
Start with the simplest thing first. Make sure the reservoir has enough water in it. Check that it is properly seated in its slot. Remove the reservoir, look for any cracks or damage, and rinse it out with warm soapy water. A reservoir that is not seated correctly will not allow water to flow into the machine.
Step Two: Inspect the Water Filter
If your machine has a water filter, remove it and check its condition. A filter that has not been replaced in over two months is likely clogged. Replace it with a new one if needed. Some machines will not dispense water if the filter indicator light is on.
For those wondering about safe materials in the kitchen, checking whether your coffee maker parts are oven-safe or dishwasher-safe can also help with overall maintenance. You can read more about Is Anyday Cookware Oven Safe to understand how different kitchen materials handle heat and cleaning.
Step Three: Run a Descaling Cycle
Fill the reservoir with a 50/50 mix of white vinegar and water. Run a full brew cycle without coffee grounds. Then run two to three cycles with plain water to rinse. This removes mineral deposits that may be blocking the water path.
If you have not descaled your machine in over three months, this step alone may solve your coffee maker not dispensing water problem. Make descaling a regular part of your maintenance routine.
Step Four: Clear Any Clogs
Look at the brew head and the tube that leads into the coffee grounds area. Use a damp cloth to wipe away any coffee residue. A thin brush can help clear buildup from small openings. For pod machines, check the pod holder and the needle that punctures the pod. A clogged needle is a common cause of no water flow.
Step Five: Test the Pump
If water still does not flow after the steps above, the pump may be the issue. Listen carefully when you press the brew button. A working pump usually makes a gentle humming sound. No sound at all could mean a dead motor or a broken electrical connection.
For more complex pump issues, you may want to compare troubleshooting approaches across different kitchen appliances. Many of the same diagnostic principles apply when how to fix a gas oven not lighting or when addressing other household appliance failures. The logic of checking power, flow, and blockages is universal.
How to Prevent Water Dispensing Problems
Prevention is always easier than repair. A few simple habits will keep your coffee maker running smoothly for years.
Descale Regularly
Set a reminder to descale your machine every one to three months. If you have hard water, aim for once a month. Regular descaling removes mineral deposits before they become a serious blockage. This single habit will dramatically extend the life of your machine.
Use Filtered Water
Filtered water has fewer minerals than tap water. Using it in your coffee maker reduces scale buildup significantly. You can use a Brita filter or any other water filtration system. Some coffee makers come with built-in water filters. Make sure you replace these on schedule.
Clean After Every Use
Take out the used coffee grounds or pod after each brew. Rinse the brew basket and carafe with warm water. Wipe down the exterior and the drip area. A quick five-minute cleanup after every use prevents buildup from becoming a major problem.
Many people also wonder about using other kitchen items near or with their coffee setup. For instance, if you ever use your oven for warming things up, understanding what is the drawer under the oven for can help you organize your kitchen better and avoid accidentally storing coffee supplies in a too-warm area. You can learn more about what the drawer under the oven is for to make sure your kitchen setup supports your coffee routine.
Replace Parts When Needed
Water filters, pump components, and tubes do not last forever. Check your machine’s manual for replacement schedules. Using worn-out parts leads to poor performance and eventually a complete failure. Replacing a small part early can save you from buying a whole new machine.
When to Call a Professional
Most coffee maker problems are fixable at home. But some situations call for professional help. If you have tried all the steps above and water still will not dispense, it is time to call in an expert.
Electrical issues like a broken pump motor or a faulty control board should be handled by a trained technician. Opening up the machine yourself can void the warranty and may create safety risks. If your machine is still under warranty, contact the manufacturer before attempting any internal repairs.
Also, if your machine is more than ten years old, it may not be worth repairing. A new coffee maker with modern features might be a better investment. Look for machines with removable reservoirs, built-in filters, and easy-to-clean parts. These features make maintenance much simpler.
For those who love exploring different kitchen appliances, understanding how various devices work can be fun. If you are curious about compact cooking options, learning about what an air fryer toaster oven is might inspire you to try something new in the kitchen while you wait for your coffee to brew.
Quick Tips for Coffee Maker Maintenance
Keep these quick tips in mind to avoid future problems with your machine:
- Never use vinegar in a machine with a stainless steel reservoir, as it can damage the finish
- Run a water-only cycle after every descaling to remove all cleaning residue
- Store your machine with the reservoir empty if you will not use it for a long time
- Check the power cord regularly for fraying or damage
- Use the right coffee grind size for your machine to prevent grounds from entering the water path
- Descale before you notice problems rather than waiting for a full blockage
Conclusion
A coffee maker not dispensing water is almost always caused by one of a few fixable issues. Mineral buildup, clogs, air locks, and faulty parts are the usual suspects. By following the troubleshooting steps in this guide, you can identify the problem and fix it yourself in most cases.
Regular maintenance is the best defense against water dispensing problems. Descale often, use filtered water, and clean your machine after every brew. These simple habits keep your coffee maker running like new for years.
Do not let a silent coffee maker ruin your morning. Use the steps above, get your coffee maker water flow back, and enjoy that first hot cup again. If the problem persists after trying everything, do not hesitate to reach out to a professional. Your morning coffee is worth it.
Frequently Asked Questions
Why is my coffee maker not dispensing water even though the reservoir is full?
This usually means there is a blockage or air lock in the water path. Check the tubes, brew head, and water filter for clogs. Running a descaling cycle with vinegar and water can clear mineral buildup that may be blocking the flow.
How often should I descale my coffee maker?
Descaling every one to three months is recommended for most households. If you live in an area with hard water, you should descale once a month. Regular descaling prevents mineral deposits from blocking the water lines and pump system.
Can I use vinegar to descale my coffee maker?
Yes, a 50/50 mix of white vinegar and water works well for descaling. Run a full brew cycle with the solution, then follow up with two to three plain water cycles to rinse out any vinegar taste. Avoid using vinegar in machines with stainless steel reservoirs as it can damage the finish over time.
What should I do if my coffee maker pump is making noise but not dispensing water?
A noisy pump that does not dispense water likely has an air lock or a partial clog. Try tapping the side of the machine gently to release trapped air. If that does not work, check the water lines for blockages and run a descaling cycle. If the pump still does not work, the motor may need replacement.
Is it safe to repair a coffee maker myself?
Simple fixes like cleaning, descaling, and replacing filters are safe for most users. However, opening the machine to repair electrical components or the pump motor should be left to professionals. Always check your warranty before attempting internal repairs.
How do I know if my coffee maker water filter needs replacing?
Most machines have a filter indicator light that alerts you when it is time for a replacement. If your machine does not have one, replace the filter every two months or as recommended in the manual. A clogged filter slows water flow and can contribute to a coffee maker not dispensing water properly.
=== CONCLUSION ===
A coffee maker not dispensing water does not have to mean a broken machine or a trip to the repair shop. Most of the time, the fix is something simple you can do right at home. Descaling, clearing clogs, and replacing old filters solve the vast majority of water flow problems.
Make maintenance part of your routine and your coffee maker will reward you with years of reliable service. Keep this guide bookmarked for the next time your machine acts up. A little care goes a long way toward keeping your daily brew flowing smoothly.