What Temp To Dry Herbs In Oven The Ultimate Guide
Learning what temp to dry herbs in oven is the easiest way to preserve your garden harvest. Most herbs dry perfectly at 170°F to 200°F, keeping their flavor and color intact. This guide covers temperatures, timing, and step-by-step methods so anyone can dry herbs at home. You will also learn common mistakes to avoid and the best storage tips. By the end, you will feel confident drying herbs in your oven like a pro.
There is something deeply satisfying about drying your own herbs at home. Whether you grew them in a backyard garden or bought fresh bunches from the farmers market, drying herbs lets you enjoy their flavor all year long. But here is the thing many people get wrong: what temp to dry herbs in oven makes all the difference between crispy, flavor-packed herbs and burnt, tasteless dust.
If you have ever wondered how to dry herbs in oven without ruining them, you are in the right place. This guide walks you through every detail. From the ideal oven temperature for herbs to drying times, preparation steps, and storage tips, we have got you covered. By the time you finish reading, you will know exactly how to dry herbs in oven like a seasoned pro.
Drying herbs at home is not just about saving money. It is about controlling quality. Store-bought dried herbs often sit on shelves for months, losing their potency. When you dry herbs at home, you lock in freshness and flavor right at the peak of their life. And the best part? You do not need any fancy equipment. Your regular kitchen oven works perfectly.
Key Takeaways
- Best Temperature: Most herbs dry best between 170°F and 200°F in the oven.
- Low and Slow Wins: High heat destroys flavor and essential oils in herbs.
- Preparation Matters: Washing, drying, and stripping leaves properly leads to better results.
- Drying Times Vary: Thin-leafed herbs take 1-2 hours, while woody stems may need 3-4 hours.
- Storage Is Key: Store dried herbs in airtight containers away from light and heat.
- Oven Drying Beats Air Drying: It is faster and works well in humid climates.
- Know Your Herbs: Different herbs need different drying times and temperatures.
📑 Table of Contents
- Why Oven Drying Herbs Works So Well
- The Best Temperature to Dry Herbs In Oven
- Step-by-Step: How To Dry Herbs In Oven
- Comparison: Drying Times for Common Herbs
- Common Mistakes When Drying Herbs In Oven
- How To Store Your Oven-Dried Herbs
- Expert Tips for Perfect Oven-Dried Herbs
- Quick Tips for Drying Herbs In Oven
- Frequently Asked Questions
- Conclusion
Why Oven Drying Herbs Works So Well
You might wonder why oven drying is such a popular method. After all, you can hang herbs upside down or use a dehydrator. So why choose the oven? Let us break it down.
Speed and Convenience
Air drying herbs takes days or even weeks. A food dehydrator works well but requires extra counter space. The oven, on the other hand, dries herbs in just a few hours. This makes it ideal when you need results fast. Whether you have a big harvest or just a small handful of fresh basil, the oven gets the job done quickly.
Consistent Results
When you dehydrate herbs in oven, you control the temperature precisely. Unlike air drying, which depends on humidity and airflow, the oven gives you a stable environment. This means every batch dries evenly. You do not have to worry about mold forming on damp leaves or some stems drying faster than others.
Works in Any Climate
If you live in a humid area, air drying can be a real challenge. Moisture in the air slows things down and invites mold. Oven drying solves this problem completely. You do not need a dry climate or a dedicated drying room. Your oven handles the job no matter what the weather is like outside.
No Special Equipment Needed
You do not need to buy a dehydrator or special racks. Most ovens work great for drying herbs right out of the box. All you need is a baking sheet, parchment paper, and your fresh herbs. This makes oven drying the most accessible method for beginners and busy home cooks.
The Best Temperature to Dry Herbs In Oven
The most important question is always what temp to dry herbs in oven. The answer depends on the type of herb, but there is a general rule that works for almost everything.
The Goldilocks Zone: 170°F to 200°F
The sweet spot for oven drying herbs is between 170°F and 200°F. This range is low enough to preserve delicate essential oils but warm enough to pull out moisture efficiently. At these temperatures, herbs dry evenly without burning or turning brown.
Here is a simple breakdown of recommended temperatures:
- Delicate herbs (basil, cilantro, parsley): 170°F to 175°F
- Medium herbs (thyme, oregano, mint): 175°F to 185°F
- Woody herbs (rosemary, sage, dill): 185°F to 200°F
Why Not Higher Temperatures?
It can be tempting to crank up the heat to speed things along. Resist that urge. High temperatures above 200°F destroy the volatile oils that give herbs their flavor and aroma. Your herbs might look dry on the outside, but they will taste dull and lifeless inside. The whole point of drying herbs is to preserve their flavor, not cook them away.
What Happens at Too Low a Temperature?
Setting the oven too low, below 150°F, also causes problems. Herbs take too long to dry and may develop an off-flavor. They can also attract dust or insects if left out for many hours. The key is finding that middle ground where moisture evaporates steadily without damaging the plant material.
Step-by-Step: How To Dry Herbs In Oven
Now that you know the right herb drying temperature, let us walk through the process step by step. Follow these instructions for the best results every time.
Step 1: Choose the Right Herbs
Start with fresh, high-quality herbs. Look for vibrant green leaves with no signs of wilting or disease. The best time to harvest herbs for drying is in the morning after the dew has dried but before the sun gets too hot. This is when their essential oil content is at its peak.
Some of the best herbs to dry in oven include:
- Basil
- Thyme
- Oregano
- Rosemary
- Sage
- Mint
- Parsley
- Cilantro
- Dill
- Marjoram
Step 2: Wash and Dry the Herbs
Rinse your herbs gently under cool running water. This removes dirt, bugs, and any residue. After washing, shake off the excess water and pat the herbs dry with a clean towel. It is very important that the herbs are completely dry before they go into the oven. Extra moisture extends drying time and can lead to mold.
Step 3: Strip the Leaves from the Stems
For most herbs, you want to remove the leaves from the stems. Simply hold the stem at the top and slide your fingers down to strip the leaves off. For herbs like rosemary and thyme with very small leaves, you can leave them on the stem and dry them whole. The leaves will slip off easily once they are dry.
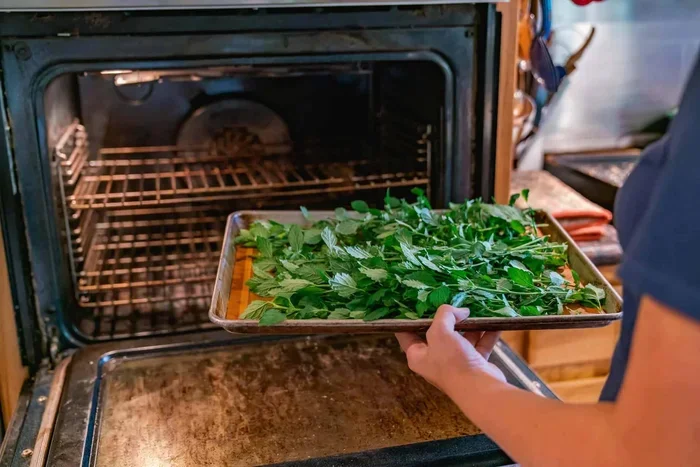
Spread the leaves out in a single layer on a parchment-lined baking sheet. Do not pile them up. Overlapping leaves trap moisture and dry unevenly. A single, flat layer is the secret to perfectly oven dried herbs.
Step 4: Set the Oven and Place the Herbs Inside
Preheat your oven to the recommended temperature for your specific herb type. Most herbs do well at 175°F. Once the oven is ready, place the baking sheet on the middle rack. Prop the oven door open slightly with a wooden spoon. This allows moisture to escape and keeps the temperature from climbing too high.
Step 5: Check and Flip Regularly
Every 30 minutes, open the oven and check on your herbs. Use a spatula to flip or stir the leaves around. This ensures even drying on all sides. Depending on the herb, the total herb drying time in the oven ranges from one to four hours.
Step 6: Test for Doneness
How do you know when herbs are fully dry? The leaves should feel crispy and crumble easily between your fingers. They should not feel leathery or bendy. If a leaf still bends, it needs more time. But be careful not to over-dry them, or they will lose their flavor.
Step 7: Cool and Store
Let the dried herbs cool completely on the baking sheet. This usually takes about 30 minutes. Once cool, crumble the leaves into a clean, dry jar. Seal the jar tightly and store it in a cool, dark place. Properly stored oven dried seasoning can last up to a year.
Comparison: Drying Times for Common Herbs
Different herbs dry at different speeds. Leafy herbs with high moisture content dry faster than woody, sturdy herbs. Use this table as a handy reference when planning your drying sessions.
| Herb | Recommended Temp | Drying Time | Leaf Type |
|---|---|---|---|
| Basil | 170°F – 175°F | 1 – 2 hours | Large, delicate |
| Thyme | 175°F – 185°F | 2 – 3 hours | Small, firm |
| Oregano | 175°F – 185°F | 2 – 3 hours | Small, firm |
| Rosemary | 185°F – 200°F | 3 – 4 hours | Woody, needle-like |
| Sage | 175°F – 185°F | 2 – 3 hours | Medium, fuzzy |
| Mint | 170°F – 175°F | 1 – 2 hours | Large, delicate |
| Parsley | 170°F – 175°F | 1 – 2 hours | Flat, tender |
| Cilantro | 170°F – 175°F | 1 – 1.5 hours | Delicate, small |
As you can see from the table, there is no one-size-fits-all answer. The drying herbs at home process requires a little attention to detail. But once you get the hang of it, it becomes second nature.
Common Mistakes When Drying Herbs In Oven
Even experienced cooks make mistakes when they first start drying herbs. Here are the most common errors and how to avoid them.
Setting the Temperature Too High
This is the number one mistake people make. A hot oven might seem faster, but it cooks the herbs instead of drying them. The essential oils that carry the flavor burn off at high temperatures. Always keep the oven at or below 200°F for the best herb preservation.
Overcrowding the Baking Sheet
It is tempting to fit as many herbs as possible on one sheet. But stacking herbs traps moisture and leads to uneven drying. Give each leaf room to breathe. If you have a large batch, use multiple baking sheets and rotate them in the oven.
Skipping the Parchment Paper
Some people place herbs directly on the oven rack. This is a bad idea. Small leaves fall through the rack, and the metal can scorch delicate herbs. Parchment paper or a silicone baking mat creates a gentle, non-stick surface that protects your herbs.
Not Checking Frequently Enough
Ovens vary in their actual temperature. Some run hot, some run cool. If you set a timer and walk away, you risk burning your herbs. Check them every 30 minutes and adjust the temperature if needed. Stay close and stay attentive.
Storing Dried Herbs Improperly
Drying is only half the battle. If you store your herbs in a clear jar on a sunny windowsill, the light and heat will degrade their flavor within weeks. Always use opaque, airtight containers and keep them in a cool, dark cupboard.
How To Store Your Oven-Dried Herbs
Proper storage makes a huge difference in how long your homemade dried herbs last and how well they retain their flavor. Follow these simple guidelines.
Choose the Right Container
Glass jars with tight-fitting lids work best. They do not absorb odors and they keep out moisture. Mason jars are an excellent and affordable choice. Avoid plastic containers, which can absorb oils and flavors over time.
Label and Date Everything
It is easy to forget which jar is which. Get in the habit of labeling each container with the herb name and the date you dried it. This keeps your spice rack organized and ensures you use older herbs first.
Keep Them in a Cool, Dark Place
Heat, light, and moisture are the enemies of dried herbs. Store your jars in a pantry or cupboard away from the stove and direct sunlight. A consistent, cool environment preserves the flavor and aroma for up to 12 months.
Whole Leaves Last Longer
Crush or grind your herbs just before using them. Whole dried leaves retain their essential oils much longer than crushed ones. Keep the leaves whole in the jar and only crush what you need for each meal.
Expert Tips for Perfect Oven-Dried Herbs
Here are some extra tips that experienced herb growers and cooks swear by. These small adjustments can take your dried herbs from good to outstanding.
Use a Kitchen Thermometer
Many ovens display temperatures that are not entirely accurate. A simple oven thermometer placed inside the oven gives you a true reading. This small investment pays off in perfectly dried herbs every time.
Dry Herbs in Batches
If you have a large harvest, dry herbs in small batches rather than one big load. Thin, even layers dry faster and more uniformly. Rushing the process with too many herbs leads to uneven results and wasted effort.
Try the Overnight Method
For a hands-off approach, set your oven to the lowest temperature (usually 170°F) and leave it on overnight. Check the herbs in the morning. This slow, gentle drying method works wonderfully for delicate herbs like basil and mint.
Combine Oven Drying With Air Drying
If you are short on time but want to preserve maximum flavor, try a hybrid approach. Oven-dry the herbs for the first hour at 175°F, then transfer them to a drying rack for the remaining moisture to evaporate naturally. This method preserves more of the aromatic oils.
Quick Tips for Drying Herbs In Oven
- Always preheat your oven before placing herbs inside.
- Use the convection setting if your oven has one; it circulates air for faster, more even drying.
- Do not wash herbs right before drying; excess water adds drying time.
- Herbs are done when they crumble easily and stems snap cleanly.
- Keep the oven door slightly open to let moisture escape.
- Rotate your baking sheet halfway through for even drying.
- Start with the lowest recommended temperature and increase only if needed.
Frequently Asked Questions
Can I dry herbs in oven at 250°F?
You can, but it is not recommended. Temperatures above 200°F risk cooking the herbs and destroying their essential oils. The flavor and aroma will suffer significantly. Stick to 170°F to 200°F for the best results and the most flavorful dried herbs.
How long does it take to dry herbs in the oven?
Most herbs take between one and four hours to dry in the oven. Delicate, leafy herbs like basil and mint dry in about one to two hours at 175°F. Woody herbs like rosemary and sage need three to four hours at 185°F to 200°F. Always check for doneness by crushing a leaf; it should crumble easily.
Is it better to dry herbs in the oven or a dehydrator?
Both methods work well, but they have different advantages. A dehydrator uses less energy and dries herbs more gently over a longer period, which can preserve more flavor. An oven is faster and more convenient for most people. If you only dry herbs occasionally, the oven is the best choice. For frequent or large-batch drying, a dehydrator may be worth the investment.
Can you dry herbs in the oven without parchment paper?
Yes, you can, but parchment paper makes the process much easier. It prevents small leaves from falling through the oven rack and stops herbs from sticking to the metal. It also makes cleanup a breeze. If you do not have parchment paper, a silicone baking mat works as a great alternative.
What is the best way to tell if oven-dried herbs are fully dry?
The simplest test is to crumble a leaf between your fingers. Fully dried herbs should break apart easily and feel crispy and brittle. If the leaf still bends or feels leathery, it needs more time in the oven. The stems should snap cleanly when bent, not bend or fold.
Can I reuse the oven-dried herb stems?
Yes! Dried herb stems can be used to make herbal infusions, teas, or flavored vinegars. Simply steep them in hot water or oil to extract their remaining flavor. You can also add them to a bouquet garni for cooking. Do not throw them away; they still have plenty of flavor to offer.
Conclusion
Drying herbs in the oven is one of the simplest and most rewarding skills you can learn in the kitchen. The key to success comes down to one thing: what temp to dry herbs in oven. Keep your temperature between 170°F and 200°F, spread the herbs in a single layer, and check them regularly. With the right herb drying temperature and a little patience, you will have flavorful, aromatic herbs ready to enhance every meal you cook.
Remember to avoid the common mistakes that ruin batches, like setting the heat too high or overcrowding the pan. Follow the preparation steps carefully, store your dried herbs properly, and you will enjoy homegrown flavor for months to come. Whether you are drying basil for winter pasta sauces or rosemary for roasted vegetables, oven dried herbs bring a level of freshness that store-bought options simply cannot match.
Start with one or two herbs this week and see how easy it is. Once you experience the difference in flavor between store-bought and home-dried herbs, you will never go back. Your garden, your kitchen, and your taste buds will thank you. Happy drying!