How to Use Aerobie Aeropress Coffee Maker Like a Pro
The Aerobie Aeropress coffee maker is a simple, portable device that brews rich, smooth espresso-style coffee in under two minutes. This guide walks you through every step, from setup to cleaning, so you can make barista-quality coffee at home. Whether you are a beginner or a seasoned coffee lover, you will find practical tips and recipes to elevate your brewing game.
There is something truly special about making a perfect cup of coffee at home. The smell fills the kitchen, the warmth warms your hands, and the first sip sets the tone for your entire day. If you have been looking for a simple way to make rich, smooth coffee without spending a fortune, the Aerobie Aeropress coffee maker might be exactly what you need.
This little device has taken the coffee world by storm. It is compact, easy to use, and delivers results that rival what you get at your favorite café. Whether you are a complete beginner or someone who has been brewing coffee for years, the Aeropress offers a fun and rewarding way to make espresso-style coffee right in your own kitchen. In this guide, we will walk you through everything you need to know, from your very first cup to advanced techniques that will make you feel like a real barista.
If you are new to kitchen appliances in general, think of the Aeropress the same way you would approach any new gadget. Just like when you first set up a brand new oven, reading the basics before diving in makes the whole experience smoother and more enjoyable. The same principle applies here. A little knowledge goes a long way toward brewing the perfect cup.
Key Takeaways
- Easy to Use: The Aeropress is a straightforward coffee maker that anyone can learn to use in minutes.
- Versatile Brewing: You can make espresso-style coffee, cold brew, and flavored drinks with one device.
- Quick Brew Time: A full cup takes less than two minutes from start to finish.
- Portable and Durable: The Aeropress is lightweight, easy to clean, and built to last.
- Affordable: You save money by making café-quality coffee at home instead of buying it out.
- Customizable: Adjust grind size, water temperature, and brew time to match your personal taste.
📑 Table of Contents
- What Is the Aerobie Aeropress Coffee Maker?
- What You Will Need to Get Started
- Step-by-Step Guide to Brewing with the Aeropress
- Tips for Perfecting Your Aeropress Coffee
- Cleaning and Maintenance
- Popular Aeropress Recipes to Try
- Common Mistakes to Avoid
- Why the Aeropress Is a Great Choice for Home Brewers
- Final Thoughts
What Is the Aerobie Aeropress Coffee Maker?
The Aerobie Aeropress is a handheld coffee brewing device invented by Alan Adler. It uses air pressure to push hot water through finely ground coffee and a paper filter. The result is a clean, bold cup of coffee that tastes similar to espresso but with a smoother, less acidic flavor. Unlike bulky machines, the Aeropress is small enough to fit in a drawer or travel bag.
Why People Love the Aeropress
There are many reasons the Aeropress has earned a loyal following. Here are some of the top ones:
- Speed: A full brew takes about one to two minutes.
- Simplicity: There are very few parts, and the process is easy to learn.
- Portability: It is lightweight and does not need electricity.
- Affordability: It costs much less than an espresso machine.
- Versatility: You can brew hot coffee, cold brew, and even flavored drinks.
- Easy Cleanup: The device disassembles quickly and rinses clean in seconds.
The Aeropress also gives you control over your coffee taste. You decide the grind size, water temperature, and brew time. This means you can experiment until you find the perfect coffee strength for your personal preference. No two cups have to taste the same, and that is part of the fun.
What You Will Need to Get Started
Before you start brewing, make sure you have everything ready. The good news is that the Aeropress comes with most of what you need right out of the box. Here is a simple checklist of coffee accessories you will want on hand.
The Essentials
- Aerobie Aeropress: The main brewing device, including the chamber, plunger, and cap.
- Coffee filter: Paper filters are included and work best for a clean taste.
- Ground coffee: Use a fine grind similar to table salt for the best results.
- Hot water: Heated to between 175 and 205 degrees Fahrenheit.
- A mug or cup: Any standard coffee mug will work.
- A stirrer: The included paddle or a wooden chopstick works great.
Optional but Helpful Extras
While not required, a few extra items can make your experience even better:
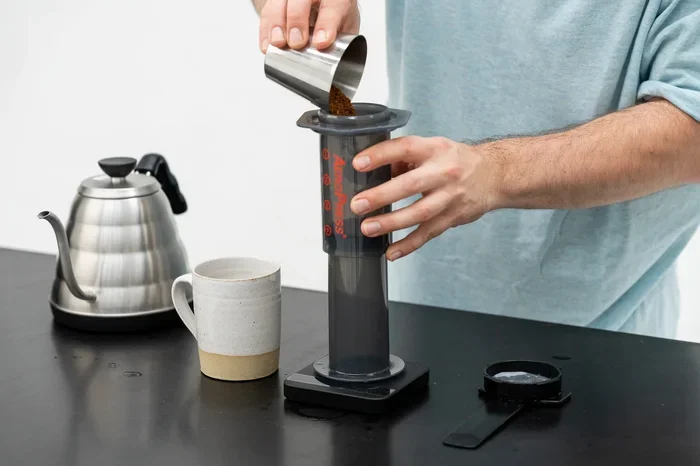
- A kettle: A gooseneck kettle gives you more control over water flow and temperature.
- A grinder: A burr grinder lets you grind beans fresh for the best flavor.
- A scale: Measuring your coffee and water precisely helps you repeat great brews.
- A timer: Your phone timer works perfectly for tracking brewing time.
Once you have your gear ready, you are all set to start brewing. The process is simpler than you might think, and you will be amazed at how quickly a great cup comes together.
Step-by-Step Guide to Brewing with the Aeropress
Now comes the fun part. Brewing with the Aeropress is straightforward, and once you do it a few times, it becomes second nature. Follow these steps for a perfect cup every time.
Step One: Prepare Your Equipment
Start by placing the Aeropress over your mug with the cap side pointing down. Put a paper filter into the cap and rinse it with hot water. This removes any papery taste and preheats your mug. Discard the rinse water before moving to the next step.
Step Two: Add Your Coffee Grounds
Add one to two scoops of finely ground coffee into the chamber. The standard ratio is about one scoop (around 14 to 17 grams) per six ounces of water. If you prefer a stronger cup, add a little more coffee. For a lighter taste, use a bit less.
Step Three: Pour Hot Water
Heat your water to just below boiling, ideally around 200 degrees Fahrenheit. Pour the water into the chamber slowly, filling it to the number one or two mark. The water temperature matters a lot. Too hot and the coffee can taste bitter. Too cool and it may taste weak or sour.
Step Four: Stir and Steep
Give the mixture a gentle stir for about ten seconds. Then let it sit for one to two minutes. The brewing time affects the final taste. A shorter steep gives a lighter cup, while a longer steep produces a bolder, richer flavor. Experiment to find what you like best.
Step Five: Attach the Cap and Plunge
After steeping, screw the cap with the filter onto the chamber. Place the Aeropress on top of your mug. Press the plunger down slowly and steadily. You should feel some resistance, which is normal. The air pressure pushes the brewed coffee through the filter and into your mug.
Step Six: Enjoy and Repeat
Once the plunger reaches the bottom, remove the Aeropress and enjoy your coffee. The entire process, from start to finish, takes less than three minutes. You can make a second small cup from the same grounds if you like a lighter brew.
For those who want to try a different approach, the inverted method is worth exploring. Simply flip the Aeropress upside down before adding water and coffee. This allows for a longer steep time and gives you more control. When you are ready to brew, place the Aeropress on your mug and plunge as usual. Many coffee lovers swear by this technique for a richer, more full-bodied cup.
Tips for Perfecting Your Aeropress Coffee
Once you have the basic process down, you can start experimenting to refine your brew. Small changes make a big difference in the final cup. Here are some expert tips to help you get the most out of your Aeropress.
Grind Size Matters
The grind size is one of the most important factors in AeroPress brewing. A fine grind works best because it allows the water to extract flavor efficiently. If your grind is too coarse, the coffee will taste weak and watery. If it is too fine, it can clog the filter and make plunging difficult. Aim for a consistency similar to table salt or slightly finer.
Water Temperature Guidelines
Water temperature affects extraction and flavor. Here is a quick guide:
- 175 to 185 degrees Fahrenheit: Lighter, sweeter cup with less acidity.
- 185 to 195 degrees Fahrenheit: Balanced flavor with moderate acidity.
- 195 to 205 degrees Fahrenheit: Bold, rich cup with more intensity.
Using water that is boiling (212 degrees) can scorch the coffee and create a bitter taste. Let your water cool for about thirty seconds after boiling for the best results.
Coffee-to-Water Ratio
The standard ratio is one part coffee to fifteen parts water. This is a great starting point. From there, you can adjust based on your preference:
- Stronger coffee: Use more grounds or less water.
- Milder coffee: Use fewer grounds or more water.
- Espresso-style concentrate: Use a 1-to-8 ratio and add hot water after brewing.
Freshness Counts
Freshly ground coffee always tastes better than pre-ground. If you can, buy whole beans and grind them just before brewing. Store your beans in an airtight container away from light and moisture. This keeps them fresh longer and preserves the coffee taste you love.
Experiment with Brew Times
Brew time is another variable you can adjust. Try brewing for one minute, then one minute thirty seconds, then two minutes. Notice how the flavor changes. Shorter times tend to produce brighter, lighter cups, while longer times bring out deeper, bolder notes. Keeping a simple log of your experiments helps you replicate your favorite brews.
Cleaning and Maintenance
One of the best things about the Aeropress is how easy it is to clean. Unlike machines with lots of parts and hard-to-reach spots, the Aeropress comes apart in seconds. A quick rinse after each use keeps it in great shape for years.
Daily Cleaning Routine
After each brew, follow these simple steps:
- Remove the plunger from the chamber.
- Lift out the used coffee grounds and paper filter.
- Rinse the chamber and plunger with warm water.
- Let everything air dry on a dish rack.
That is it. No special cleaners or complicated procedures. The rubber seal on the plunger is designed to last, but you should check it regularly for wear. If it starts to look cracked or feels loose, a replacement is inexpensive and easy to install.
Keeping your kitchen gear clean is important for both taste and hygiene. Just as you would take care to clean the bottom tray of a toaster oven after regular use, maintaining your Aeropress ensures every cup tastes fresh and delicious.
Deep Cleaning Tips
Once a week or so, give your Aeropress a more thorough cleaning. Remove the rubber seal and wash it separately with warm, soapy water. Check the filter cap for any built-up coffee oils and rinse it well. If you notice any stubborn residue, a mixture of baking soda and warm water works wonders. Let all parts dry completely before reassembling.
It is also a good idea to replace your paper filters regularly. Using the same filter for too long can affect the taste and slow down the brewing process. Keep a stash of spare filters on hand so you never have to skip a morning cup.
Popular Aeropress Recipes to Try
Once you master the basic brew, you can start exploring different recipes. The Aeropress is incredibly versatile and can make many types of coffee drinks. Here are some popular recipes to try at home.
Classic Aeropress Espresso
This is the standard recipe and the best place to start. Use a fine grind, 200-degree water, and a one-to-eight coffee-to-water ratio. Brew for one minute, plunge slowly, and enjoy a rich, concentrated cup. Add hot water or milk to dilute it to your preferred strength.
Aeropress Cold Brew
Cold brew coffee is smooth and naturally sweet. To make it with the Aeropress, use a coarse grind and cold or room-temperature water. Steep the mixture in the fridge for twelve to twenty-four hours, then plunge and serve over ice. The result is a refreshing, low-acidity drink perfect for warm days.
Vanilla Aeropress Latte
Add a splash of vanilla extract or a vanilla bean pod to your brew for a café-style latte at home. Brew your coffee as usual, then add steamed milk and a touch of sweetener. This is a simple way to enjoy a fancy drink without leaving your kitchen.
Herb-Infused Aeropress Coffee
For a unique twist, try adding dried herbs to your coffee. Fresh herbs can be dried using gentle heat, similar to how you would dry basil in an oven at a low temperature. Crushed dried lavender or mint adds a subtle, aromatic flavor to your morning cup. Just a small pinch is enough to transform your brew.
Common Mistakes to Avoid
Even with a simple device like the Aeropress, there are a few common mistakes that can affect your coffee. Avoiding these pitfalls will help you get better results from the start.
- Using the wrong grind size: Too coarse means weak coffee. Too fine means slow brewing and clogging.
- Using boiling water: This scorches the grounds and creates a bitter taste.
- Skipping the rinse: Rinsing the filter removes papery taste and preheats your mug.
- Plunging too fast: A slow, steady plunge produces a smoother cup.
- Not measuring your coffee: Consistency comes from using the same amounts each time.
- Using old coffee grounds: Freshly ground beans make a noticeable difference in flavor.
By paying attention to these details, you will notice a big improvement in every cup you make. The Aeropress is forgiving and flexible, so do not be afraid to experiment and find what works best for you.
Why the Aeropress Is a Great Choice for Home Brewers
The Aerobie Aeropress coffee maker stands out in a crowded market of coffee makers. It combines simplicity, speed, and quality in a way that few other devices can match. You do not need expensive equipment or years of experience to make a great cup.
For people who travel often, the Aeropress is a dream come true. It is small, lightweight, and does not need electricity. You can brew a great cup in your hotel room, at a campsite, or at a friend’s house. It comes with a carrying case in most models, making it easy to pack and go.
Home brewing also saves you money over time. A quality cup of coffee from a café can cost four to six dollars or more. With the Aeropress, your cost per cup drops to just a few cents. Over weeks and months, those savings add up significantly. Plus, you have full control over the quality of beans and the brewing process, which means no hidden ingredients or surprises.
The Aeropress also makes a wonderful gift. It is affordable, practical, and appeals to almost anyone who enjoys coffee. Whether you are buying for a friend, a family member, or treating yourself, it is a choice you will not regret.
Final Thoughts
The Aerobie Aeropress is more than just a coffee maker. It is a gateway to better coffee at home. With its simple design, fast brew time, and incredible versatility, it has earned its place as one of the most popular brewing devices in the world. Whether you prefer a quick morning espresso, a refreshing cold brew, or a flavored latte, the Aeropress delivers.
Start with the basics, follow the steps in this guide, and then let your creativity take over. Adjust the grind, tweak the water temperature, and experiment with brew times until you find your perfect cup. The beauty of the Aeropress is that there is no single right way to use it. Your perfect cup is the one that tastes best to you.
So grab your Aeropress, fresh coffee grounds, and a mug you love. Brew something wonderful today. Once you experience the difference a well-made cup of Aeropress coffee can make, you will wonder how you ever settled for anything less.
Frequently Asked Questions
What is the best grind size for the Aerobie Aeropress?
A fine grind, similar to table salt, works best for the Aeropress. It allows the water to extract flavor efficiently without clogging the filter. If your coffee tastes weak, try grinding a little finer. If it tastes bitter or takes too long to plunge, try a slightly coarser grind.
Can I use the Aeropress to make cold brew coffee?
Yes, absolutely. The Aeropress makes excellent cold brew. Simply add coarse grounds and cold water, steep in the refrigerator for twelve to twenty-four hours, then plunge and serve over ice. The result is a smooth, low-acidity drink perfect for warm weather.
How long does an Aeropress last?
With proper care, an Aeropress can last for years. The rubber seal and filter cap may need occasional replacement, but the main chamber and plunger are built to last. Cleaning your device after every use and storing it properly will extend its lifespan significantly.
Is the Aeropress better than a regular drip coffee maker?
This depends on your preferences. The Aeropress produces a cleaner, bolder cup with more control over strength and flavor. A drip coffee maker is faster for making multiple cups but offers less customization. Many coffee lovers use both, depending on their mood and needs.
Can I reuse coffee grounds in the Aeropress?
You can, but the second brew will be much weaker and less flavorful. It works in a pinch if you want a lighter cup, but for the best taste, always use fresh grounds. The first extraction pulls out the most desirable flavors, so a second round will not deliver the same rich coffee experience.
What is the inverted method, and is it worth trying?
The inverted method involves flipping the Aeropress upside down before brewing. This allows for a longer steep time and gives you more control over the extraction process. Many coffee enthusiasts prefer it because it produces a richer, more full-bodied cup. It is simple to do and well worth experimenting with if you want to explore different brewing styles.