How To Make Shapes In Your Coffee And Impress Everyone
Making shapes in your coffee is easier than you think. With the right tools, milk texture, and pour technique, you can create stunning latte art at home. This guide covers everything from beginner designs to advanced patterns that will wow your friends and family.
There is something magical about picking up a coffee cup and seeing a beautiful design staring back at you. Whether it is a simple heart or an intricate rosetta, coffee shapes turn an everyday drink into a work of art. People love when their coffee looks as good as it tastes. And the good news is that you do not need to be a professional barista to pull off amazing designs at home.
How to make shapes in your coffee is a skill anyone can learn with a little patience and practice. The basics boil down to three things: good espresso, properly frothed milk, and a steady hand. Once you understand these core elements, you will be creating stunning latte art in no time. This guide walks you through every step, from choosing your tools to mastering advanced pour patterns.
Think of coffee art as a fun kitchen project. Just like making nachos at home in the oven lets you customize every layer to your liking, making coffee shapes lets you personalize your drink with creativity and flair. The difference is that coffee art takes seconds to create once you have the basics down.
You might be surprised at how many people do not know that latte art is really just about milk texture and pouring speed. The coffee itself is only half the equation. The foam you create and the way you pour it onto the espresso is what forms the shape. Once you get that down, the possibilities are endless. You can make hearts, tulips, rosettas, and even swans.
So grab your favorite mug, pull up a chair, and let us dive into the world of coffee shape art. By the end of this guide, you will have all the knowledge you need to create beautiful designs every single time.
Key Takeaways
- Latte art starts with milk texture: Properly frothed milk is the foundation of every great coffee shape.
- You don’t need expensive gear: A simple milk frother and a good espresso cup are all you need to begin.
- Practice makes perfect: Start with basic designs like hearts and rosettas before moving to more complex patterns.
- The pour matters most: How you pour the milk determines the shape you create on the surface.
- Temperature is key: Both your espresso and steamed milk need to be at the right temperature for the best results.
- You can pair coffee art with great food: Warm pastries like pita bread warmed in the oven make the perfect companion to your coffee creations.
- Clean cups make clean art: Always start with a clean, preheated cup for the best contrast and design visibility.
📑 Table of Contents
- What Are Coffee Shapes And Why Do They Matter
- The Essential Tools For Making Coffee Shapes
- Mastering The Milk Frothing Technique
- Basic Coffee Shape Designs For Beginners
- Advanced Coffee Art Patterns To Try
- Tips For Perfect Coffee Shapes Every Time
- Common Mistakes And How To Avoid Them
- Final Thoughts On Making Shapes In Your Coffee
What Are Coffee Shapes And Why Do They Matter
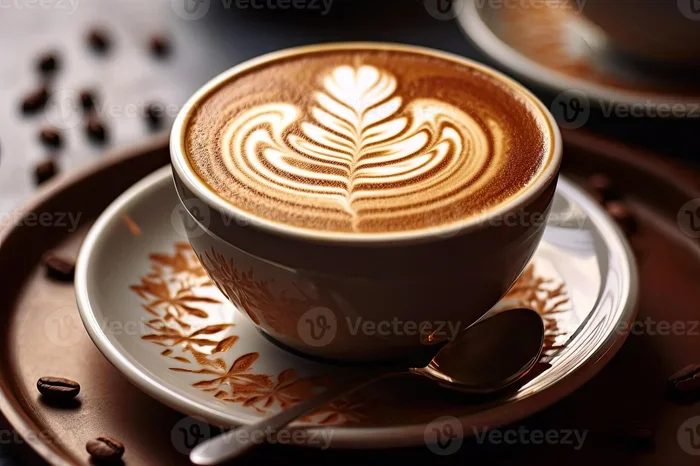
Coffee shapes refer to the designs you create on the surface of your drink using steamed milk and foam. Also known as latte art, this technique has been around for decades but has exploded in popularity thanks to social media and coffee culture. The contrast between the dark espresso crema and the white milk foam creates eye-catching patterns that people love to photograph and share.
But coffee art is not just about looks. The way you texture and pour your milk actually affects the taste and mouthfeel of your drink. Properly frothed milk adds a creamy, velvety texture that balances the boldness of espresso. So when you make shapes in your coffee, you are also improving the drinking experience.
The History Of Coffee Art
Latte art originated in Italy, where espresso drinks have been a staple for centuries. Baristas started experimenting with milk pouring techniques in the 1980s, and the art form quickly spread across Europe and then to the United States. Today, coffee shops around the world compete to create the most intricate designs. You do not need a shop setup to join in, though. With a little practice, your home kitchen becomes your own coffee studio.
Why People Love Coffee Shapes
There is something deeply satisfying about seeing a perfect heart or rosetta appear on the surface of your coffee. It adds a moment of joy to your morning routine. For many people, making coffee shapes is a form of relaxation and creative expression. It also makes for a great impression when guests come over. Imagine serving a cup of coffee with a beautiful tulip design sitting on top. Your guests will be amazed.
The Essential Tools For Making Coffee Shapes
You do not need a lot of equipment to start making shapes in your coffee. In fact, you probably already have most of what you need in your kitchen. Here is a simple list of the essential tools.
An Espresso Machine Or Moka Pot
The foundation of any coffee shape is a good shot of espresso. You need a machine that can produce consistent, high-pressure extraction. A traditional espresso machine works best, but a Moka pot is a great budget-friendly alternative. The key is that your espresso needs a layer of crema on top. Crema is the golden-brown foam that forms on the surface of properly extracted espresso. It provides the contrast you need for your designs to stand out.
A Milk Frother Or Steam Wand
Milk frothing is the most important skill in coffee art. You need to create microfoam, which is milk with tiny, uniform bubbles. This gives you the smooth, creamy texture that flows beautifully into designs. Most espresso machines come with a steam wand. If you do not have one, a handheld milk frother works just as well for beginners.
A Good Coffee Cup
Choose a cup with a wide opening. This gives you more room to pour and control the milk flow. A clear glass cup is ideal for beginners because you can see the layers forming as you pour. Make sure your cup is clean and preheated before you start. Cold cups can cause your foam to collapse too quickly.
A Milk Pitcher
A small stainless steel pitcher with a spout is your best friend for coffee art. The spout gives you control over the milk flow. Start with a pitcher that holds about 12 ounces. As you get more advanced, you can try different sizes and shapes.
Mastering The Milk Frothing Technique
If there is one skill that separates good coffee art from great coffee art, it is milk frothing. Getting the right milk texture takes practice, but once you nail it, everything else falls into place.
Step By Step Milk Frothing
Start with cold milk. Whole milk works best because it froths more easily and creates a richer texture. Pour the milk into your pitcher until it is about one-third full. This leaves room for the milk to expand as you froth it.
Place the steam wand just below the surface of the milk. Turn on the steam and let air into the milk for a few seconds. You should hear a gentle hissing sound. This is called stretching, and it introduces tiny air bubbles into the milk.
Once the milk has expanded by about one-third, lower the wand deeper into the pitcher. Now you are texturing. Move the pitcher in a circular motion to create a swirling effect. This breaks up any large bubbles and creates that smooth microfoam you need for latte art.
Stop steaming when the milk reaches about 150 to 155 degrees Fahrenheit. The pitcher should feel warm but not burning hot to the touch. Overheated milk loses its sweetness and the foam becomes stiff and bubbly.
Common Milk Frothing Mistakes
- Adding too much air: This creates big bubbles instead of microfoam. Your foam will look foamy and rough rather than smooth and creamy.
- Not swirling enough: Large bubbles will sit on top and ruin your design. Always swirl the milk after stretching to break up the bubbles.
- Overheating the milk: Milk that is too hot loses its creamy texture and sweet flavor. Keep it between 150 and 155 degrees.
- Using skim milk: While skim milk froths more volume, it does not create the rich microfoam needed for detailed shapes. Whole milk or oat milk are better choices.
Quick Tip For Better Foam
Tap your pitcher on the counter a few times after frothing. This knocks out any remaining large bubbles. Then give the pitcher a gentle swirl. Your foam should look like wet paint. That is exactly the texture you want for beautiful coffee shapes.
Basic Coffee Shape Designs For Beginners
Now that your milk is ready, it is time to start pouring. Start with the simplest designs and work your way up. Every expert barista started with a heart, and so will you.
The Heart Design
The heart is the most basic coffee shape and the perfect starting point. Pour your espresso into a preheated cup first. Then hold your milk pitcher about one inch above the surface of the coffee. Pour a thin, steady stream of milk into the center of the cup.
As the white foam begins to spread, move the pitcher closer to the surface. Keep pouring steadily. When the foam circle is about three inches wide, quickly pull the pitcher up and through the center of the circle. This motion creates the heart shape at the bottom of your design.
It might take a few tries to get the timing right. That is completely normal. The key is to pour with confidence and not hesitate mid-pour. Once you get the hang of it, the heart will start looking natural and consistent.
The Tulip Design
Once you have mastered the heart, try the tulip. Start by pouring a small circle of foam in the center of the cup. Then pour another circle on top of the first one, slightly smaller. Repeat this two or three times to build up layers. Finish by pulling through the top layer with a quick stream of milk, just like you do with the heart.
The tulip looks impressive but is really just a series of small circles stacked on top of each other. Practice the circle pour separately before combining them into the full design.
The Rosetta Design
The rosetta is a leaf-shaped design that looks stunning and is easier than it looks. Pour a thin stream of milk into the center of the cup and slowly move the pitcher back and forth in a zigzag pattern. As the foam spreads, keep the stream narrow and steady.
When you reach the far edge of the cup, stop the zigzag and pull the stream through the center of the design in one smooth motion. The zigzag creates the leaf veins, and the pull creates the stem. The result is a beautiful, symmetrical leaf pattern floating on your coffee.
Advanced Coffee Art Patterns To Try
Once you have the basics down, you can start experimenting with more complex designs. Advanced coffee art takes more control and timing, but the results are worth it.
The Swan Design
The swan is one of the most impressive coffee shapes you can create. Start by pouring a small circle for the body. Then pour a smaller circle on top and to the side for the head. Use a toothpick or the tip of your pitcher to draw the neck and beak. Finish with a zigzag tail by moving the pitcher quickly across the surface.
The swan requires precise control over your milk flow. Take your time and do not rush. If a mistake happens, simply pour a new base layer and start over. Even experienced barista artists mess up sometimes.
The Layered Design
Layered designs involve building multiple shapes on top of each other. You can create a heart with a tulip on top, or a rosetta with a small circle in the center. The key to layered designs is patience. Each layer needs to set slightly before you add the next one.
Practice each layer separately before combining them. For example, perfect your heart pour first, then practice adding a small circle on top. Once you can do both independently, combining them becomes much easier.
Free Pour Vs Etching
There are two main approaches to coffee art. Free pour means creating the design entirely by pouring the milk. This is the technique we have been discussing. Etching uses a tool like a toothpick or skewer to draw lines and shapes on the foam after pouring.
Etching gives you more control and allows for intricate designs that are hard to achieve with pouring alone. Some baristas use a combination of both techniques. Free pour creates the base shape, and etching adds fine details. Both methods are valid and fun to explore.
Tips For Perfect Coffee Shapes Every Time
Making great coffee shapes consistently takes more than just technique. A few practical tips can make a big difference in your results.
Temperature Matters
Your espresso should be freshly pulled and hot. Your milk should be steamed to the right temperature. When hot espresso meets properly textured milk, the foam sits on the surface and holds its shape. If either the espresso or milk is too cold, the foam will blend in and your design will disappear.
Think of it this way. Just like you need the right oven temperature to get perfect results when you keep burgers warm in the oven, you need the right temperatures for your coffee components to work together properly.
Pour With Confidence
Hesitation is the enemy of good latte art. When you pour, commit to the motion. Wobbly or shaky pours create uneven designs. A steady, confident stream gives you clean lines and smooth shapes. If you need to practice the pouring motion without coffee, try pouring water into a bowl with a thin stream of milk.
Use The Right Milk
Whole milk froths best for coffee art because of its fat content. The fat creates a smooth, creamy microfoam that holds its shape well. Oat milk is a great dairy-free alternative that also froths beautifully. Avoid skim milk for art because it creates large, unstable bubbles that do not hold designs well.
Practice With Water First
Before you use real coffee and milk, practice your pouring technique with water and a splash of milk. This lets you focus on the motion and timing without wasting ingredients. Many professional barista students spend weeks practicing with water before they ever touch an espresso machine.
Keep Your Cups Clean
Any residue or grease on the inside of your cup will interfere with how the foam sits on the surface. Always rinse your cup with hot water before you start pouring. A clean, preheated cup gives you the best contrast and the cleanest designs.
Pair Your Coffee Art With Great Food
Coffee shapes look even better when served alongside delicious food. A warm pastry or fresh bread pairs wonderfully with a beautifully designed latte. If you are hosting a coffee art session, consider warming up some treats in the oven. A warm chicken pot pie from the oven or some toasted bread makes the perfect accompaniment to your coffee creations.
Common Mistakes And How To Avoid Them
Everyone makes mistakes when learning coffee art. The good news is that most errors have simple fixes.
- Foam is too bubbly: You are not swirling enough after steaming. Tap the pitcher on the counter and swirl vigorously to break up large bubbles.
- Design sinks into the coffee: Your espresso crema is too thin. Make sure your espresso is freshly pulled and has a good layer of crema on top.
- Pour is too fast: Slow down. A fast pour overwhelms the crema and mixes the milk into the coffee instead of floating on top.
- Milk is too hot: Overheated milk loses its sweetness and texture. Use a thermometer and stop steaming at 155 degrees Fahrenheit.
- Cup is not preheated: Cold cups cool the milk too quickly, causing the foam to collapse. Rinse your cup with hot water before pouring.
Remember that every mistake is a learning opportunity. Even the most skilled barista started with lopsided hearts and wobbly rosettas. Keep practicing and you will see improvement with every cup.
Final Thoughts On Making Shapes In Your Coffee
Making shapes in your coffee is one of the most rewarding skills you can pick up at home. It combines creativity, technique, and a little bit of patience. The results are not just visually stunning, they also make your coffee taste better by adding that perfect layer of creamy microfoam.
Start with the heart design and build from there. Master the milk frothing technique first, then move on to more complex patterns. Within a few weeks of practice, you will be creating beautiful latte art that rivals what you see in coffee shops. The key is to enjoy the process and not get frustrated with early failures.
Share your creations with friends and family. Coffee art is a wonderful way to connect with people and bring a little extra joy to your daily routine. Whether you are making a simple heart for yourself or an elaborate swan for guests, every cup you create is a small masterpiece.
So go ahead, pull up your espresso, steam your milk, and start pouring. Your coffee shapes journey starts with a single pour. And who knows, you might just discover a hidden talent for latte art that impresses everyone around you.
Frequently Asked Questions
Do I need an expensive espresso machine to make shapes in my coffee?
No, you do not need an expensive machine. A Moka pot or even a strong drip coffee maker can work for beginners. The most important thing is that your coffee has a layer of crema on top. A handheld milk frother is also an affordable alternative to a full espresso machine. Focus on mastering your milk texture first.
What type of milk works best for coffee art?
Whole milk is the best choice for beginners because it froths into a smooth, creamy microfoam easily. Oat milk is a great dairy-free option that also produces excellent foam. Avoid skim milk because it creates large bubbles that do not hold shapes well. Cold milk froths better than warm milk.
How long does it take to learn coffee latte art?
Most people can create a basic heart within a few days of practice. More complex designs like rosettas and swans may take a few weeks. The key is consistent practice. Even 15 minutes a day will improve your skills quickly. Do not get discouraged if your first attempts are not perfect.
Can I make coffee shapes without an espresso machine?
Yes, you can. While espresso provides the best base for coffee art, you can also use strong brewed coffee. The important element is the milk foam. Use a handheld frother or a French press to create foam, then pour it over your coffee. The shapes will not be as defined as with espresso, but you can still create lovely designs.
Why does my foam disappear when I pour it into the coffee?
This usually happens because your espresso crema is too thin or your milk is too hot. Make sure your espresso is freshly pulled with a good layer of crema. Also check that your milk is between 150 and 155 degrees Fahrenheit. Cold or overheated milk will not sit properly on the coffee surface.
Is latte art just for coffee or can I make shapes in other drinks?
You can make shapes in any drink that has a dark base and white foam. Hot chocolate, chai lattes, and even matcha drinks work well for latte art. The same frothing and pouring techniques apply. Experiment with different beverages to find what works best for you.