How To Make the Best Rice Pilaf In The Oven at Home
Making rice pilaf in the oven is one of the easiest and most reliable ways to get perfectly fluffy rice every time. This simple method uses basic ingredients and minimal hands-on effort, making it ideal for busy weeknights. You will learn the exact steps, ingredient ratios, and pro tips to create a delicious rice pilaf that pairs with any meal.
There is something truly satisfying about pulling a perfectly cooked rice pilaf out of the oven. The grains are fluffy, the aroma fills the kitchen, and you did most of the work without standing over a hot stove. Whether you are a beginner cook or a seasoned home chef, learning how to make rice pilaf in the oven is a skill that will serve you well for years to come.
This rice pilaf recipe is straightforward, forgiving, and incredibly versatile. You can keep it simple with just butter and onion, or dress it up with herbs, spices, and roasted vegetables. The oven pilaf cooking method ensures even heat distribution, which means every grain cooks at the same rate. No stirring required, no scorching, no stress.
In this guide, we will walk you through everything you need to know about making oven rice pilaf at home. You will discover the best ingredients, the step-by-step process, and plenty of tips to elevate your baked rice pilaf from good to great. By the end, you will have all the confidence you need to make this one pot rice dish whenever you like.
Key Takeaways
- Oven Rice Pilaf Is Simple: You only need a few pantry staples and an oven to make restaurant-quality rice pilaf at home.
- Fluffy Results Every Time: The right rice-to-liquid ratio and resting time guarantee perfectly separated, tender grains.
- Customizable to Your Taste: Add herbs, spices, vegetables, or protein to create endless flavor combinations.
- Hands-Off Cooking: Once you assemble the ingredients, the oven does all the work for you.
- Works With Any Rice Type: Long grain, basmati, and jasmine rice all produce excellent results in the oven.
- Perfect Side Dish: Baked rice pilaf complements meats, stews, salads, and grilled vegetables beautifully.
📑 Table of Contents
- What Is Rice Pilaf and Why Make It in the Oven?
- Ingredients You Will Need for Perfect Oven Rice Pilaf
- Step-by-Step Instructions for Making Oven Rice Pilaf
- Tips for Making Fluffy and Flavorful Baked Rice Pilaf
- Popular Rice Pilaf Variations to Try
- Common Mistakes to Avoid When Making Rice Pilaf
- Conclusion
What Is Rice Pilaf and Why Make It in the Oven?
Rice pilaf is a seasoned rice dish that is cooked in a flavorful liquid, often with butter, onions, and spices. It originates from Middle Eastern rice and Mediterranean rice traditions, where it has been a staple for centuries. Unlike regular boiled rice, rice pilaf is toasted in fat before simmering, which gives it a rich, nutty flavor and a light, separate texture.
The pilaf cooking method has been passed down through generations across many cultures. From Persian jeweled rice to Greek lemon rice, the core technique remains the same: toast the grain, add a flavorful liquid, and cook until tender. Making rice pilaf in the oven simply adapts this classic method for modern kitchens, where convenience and consistency matter most.
The Oven Pilaf Cooking Method
Making rice pilaf in the oven is a gentle, hands-off approach. The enclosed heat of the oven surrounds the pot evenly, so every grain absorbs the liquid at the same pace. This is very different from stovetop cooking, where hot spots can cause some grains to stick or burn.
The oven rice dish method also frees you up to prepare other parts of your meal while the rice cooks. You can set a timer, walk away, and come back to perfectly cooked fluffy rice. For busy families and meal preppers alike, this is a huge advantage.
How Baked Rice Pilaf Differs From Stovetop Pilaf
Both methods produce delicious results, but there are some notable differences. Stovetop rice pilaf requires more attention and occasional stirring. Oven-baked rice pilaf relies on consistent, ambient heat and needs very little intervention. Here is a quick comparison to help you understand the differences.
| Factor | Oven Rice Pilaf | Stovetop Rice Pilaf |
|---|---|---|
| Attention Required | Minimal | Moderate |
| Heat Distribution | Even from all sides | Bottom heat only |
| Risk of Scorching | Very low | Higher if not stirred |
| Hands-On Time | 10 minutes | 20-25 minutes |
| Best For | Busy days, meal prep | Quick single batches |
| Texture | Uniformly fluffy | Slightly more varied |
As you can see, the oven-baked rice method wins on convenience and consistency. That does not mean stovetop is bad, but for most home cooks, the oven approach is the easier path to perfect pilaf.
Quick Tips for Understanding Rice Pilaf
- Rice pilaf is not the same as plain boiled rice. The toasting step and the use of broth set it apart.
- The word “pilaf” comes from the Persian word “pilav,” which means a seasoned rice dish.
- Baked rice pilaf is often called “oven rice” in many recipe collections.
- This one pot rice method means you cook everything in a single pot, reducing cleanup.
Ingredients You Will Need for Perfect Oven Rice Pilaf
The beauty of rice pilaf lies in its simplicity. You do not need a long grocery list or hard-to-find items. Here is what you will need for a basic baked rice pilaf that serves four to six people.
Core Pilaf Ingredients
- Long grain rice: This is the best rice for pilaf because the grains stay separate and fluffy after baking. Basmati and jasmine work wonderfully too. Avoid short grain rice, which is too starchy for this dish.
- Butter or olive oil: Fat is essential for toasting the rice and adding richness. Butter gives a classic flavor, while olive oil keeps it lighter and more Mediterranean.
- Onions: Finely diced onions create a savory base. They become sweet and translucent as they cook in the butter, forming the flavor foundation of your dish.
- Chicken broth or vegetable broth: Using broth instead of water adds deep flavor to every grain. This is the single biggest upgrade you can make over regular boiled rice.
- Garlic: Minced garlic adds a warm, aromatic depth that pairs beautifully with the rice. Fresh garlic is best, but minced garlic from a jar works in a pinch.
- Salt and pepper: Do not skip seasoning. Proper pilaf seasoning makes all the difference between bland and brilliant. Taste your broth before adding it to the rice.
Optional Add-Ins for Extra Flavor
Once you master the basic rice pilaf recipe, you can experiment with add-ins. Here are some popular options that take your oven rice pilaf to the next level:
- Fresh herbs like parsley, dill, or cilantro
- Toasted almonds or pine nuts for crunch
- Dried cranberries or golden raisins for sweetness
- Saffron threads for a luxurious golden color
- Roasted carrots, peas, or bell peppers
- Cumin, turmeric, or smoked paprika for extra warmth
- A squeeze of fresh lemon juice right after baking
Choosing the Right Rice for Your Oven Rice Pilaf
Not all rice is created equal when it comes to making rice pilaf. Long grain varieties like basmati and jasmine are ideal because they stay fluffy and do not clump together. Short grain rice, which is starchier, tends to become sticky and is better suited for pilaf vs risotto comparisons where stickiness is desired. If you want light, separate grains, stick with long grain.
For the best results, rinse your rice briefly before toasting it. This removes excess surface starch and helps prevent clumping. However, do not rinse for too long or you will wash away too much starch, which can affect the final texture.
Step-by-Step Instructions for Making Oven Rice Pilaf
Now for the fun part. Making rice pilaf in the oven is easy once you know the steps. Follow this guide and you will have a beautiful baked rice pilaf on your table in about 45 minutes.
Step 1: Preheat Your Oven
Start by preheating your oven to 375 degrees Fahrenheit. While the oven warms up, gather your pilaf ingredients and prep your pot. Using a heavy-bottomed oven-safe pot or Dutch oven is important because it distributes heat evenly and can go from stovetop to oven safely without cracking.
Step 2: Sauté the Onions and Garlic
Melt two tablespoons of butter in your pot over medium heat. Add one finely diced onion and cook for three to four minutes until it turns soft and translucent. Stir in two cloves of minced garlic and cook for another 30 seconds until fragrant. This step builds the flavor foundation of your aromatic rice dish. Do not rush this part. Properly sautéed onions and garlic create a deep, savory base that elevates the entire rice pilaf.
Step 3: Toast the Rice
Add one and a half cups of long grain rice to the pot. Stir it around so every grain gets coated in the butter and onion mixture. Toast the rice for two to three minutes, stirring occasionally. You will notice the grains become slightly translucent around the edges. This toasting step is what gives rice pilaf its signature nutty flavor and helps the grains stay separate during baking. Think of it as the secret weapon of great pilaf seasoning.
Step 4: Add the Liquid and Seasonings
Pour in three cups of chicken broth or vegetable broth. Add one teaspoon of salt, half a teaspoon of black pepper, and any other seasonings you like. Stir everything together once, then bring the mixture to a gentle boil on the stovetop.
This is also a great time to add any optional ingredients like saffron, dried herbs, or a bay leaf. The liquid should just cover the rice. If it seems too low, add a small amount of extra broth. Getting the liquid ratio right is one of the most important rice cooking tips you will ever learn.
Step 5: Cover and Transfer to the Oven
Once the liquid reaches a boil, cover the pot tightly with a lid. Place the covered pot into the preheated oven. Set a timer for 25 to 30 minutes. The trapped steam inside the pot does the cooking, and the oven provides gentle, consistent heat from all sides.
Resist the urge to open the lid during this time. Every time you lift the lid, you release steam and can affect the cooking process. Trust the method and let the oven work its magic. This is what makes oven-baked rice so foolproof compared to stovetop methods.
Step 6: Rest and Fluff
When the timer goes off, carefully remove the pot from the oven. Keep the lid on and let the oven rice dish rest for five to ten minutes. This resting period allows the remaining moisture to be fully absorbed by the rice. After resting, remove the lid, fluff the rice gently with a fork, and serve.
Pro tip: if you find the rice is still a bit firm after the cooking time, cover it back up and let it rest for an additional five minutes. The residual heat will finish the job without drying out the grains. This resting step is one of the most overlooked rice cooking tips but it makes a real difference in texture.
Expert Insights on Perfect Oven Rice Pilaf
Many professional cooks agree that the most overlooked step in making rice pilaf is resting the rice after it comes out of the oven. The carryover cooking during the rest period finishes the job and ensures a uniform texture throughout. Another expert tip is to add a splash of lemon juice or a bay leaf to the cooking liquid. Both ingredients add a subtle layer of flavor that elevates the entire dish without overpowering it.
If you are cooking for a crowd, you can double or even triple the recipe. Just make sure your pot is large enough to allow the rice to expand. A good rule of thumb is to use a pot that is at least four quarts in size for a double batch. This gives the rice enough room to cook evenly without becoming crowded.
Tips for Making Fluffy and Flavorful Baked Rice Pilaf
Getting great results with rice pilaf comes down to a few key details. These rice cooking tips will help you nail it every single time.
Quick Tips for Better Rice Pilaf
- Always use broth: Water simply cannot compete with the depth of flavor that broth brings. If you want vegetarian rice pilaf, use vegetable broth. The taste difference is remarkable.
- Toast the rice properly: Do not skip the toasting step. It is the secret to achieving that distinct nutty taste and separate grain texture that defines great baked rice pilaf.
- Keep the lid tight: Use a lid that fits snugly. If your lid is loose, cover the pot with aluminum foil first, then place the lid on top. This traps every bit of steam inside.
- Measure the liquid carefully: A good ratio is one part rice to two parts liquid. Too little liquid and the rice will be undercooked. Too much and it will be mushy.
- Let it rest: The five to ten minute resting period after baking is not optional. It allows the grains to firm up and become perfectly fluffy.
- Fluff with a fork, not a spoon: A fork separates the grains gently without breaking them. A spoon tends to mash the rice together and releases extra starch.
- Add butter at the end: Stirring in a small pat of butter after fluffing adds a beautiful shine and extra richness to your buttered rice pilaf.
Making Fluffy Rice Every Time
The key to fluffy rice is controlling the moisture. When you use the oven method, the even heat prevents the bottom from drying out while the top stays perfectly steamed. The tight lid keeps all the steam circulating inside, which is exactly what aromatic rice varieties like basmati need to reach their full potential.
Another trick is to let the rice sit covered for a full ten minutes after baking. This extra rest time allows any remaining liquid to be absorbed completely. When you finally fluff it with a fork, the grains should be separate, light, and tender from end to end.
Popular Rice Pilaf Variations to Try
Once you have mastered the basic rice pilaf recipe, you can explore all kinds of delicious variations. Rice pilaf is a canvas for your creativity, and every culture has its own take on this beloved dish.
Mediterranean Rice Pilaf
For a Mediterranean twist, add chopped sun-dried tomatoes, Kalamata olives, crumbled feta cheese, and fresh oregano. This version pairs beautifully with grilled fish or chicken and makes a wonderful side dish recipe for summer dinners. The olive oil and lemon juice in this variation give it a bright, fresh flavor that everyone loves.
Middle Eastern Aromatic Rice
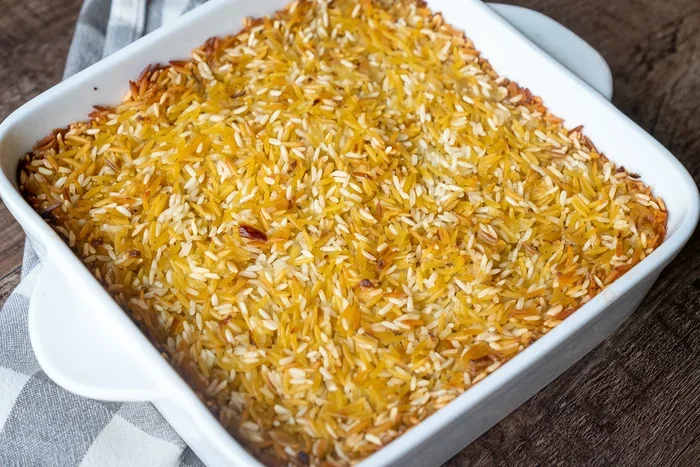
Inspired by traditional Middle Eastern rice dishes, this variation uses saffron, cinnamon, and allspice. Add slivered almonds and golden raisins for a sweet and savory combination that is absolutely stunning alongside roasted lamb or kebabs. This style of rice pilaf often includes a crispy bottom layer called “tahdig,” which you can achieve by broiling the finished pilaf for two to three minutes.
Herb Garden Rice Pilaf
Stir in a generous handful of fresh dill, parsley, and chives right after the rice finishes baking. This bright, herby version is perfect alongside roasted chicken, roasted vegetables, or a simple green salad. The fresh herbs add a pop of color and fragrance that makes the dish look and taste restaurant-quality.
Spicy Rice Pilaf with Roasted Vegetables
Toss diced bell peppers, zucchini, and red onion onto the rice before baking. Add a teaspoon of cumin and a pinch of cayenne pepper for heat. The vegetables roast alongside the rice, creating a complete one pot rice meal with minimal cleanup. This variation is perfect for meal prep because it stores well and reheats beautifully.
Common Mistakes to Avoid When Making Rice Pilaf
Even experienced cooks can run into trouble when making rice pilaf. Here are the most common pitfalls and how to avoid them so your oven rice dish turns out perfectly every time.
Using the Wrong Rice
Short grain or instant rice will not give you the results you want. These varieties are too starchy or too thin to hold up to the pilaf cooking method. Always use long grain rice for the best baked rice pilaf with separate, fluffy grains. If you only have medium grain rice available, reduce the liquid slightly to compensate for the higher starch content.
Lifting the Lid Too Often
Every time you open the oven to check on the rice, you release precious steam. This steam is what cooks the rice evenly. Trust the process, set your timer, and keep that lid on until the timer goes off. If you are really curious, you can quickly peek through the oven window instead of opening the door.
Skipping the Toasting Step
Some recipes skip straight to adding the liquid, but toasting the rice in butter is what sets rice pilaf apart from regular boiled rice. That toasting step develops flavor and helps each grain maintain its structure during baking. It only takes two to three minutes but makes a noticeable difference in the final result.
Not Enough Liquid
If you use too little broth, the rice will be crunchy and unevenly cooked. Stick to the recommended ratio of one and a half cups of rice to three cups of liquid. You can always adjust in future batches based on your preference. Remember that different rice varieties absorb liquid at different rates, so you may need to experiment slightly.
Overlooking Seasoning
Plain rice needs salt and pepper, but rice pilaf thrives on seasoning. Taste your broth before adding it to the rice, and adjust the salt accordingly. A well-seasoned oven rice dish makes all the difference. Keep in mind that the broth will reduce slightly during baking, so season a touch more generously than you normally would.
Conclusion
Making rice pilaf in the oven is one of the easiest and most rewarding cooking techniques you can learn. With just a handful of ingredients and about 45 minutes of your time, you can create a dish that looks and tastes like it came from a restaurant kitchen. The gentle, even heat of the oven produces fluffy rice with a rich, nutty flavor that stovetop methods simply cannot match.
Remember to toast your rice, use flavorful broth, keep the lid tight, and let the rice rest before serving. These small steps make a huge difference in the final result. Once you try this oven rice pilaf method, you will never go back to stovetop rice again.
Experiment with different herbs, spices, and add-ins to make this rice pilaf recipe your own. Whether you keep it classic or get creative with Mediterranean rice or Middle Eastern rice flavors, the oven pilaf cooking method will deliver consistent, delicious results every time. So preheat that oven, gather your pilaf ingredients, and enjoy the process of making one of the best side dish recipes you will ever prepare.
Frequently Asked Questions
Can I use instant rice for oven rice pilaf?
It is not recommended. Instant rice is pre-cooked and dried, so it will not absorb liquid the same way long grain rice does. The result will be mushy and lacking the nutty flavor that comes from toasting fresh rice. Stick with long grain, basmati, or jasmine rice for the best baked rice pilaf.
How long does oven rice pilaf last in the fridge?
Properly stored in an airtight container, rice pilaf keeps well in the refrigerator for up to four to five days. Reheat it in the oven at 300 degrees Fahrenheit with a damp paper towel over the top to restore moisture. Avoid reheating it in the microwave for too long, as this can dry out the grains.
Can I make rice pilaf in a regular pot?
Yes, as long as the pot is oven-safe and has a tight-fitting lid. A heavy-bottomed Dutch oven is ideal because it distributes heat evenly. If your pot does not have a lid that seals well, you can cover it with aluminum foil first and then place the lid on top to trap all the steam inside.
What is the best broth to use for rice pilaf?
Chicken broth is the most popular choice because it adds a rich, savory depth to the rice. However, vegetable broth works wonderfully for vegetarian rice pilaf, and beef broth creates a heartier flavor for winter dishes. You can also use mushroom broth for an earthy, umami-rich option that pairs beautifully with roasted vegetables.
Can I freeze baked rice pilaf?
Absolutely. Rice pilaf freezes very well for up to three months. Let it cool completely, then pack it into airtight containers or freezer bags. When you are ready to eat it, thaw it overnight in the refrigerator and reheat in the oven at 325 degrees Fahrenheit until warmed through. Adding a splash of broth before reheating helps restore the fluffy texture.
Is rice pilaf the same as pilaf?
Yes, “rice pilaf” and “pilaf” refer to the same dish. The term “pilaf” is the broader category, and “rice pilaf” specifies that rice is the grain being used. The technique involves toasting the grain in fat, then cooking it in a seasoned liquid. Whether you call it rice pilaf or just pilaf, the oven method produces consistently excellent results.