How To Toast A Sub In The Oven For Perfect Crispiness
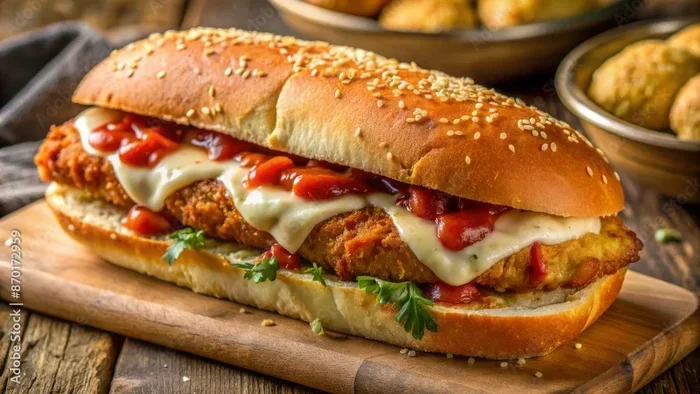
Learning how to toast a sub in the oven is the easiest way to get a crispy, warm sandwich at home. This guide covers everything from the right oven temperature to wrapping techniques that keep your sub moist inside while the outside turns golden and crunchy. Whether you prefer a classic Italian sub or a loaded hoagie, these tips will help you achieve perfectly toasted sub sandwich results every single time.
There is something magical about a warm, crispy sub sandwich straight from the oven. The crunch of the bread gives way to melted cheese, savory meats, and fresh veggies. It is comfort food at its finest. If you have ever wondered how to toast a sub in the oven and get restaurant-quality results, you are in the right place.
Toasting a sub in the oven is simple, but there are a few tricks that make all the difference. The right temperature, the right wrapping method, and the right timing can turn an ordinary sandwich into something extraordinary. This guide walks you through every step of the process. You will learn the best oven settings, how to prep your sub, and how to avoid common mistakes that ruin a good sandwich.
Whether you are feeding a family, prepping lunches for the week, or just craving a crispy oven toasted sub, this article has you covered. Let us dive in and make your next sub sandwich the best one yet.
Key Takeaways
- Right Temperature Matters: Preheat your oven to 375°F for the best toast without burning the bread.
- Foil Wrapping Is Key: Wrapping your sub in aluminum foil traps steam and keeps the inside moist while the outside crisps up.
- Timing Is Everything: Toast for 10-15 minutes depending on thickness and how crispy you like it.
- Broiler Finishing: Switch to the broiler for the last 1-2 minutes for extra crispy edges and melted cheese.
- Prep Before Toasting: Add cheese and sauces before toasting so they melt perfectly into the sub.
- Bread Choice Counts: Use a sturdy sub roll or hoagie bread that can hold up to oven heat.
- Let It Rest: Rest your toasted sub for 1-2 minutes before cutting to keep everything inside.
📑 Table of Contents
- Why Toast A Sub In The Oven?
- What You Need Before You Start
- Step By Step: How To Toast A Sub In The Oven
- Oven Temperature And Timing Guide
- Tips For The Crispiest Sub Possible
- Common Mistakes To Avoid
- Variations And Creative Ideas
- Toaster Oven Vs Regular Oven For Toasting Subs
- How To Store And Reheat Leftover Subs
- Conclusion
Why Toast A Sub In The Oven?
You might be thinking, why not just use a toaster or microwave? Those tools work in a pinch, but they do not give you the same results. Toasting a sub in the oven offers benefits that no other method can match.
First, the oven heats evenly. A microwave makes bread soggy, and a toaster can burn the outside while leaving the inside cold. The oven wraps the entire sub in gentle, consistent heat. This melts the cheese perfectly and warms the fillings without drying everything out.
Second, the oven gives you that signature crispy exterior. The crispy sub sandwich texture comes from the dry heat of the oven. The bread turns golden and slightly crunchy while staying soft on the inside. It is the perfect contrast of textures that makes a toasted sub so satisfying.
Third, the oven gives you control. You can adjust the temperature, the time, and the wrapping method to get exactly the results you want. Want extra crispy edges? Broil for a minute. Want a softer toast? Wrap tightly in foil. The oven lets you customize every bite.
The Science Behind Toasting Bread
When bread heats up, the moisture inside starts to evaporate. This creates that satisfying crunch on the outside. At the same time, the cheese and fillings warm up and become gooey and delicious. The Maillard reaction, which is the chemical process that browns food, gives the bread that golden color and rich flavor.
This is why oven toasting works so well for sub sandwich crispy results. The dry heat removes just enough moisture from the bread surface to create a crunch, while the foil or butter paper keeps the inside from drying out too much. It is a balance between crisp and soft, and the oven handles it beautifully.
What You Need Before You Start
Before you start toasting a sub in the oven, gather everything you need. Having your ingredients and tools ready makes the process smooth and fast. Here is what you will need.
Ingredients For The Perfect Sub
- A good sub roll or hoagie bread: Choose a sturdy roll that can hold up to oven heat. A crusty Italian bread works best for oven toasted sub results.
- Cold cuts or protein: Salami, ham, turkey, roast beef, or chicken all work great.
- Cheese: Provolone, American, mozzarella, or cheddar melt beautifully in the oven.
- Veggies: Lettuce, tomato, onion, bell peppers, and pickles add freshness and crunch.
- Condiments: Mustard, mayo, Italian dressing, or oil and vinegar.
- Spices and extras: Oregano, garlic powder, salt, pepper, or hot pepper flakes.
Tools You Will Need
- Aluminum foil: This is the most important tool for wrapping your sub before toasting.
- A baking sheet or oven-safe dish: Something flat that fits in your oven.
- An oven or toaster oven: A regular oven works great, but a toaster oven is perfect for single subs.
- A knife and cutting board: For prep work and slicing your finished sub.
- A spatula: Helpful for transferring the sub in and out of the oven safely.
Choosing The Right Bread
The bread you choose matters a lot for how to toast a sub in the oven. Soft white bread will get too mushy. A very thin baguette might dry out quickly. The best choice is a sub roll or hoagie bread with a slightly thick crust. Italian bread rounds or submarine rolls work perfectly. They hold their structure in the oven and give you that satisfying chew after toasting.
If you want an extra crispy result, try using a crispy bread sub roll from a bakery. These are often slightly denser and hold up much better to oven heat than soft supermarket bread. The crust toasts beautifully and gives you that restaurant-quality bite.
Step By Step: How To Toast A Sub In The Oven
Now that you have everything ready, let us get into the actual process. Follow these steps for a perfectly oven toasted sub every time.
Step 1: Preheat Your Oven
Start by preheating your oven to 375°F. This is the sweet spot for toasting a sub. The temperature is hot enough to crisp the bread but not so hot that it burns. If you are using a toaster oven, set it to 375°F as well. Let the oven fully heat up before you put the sub in.
Preheating is an important step that many people skip. Putting a cold sub in a cold oven leads to uneven toasting. The bread might get soggy instead of crispy. Always give your oven at least 5-10 minutes to reach the right oven temperature for sub toasting.
Step 2: Prep Your Sub
While the oven heats up, build your sub. Start with the bread and layer on your cold cuts, cheese, and veggies. Add condiments like mustard or mayo directly to the bread. This helps the flavors soak in during toasting.
Here is a helpful tip: add the cheese before toasting. The heat will melt it perfectly and act as a glue that holds the sub together. If you add lettuce and tomato after toasting, they stay fresh and crunchy, which gives you the best texture contrast.
Step 3: Wrap The Sub In Foil
Take a sheet of aluminum foil and wrap the sub tightly. The foil creates a sealed environment that traps steam. This steam keeps the inside of the sub warm and moist while the outside toasts in the dry oven heat.
Make sure there are no gaps in the foil. If steam escapes, the inside will dry out. If you prefer a crunchier result, you can wrap the sub loosely or leave the top partially open. This lets more heat reach the bread surface and creates extra crispy edges.
Step 4: Place On A Baking Sheet
Put the wrapped sub on a baking sheet or oven-safe dish. This makes it easy to transfer in and out of the oven. If you are toasting multiple subs at once, space them out on the baking sheet so the heat circulates evenly around each one.
For an extra touch, you can line the baking sheet with parchment paper. This prevents any cheese or condiments from sticking and makes cleanup a breeze.
Step 5: Toast In The Oven
Place the baking sheet on the middle rack of your oven. Set a timer for 10 minutes. After 10 minutes, check the sub. The bread should be lightly golden and the cheese should be melted. If you like a more crispy sub sandwich with deeper browning, toast for an additional 2-3 minutes.
For a thicker sub or one loaded with heavy fillings, you may need to go up to 15 minutes. Just keep an eye on it to make sure the bread does not burn. Every oven is different, so the first time you try this, stay nearby and check frequently.
Step 6: Broil For Extra Crispiness
This is the secret step that takes your toasted sub in the oven to the next level. After the initial toasting, switch your oven to the broil setting. Remove the foil from the top of the sub and place it back in the oven for 1-2 minutes.
The broiler delivers intense direct heat from above. This crisps up the top layer of bread and gives the cheese those beautiful bubbly, browned spots. Watch it closely during broiling. It only takes a minute or two, and bread can go from perfectly crispy to burnt very quickly.
Step 7: Rest And Serve
Take the sub out of the oven and let it rest for 1-2 minutes. This resting period allows the fillings to set slightly, which makes the sub easier to cut and eat. The cheese firms up just enough to hold everything together.
Unwrap the foil carefully, as steam will escape. Add any cold toppings like fresh lettuce, tomato, or pickles at this point. Slice the sub diagonally and serve immediately. A warm, crispy oven toasted sub is best enjoyed right away while the bread is still crunchy.
Oven Temperature And Timing Guide
Getting the right oven temperature for sub and timing is crucial. Here is a quick reference guide to help you dial in the perfect toast every time.
| Sub Type | Temperature | Time (Foil Wrapped) | Broil Time |
|---|---|---|---|
| Thin Sub (6 inch) | 375°F | 8-10 minutes | 1 minute |
| Standard Sub (12 inch) | 375°F | 10-12 minutes | 1-2 minutes |
| Thick Loaded Sub (12+ inch) | 375°F | 12-15 minutes | 2 minutes |
| Toaster Oven Sub (12 inch) | 375°F | 10-12 minutes | 1 minute |
| Veggie Sub (Light Fillings) | 375°F | 8-10 minutes | 1 minute |
These times are guidelines. Your oven may vary, so always check the sub a couple of minutes before the recommended time. You want the bread to be golden brown, not dark brown or burnt. The cheese should be fully melted and slightly bubbly on top.
Tips For The Crispiest Sub Possible
Want to take your crispy sub sandwich game to the next level? Here are some expert tips that make a huge difference.
Brush The Bread With Olive Oil
Before wrapping the sub in foil, brush the outside of the bread lightly with olive oil. This adds a layer of fat that promotes browning and crispiness. The result is a sub with a richer flavor and a more golden, crunchy crust. Use just a small amount a little goes a long way.
Use Butter Instead Of Mayo
Spread a thin layer of butter on the outside of the bread before toasting. This is a technique used by sandwich shops to get that perfectly crispy exterior. The butter fries the bread slightly as it heats up, creating a texture that is almost like a panini but with the shape of a classic sub.
Toast The Bread Separately First
If you really love crispy bread, try toasting the sub roll on its own for 3-4 minutes before adding the fillings. This gives the bread a head start on crisping. Then wrap the filled sub in foil and toast for the full time. The result is a sub with an extra crunchy shell and a perfectly warm, melty interior.
Do Not Overfill The Sub
It is tempting to load up the sub with everything, but overfilling can cause problems. Too many fillings can make the sub soggy and prevent the bread from toasting evenly. Keep the fillings moderate and focus on quality over quantity. A well-balanced sub toasts much better than an overstuffed one.
Use The Right Cheese
Not all cheeses melt the same way. American cheese melts quickly and smoothly, making it ideal for oven toasting. Provolone and mozzarella also melt beautifully. Hard cheeses like Parmesan or aged cheddar do not melt as well and can leave a greasy texture. Choose a cheese that melts easily for the best oven toasted sub experience.
Common Mistakes To Avoid
Even a simple task like how to toast a sub in the oven has some pitfalls. Avoid these common mistakes to get the best results every time.
Skipping The Preheat
Putting a sub in a cold oven leads to uneven heating. The bread steams instead of toasting, which makes it soggy. Always preheat your oven to the right temperature before placing the sub inside.
Using The Wrong Wrap
Wrapping the sub too tightly in foil can trap too much steam and make the bread soft instead of crispy. Wrapping too loosely lets the heat escape and dries out the fillings. Find the right balance by wrapping snugly but not crushing the sub.
Toasting Too Long
Overtoasting is a common mistake that ruins a perfectly good sub. The bread can go from golden to burnt in just a couple of minutes. Set a timer and check the sub frequently. It is always better to under toast and add a minute or two than to over toast and end up with a burnt, bitter sub.
Adding Cold Toppings Before Toasting
Adding cold ingredients like lettuce, pickles, and cold sauces before toasting can make the sub watery. The moisture from these ingredients can soak into the bread and prevent it from crisping. Add cold toppings after toasting for the best texture.
Ignoring The Broiler
Many people skip the broiling step and miss out on that extra level of crispiness. The broiler adds a finishing touch that makes the bread look and taste amazing. Do not ignore this simple step if you want a truly crispy sub sandwich.
Variations And Creative Ideas
Once you master the basic how to toast a sub in the oven technique, you can get creative with different variations. Here are some ideas to try.
The Classic Italian Sub
This is the most popular oven toasted sub variation. Layer salami, capicola, provolone, lettuce, tomato, onion, and Italian dressing. Wrap in foil and toast at 375°F for 10-12 minutes. Broil for 1 minute for extra crispiness. The result is a warm, melty, flavorful sub that tastes like it came from a deli.
The Philly Cheesesteak Sub
Use thinly sliced steak, sautéed onions, and provolone cheese. Toast the sub at 375°F for 12 minutes. The beef heats through and the cheese melts into a delicious blanket over the meat. This is a hearty option that works beautifully in the oven.
The Veggie Delight
For a lighter option, use roasted peppers, sautéed mushrooms, spinach, and mozzarella. Brush the bread with olive oil before toasting. The veggies warm up nicely and the cheese adds richness. This is a great toasted sub sandwich for vegetarians or anyone looking for a fresher option.
The Turkey Club Sub
Layer turkey, bacon, lettuce, tomato, and mayo. Toast at 375°F for 10 minutes. The bacon gets slightly crispy in the oven and the turkey warms through. This is a hearty sub that works great for lunch or dinner.
Toaster Oven Vs Regular Oven For Toasting Subs
You can toast a sub in both a regular oven and a toaster oven. Both work well, but there are some differences to consider.
A toaster oven is great for toasting a single sub or a half sub. It heats up faster and uses less energy. The smaller space means the heat surrounds the sub more directly, which can create a crispier result in less time. If you are making one sub for yourself, a toaster oven is the more efficient choice.
A regular oven is better when you need to toast multiple subs at once. The larger space allows you to fit several subs on a baking sheet. The heat distribution is also more even in a full-size oven, which means more consistent results. If you are feeding a family or a group of friends, use the regular oven.
For the best crispy bread sub results in a toaster oven, reduce the toasting time by 1-2 minutes since the heat is more concentrated. Keep an eye on the sub as it toasts because toaster ovens can run hotter than regular ovens.
How To Store And Reheat Leftover Subs
If you have leftover subs, you can reheat them in the oven to restore the crispy texture. Wrap the sub in foil and place it in a 350°F oven for 5-8 minutes. This reheats the fillings and refreshes the bread crust. Avoid using the microwave for leftovers, as it will make the bread soggy.
For meal prep, you can build subs ahead of time and store them wrapped in foil in the refrigerator. When you are ready to eat, just pop them in the oven at 375°F for 10-12 minutes. This is a great way to have warm, crispy subs ready for lunch without any last-minute effort.
Conclusion
Learning how to toast a sub in the oven is one of the simplest and most rewarding kitchen skills you can develop. The process is easy, the results are delicious, and the customization options are endless. From the right temperature to the wrapping technique to the broiling finish, every step contributes to that perfect crispy sub sandwich you crave.
Now that you have all the tips and techniques, it is time to put them into practice. The next time you build a sub at home, skip the microwave and let the oven do its magic. You will notice the difference immediately in texture, flavor, and overall satisfaction. A perfectly oven toasted sub is one of life’s simple pleasures, and now you know exactly how to make it happen every single time.
Grab your favorite sub roll, load it up with your go-to fillings, and give oven toasting a try. Your taste buds will thank you. Enjoy that warm, crispy, melty goodness and share the technique with friends and family. Once you start making oven toasted subs at home, you will never go back to soggy, microwaved sandwiches again.
Frequently Asked Questions
What is the best temperature to toast a sub in the oven?
The best temperature to toast a sub in the oven is 375°F. This temperature provides the perfect balance of crispy bread and melted fillings without burning the outside. Preheat your oven fully before placing the sub inside for even toasting.
How long should you toast a sub in the oven?
A standard 12-inch sub should be toasted for 10-12 minutes at 375°F when wrapped in foil. Thicker subs or those with heavy fillings may need up to 15 minutes. Always check the sub a few minutes before the timer goes off to prevent burning.
Can you toast a sub without foil in the oven?
Yes, you can toast a sub without foil, but the results will be different. Without foil, the bread will crisp up more quickly and evenly, but the inside may dry out faster. For the best balance of crispy outside and moist inside, wrapping in foil is recommended.
Is it better to toast a sub in a toaster oven or a regular oven?
A toaster oven works great for a single sub and heats up faster. A regular oven is better for toasting multiple subs at once. Both produce excellent crispy results, so choose based on how many subs you need to make.
What type of bread is best for oven toasting?
A sturdy sub roll or hoagie bread with a slightly thick crust works best for oven toasting. Italian bread rounds and submarine rolls hold up well to the heat and give you the best texture. Avoid very soft or thin breads as they can get soggy or burn easily.
Can you add cheese before toasting a sub in the oven?
Yes, adding cheese before toasting is actually recommended. The heat melts the cheese perfectly and helps bind the fillings together. Hard cheeses like provolone, mozzarella, and American melt best in the oven for a delicious, gooey finish.
=== META TITLE ===
How To Toast A Sub In The Oven | Crispy Results Guide
=== SEO TITLE ===
How To Toast A Sub In The Oven For Perfect Crispiness
=== URL SLUG ===
/how-to-toast-a-sub-in-the-oven