How To Dry Basil In Microwave Oven Quickly At Home
Drying basil in a microwave oven is the fastest and easiest way to preserve your fresh harvest. With just a few simple steps, you can have flavorful dried basil ready in minutes. This guide walks you through every detail from prep to storage so you never waste a single leaf.
If you have ever grown basil or brought home a fresh bunch from the garden, you know how wonderful this herb smells and tastes. But basil wilts fast. Within just a few days, those beautiful green leaves start to turn brown and lose their flavor. That is a real shame when you have worked hard to grow or buy quality fresh basil.
The good news is that you do not need a fancy dehydrator or a complicated setup to preserve your basil. Your microwave oven can do the job quickly and easily. How to dry basil in microwave oven is a question many home cooks ask, and the answer is simpler than you might think. In just a few minutes, you can turn fresh leaves into dried herb that lasts for months.
This guide covers everything you need to know about drying basil in the microwave. From picking the right leaves to storing your finished product, you will find clear steps and helpful tips along the way. Whether you are a beginner cook or someone who grows basil in their backyard, this method will save you time and money. Let us get started.
Key Takeaways
- Microwave drying is the quickest method: You can dry fresh basil in just 2 to 4 minutes using your microwave oven.
- Proper prep matters: Washing, drying, and removing stems before microwaving ensures the best results.
- Storage keeps flavor fresh: Airtight containers and cool dark places extend the shelf life of dried basil for up to a year.
- Avoid common mistakes: Overheating and skipping the preparation step are the top errors people make.
- Dried basil has many uses: From cooking to seasoning blends, your preserved herb adds flavor year-round.
- No special equipment needed: Just a microwave, parchment paper, and fresh basil leaves are all you require.
📑 Table of Contents
- Why Drying Basil In The Microwave Is A Great Idea
- How To Prepare Fresh Basil For Microwave Drying
- Step By Step Guide To Drying Basil In Microwave Oven
- Best Microwave Settings And Tips For Perfect Results
- How To Store Dried Basil And Keep It Fresh
- Comparison: Microwave Drying Vs Other Methods
- Creative Ways To Use Your Dried Basil
- Frequently Asked Questions About Drying Basil In The Microwave
- Conclusion
Why Drying Basil In The Microwave Is A Great Idea
Before we jump into the steps, it helps to understand why microwave drying has become so popular. Many people still use traditional methods like air drying or oven baking. But the microwave offers some clear advantages that make it stand out.
Speed And Convenience
The biggest benefit of microwave drying basil is speed. Air drying can take one to two weeks. Oven drying usually takes one to three hours. But a microwave oven can dry your basil leaves in just two to four minutes. That is incredibly fast. If you need dried herbs right now for a recipe, the microwave is your best friend.
Think about it. You just finished cooking and realize you need dried basil for tomorrow’s dinner. Instead of planning ahead for days, you can dry your fresh basil in under five minutes. That kind of convenience is hard to beat.
Preserving Fresh Flavor And Nutrients
Another great reason to use the microwave is flavor preservation. When you dry herbs slowly at low heat, the essential oils that give basil its strong aroma can escape. But microwave drying works so fast that those oils stay locked inside the leaves. This means your dried basil will taste much closer to fresh basil compared to slower methods.
Microwaving also helps retain more nutrients. Vitamins like vitamin K and vitamin A are sensitive to heat and air. The shorter drying time means less nutrient loss. So you are not just preserving flavor. You are also keeping more of the healthy compounds that make basil so good for you.
No Special Equipment Required
You do not need to buy a food dehydrator or a special herb drying kit. Almost every household has a microwave oven. All you need is a microwave-safe plate, some parchment paper, and your fresh basil. This makes drying basil at home accessible to everyone regardless of budget or kitchen setup.
How To Prepare Fresh Basil For Microwave Drying
Preparation is the most important step in the whole process. If you skip or rush this part, your results will not be as good. Taking a few extra minutes to prep your basil properly makes a huge difference in the final quality of your dried herb.
Choosing The Right Basil
Start with the freshest basil you can find. Look for leaves that are bright green and free from brown spots or yellow edges. If you are growing your own, pick the leaves in the morning after the dew has dried but before the sun gets too hot. Morning harvest gives you the best flavor and oil content.
Avoid using wilted or damaged leaves. They will not dry well and may have an off taste. If you bought basil from a store, try to use it within a day or two of purchasing for the best results. The fresher the herb, the better your dried basil will turn out.
Washing And Drying The Leaves
Rinse your basil leaves gently under cool running water. This removes any dirt, insects, or residue. Be careful not to bruise the leaves. After rinsing, pat them dry with a clean towel or paper towel.
Here is a key point. The leaves must be completely dry before you put them in the microwave. Any moisture left on the leaves will steam instead of dry. This can make your basil soggy and reduce its flavor. Take the time to thoroughly dry each leaf. It is worth the extra effort.
Removing Stems And Sorting
Pinch or cut the leaves off the stems. You can discard the stems or save them for making stock. Sort through the leaves and remove any that are damaged or discolored. Only use the best leaves for drying. This small sorting step ensures that every piece of your final product is high quality.
Quick Tip: Do not tear the leaves into small pieces before drying. Keep them whole for the best results. You can crumble them later once they are fully dried.
Step By Step Guide To Drying Basil In Microwave Oven
Now that your basil is prepped, it is time to actually dry it. Follow these steps carefully for the best outcome. The process is simple but paying attention to details makes all the difference.
Step One: Set Up Your Workspace
Place a microwave-safe plate on your counter. Lay a sheet of parchment paper on top of the plate. The parchment paper prevents the leaves from sticking to the plate and makes cleanup much easier. You can also use a paper towel, but parchment paper works better because it absorbs moisture more evenly.
Step Two: Arrange The Leaves
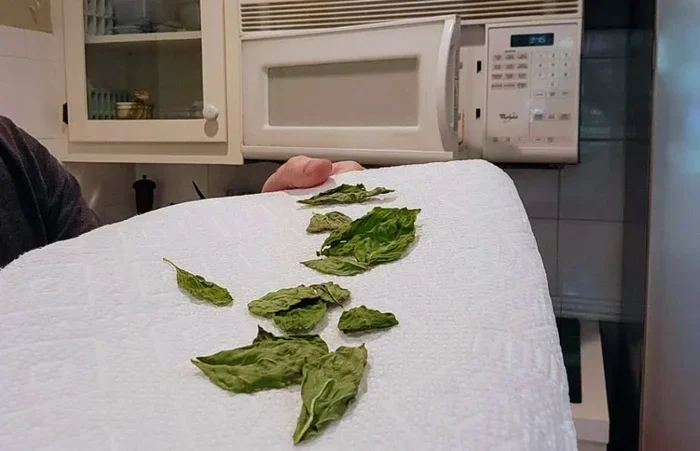
Place your basil leaves in a single layer on the parchment paper. Do not stack them on top of each other. Each leaf needs to have space so the microwave heat can reach all sides evenly. If you have a lot of basil, dry them in batches rather than crowding the plate.
Make sure the leaves are not touching each other. Overlapping leaves will dry unevenly, and some parts may burn while others stay moist. A single flat layer is the secret to perfect results every time.
Step Three: Cover With Another Layer
Place another sheet of parchment paper on top of the leaves. Then put a second microwave-safe plate on top to hold everything down. This setup creates even pressure and helps the moisture escape uniformly. The double plate method is a simple trick that professional cooks use at home.
Step Four: Microwave On Medium Power
Set your microwave to medium power. Do not use full power. High power can burn the leaves in seconds, and burnt basil has a bitter taste that cannot be fixed. Medium power gives you more control and prevents scorching.
Microwave the basil for 30 seconds. Then open the microwave and check the leaves. They should feel slightly dry but still flexible. If they are not ready, microwave for another 15 to 30 seconds. Keep checking every 15 seconds after the first minute. Most batches need between two and four minutes total.
Step Five: Check For Doneness
The leaves are done when they feel crispy and crumble easily between your fingers. They should snap when you bend them. If they still feel leathery or flexible, they need more time. But be careful. It is easy to go from perfectly dried to burnt in just a few seconds.
Let the dried leaves cool on the plate for about 10 minutes. They will become even crispier as they cool down. Do not touch them too much while they are hot because they can break into small pieces.
Expert Insight: Many people wonder about the difference between drying basil in microwave and using a dehydrator. The microwave method is faster and works great for small batches. A dehydrator is better if you are drying large amounts regularly. But for most home cooks, the microwave is more than enough.
Quick Tips For Perfect Results
- Use fresh basil: The fresher the leaves, the better the dried flavor will be.
- Keep leaves whole: Do not cut or tear them before microwaving.
- Use medium power: Never use full power to avoid burning.
- Check frequently: Every 15 to 30 seconds makes a big difference.
- Work in small batches: Do not overcrowd the plate for even drying.
- Let them cool: Cooling makes the leaves crispier and easier to store.
Best Microwave Settings And Tips For Perfect Results
Getting the right microwave settings is crucial for drying basil successfully. Not all microwaves work the same way, so you may need to adjust slightly based on your appliance.
Power Level Matters
Always use medium or medium-low power when drying herbs. Full power is too intense and will cook the leaves instead of drying them. Medium power (around 50 percent) gives you gentle, even heat that removes moisture without damaging the flavor.
If your microwave does not have power settings, you can use the defrost setting instead. This works similarly to medium power and gives you more control over the drying process. The goal is slow moisture removal, not cooking.
Time Guidelines For Different Amounts
The drying time depends on how many leaves you are processing. Here is a simple guide:
- Small batch (5 to 10 leaves): 1 to 2 minutes
- Medium batch (10 to 20 leaves): 2 to 3 minutes
- Large batch (20 to 30 leaves): 3 to 4 minutes
These times are approximate. Your microwave may vary. Always start checking at the lower end of the time range. It is much easier to add more time than to save burnt leaves.
Humidity And Your Environment
Did you know that the humidity in your kitchen can affect drying time? On a humid day, your basil may need an extra 30 seconds or so. On a dry day, it might be done faster. Pay attention to how the leaves feel rather than relying only on the clock. Your senses are the best tools for this job.
Common Mistake: One of the biggest errors people make is using too many leaves at once. Overcrowding the plate leads to uneven drying. Some leaves burn while others stay damp. Always keep a single flat layer for the best outcome.
How To Store Dried Basil And Keep It Fresh
Drying your basil is only half the battle. Proper storage is what keeps your dried herbs flavorful for months. If you store them incorrectly, they can lose their aroma and potency quickly.
Choosing The Right Container
The best containers for storing dried basil are airtight. Glass jars with tight-fitting lids work perfectly. Mason jars are a popular choice because they are affordable and easy to find. You can also use resealable plastic bags or vacuum-sealed bags for longer storage.
Make sure the container is completely dry before you put the basil inside. Any moisture trapped inside the container can cause mold to grow. This will ruin your dried basil and make it unsafe to use.
Where To Store Your Dried Basil
Store your dried basil in a cool, dark, and dry place. A kitchen cupboard away from the stove works great. Avoid storing it near the stove, oven, or window where heat and light can degrade the flavor. Light and heat are the enemies of dried herbs.
A pantry or a dark cupboard is ideal. The temperature should be consistent. Avoid places that get hot and cold throughout the day. Stable conditions keep your dried basil fresh for longer.
How Long Does Dried Basil Last?
When stored properly, dried basil can last for six months to one year. However, the flavor is strongest in the first three to six months. After that, it gradually loses its potency. To get the best flavor, try to use your dried basil within six months of drying.
If you want to check whether your dried basil is still good, crush a small piece between your fingers. If it has a strong aroma, it is still fresh. If there is little to no smell, it is time to replace it.
Quick Tip: Label your containers with the date you dried the basil. This helps you keep track of freshness and use the oldest batches first. A simple piece of tape and a marker is all you need.
Comparison: Microwave Drying Vs Other Methods
There are several ways to dry basil at home. Each method has its pros and cons. Here is a comparison to help you understand why microwave drying stands out.
| Method | Time Required | Flavor Retention | Equipment Needed | Best For |
|---|---|---|---|---|
| Microwave Drying | 2 to 4 minutes | Excellent | Microwave oven, parchment paper | Small batches, quick results |
| Air Drying | 7 to 14 days | Good | None | Large harvests, no equipment |
| Oven Drying | 1 to 3 hours | Fair | Oven, baking sheet | Medium batches |
| Dehydrator | 2 to 4 hours | Very Good | Food dehydrator | Frequent drying, large quantities |
As you can see, microwave drying basil offers the best balance of speed and flavor. It is faster than oven drying and air drying while preserving more flavor than the oven method. For most home cooks, the microwave is the clear winner when it comes to convenience and quality.
Expert Insight: Professional chefs often use microwave drying for small quantities of fresh herbs. It is fast, clean, and produces excellent results. If you want restaurant-quality dried basil at home, the microwave method is hard to beat.
Creative Ways To Use Your Dried Basil
Now that you know how to dry basil in microwave oven, let us talk about what to do with it. Dried basil opens up a world of culinary possibilities. You can use it in so many dishes and recipes throughout the year.
Cooking With Dried Basil
Dried basil is a staple in Italian cooking. It adds depth and aroma to pasta sauces, pizza, and roasted vegetables. You can also use it in soups, stews, and marinades. Because the flavor is more concentrated than fresh basil, you need less of it. A general rule is to use one-third the amount of dried basil compared to fresh basil in any recipe.
Dried basil also works well in meat rubs and spice blends. Mix it with garlic powder, onion powder, salt, and pepper for a simple all-purpose seasoning. Sprinkle it on grilled chicken, fish, or roasted potatoes for an instant flavor boost.
Making Basil Powder
If you want an even more versatile form of dried basil, try making basil powder. Once your leaves are fully dried and crispy, crumble them into a fine powder using your fingers or a mortar and pestle. Store the powder in a small jar and use it as a seasoning.
Basil powder is incredibly convenient. You can sprinkle it directly onto dishes without worrying about chunks or stems. It dissolves quickly and distributes flavor evenly. This is a great trick for quick weeknight meals.
Homemade Seasoning Blends
Dried basil is a key ingredient in many popular seasoning blends. You can make your own Italian seasoning, pizza seasoning, or herb salt at home. Simply mix dried basil with other dried herbs like oregano, thyme, and rosemary. Add some garlic powder and salt for a complete blend.
Making your own seasoning blends is fun and easy. It also saves you money compared to buying pre-made blends at the store. Plus, you know exactly what goes into them. No hidden additives or preservatives.
Gift Ideas
Dried basil also makes a wonderful homemade gift. Fill small mason jars with your dried basil and tie a ribbon around the lid. Add a handwritten label with the date and the name of the herb. These make thoughtful gifts for cooking enthusiasts, neighbors, and friends during the holiday season.
You can also package dried basil with a simple recipe card. Include a recipe that uses the herb, like a homemade pasta sauce or a roasted vegetable dish. This adds a personal touch and makes your gift even more special.
Common Mistake: Do not store dried basil near strong-smelling foods or spices. Basil can absorb odors from its surroundings. Keep it separate from garlic, onions, or strong spices to preserve its pure flavor.
Frequently Asked Questions About Drying Basil In The Microwave
Can I dry basil stems in the microwave too?
Yes, you can dry basil stems in the microwave, but they take longer than the leaves. Stems contain more moisture and are thicker. You may need to microwave them for 4 to 6 minutes on medium power, checking every 30 seconds. Dried stems can be used to infuse oils or added to soups and stocks for extra flavor.
Is it safe to microwave herbs on paper towels?
Yes, it is safe to use paper towels in the microwave for drying herbs. Paper towels absorb moisture effectively and are microwave-safe. However, parchment paper or brown paper bags work even better because they dry more evenly and are less likely to cause static or sticking. Avoid using colored or printed paper towels as the ink may transfer to your herbs.
Why did my dried basil turn brown or black?
Your basil likely turned brown or black because the microwave power was too high or the drying time was too long. High heat scorches the leaves and destroys the green color. Always use medium power and check the leaves every 15 to 30 seconds. If you notice any edges turning dark, remove those leaves immediately and continue drying the rest at a lower power setting.
Can I rehydrate dried basil for cooking?
Yes, you can rehydrate dried basil by soaking it in warm water for 10 to 15 minutes before adding it to your dish. However, rehydrated dried basil does not have the same texture as fresh basil. It works best in cooked dishes like sauces, soups, and stews where the texture difference does not matter. For salads or garnishes, use fresh basil instead.
How do I know when dried basil is fully dry?
Fully dried basil leaves should be crispy and crumble easily when you press them between your fingers. They should snap rather than bend. If the leaves still feel leathery or flexible, they need more drying time. Another test is to place a dried leaf in an airtight container overnight. If you see any moisture or condensation inside the container the next morning, the basil is not fully dry yet.
Can I use a microwave to dry other herbs besides basil?
Absolutely. The microwave drying method works well for many herbs including oregano, thyme, rosemary, mint, and parsley. Each herb has a slightly different drying time, but the basic process remains the same. Thicker herbs like rosemary may need a bit more time, while thinner herbs like mint dry very quickly. Always start with short intervals and check frequently for the best results.
Conclusion
How to dry basil in microwave oven is one of the simplest and most useful kitchen skills you can learn. It saves time, preserves flavor, and lets you enjoy your homegrown or store-bought basil all year round. With just a few minutes and basic supplies, you can turn fresh leaves into a pantry staple that enhances countless dishes.
The microwave method is fast, efficient, and requires no special equipment. Whether you are a seasoned cook or just starting out in the kitchen, this technique will serve you well. Follow the preparation steps carefully, use medium power, and store your dried basil properly for the best results.
Now that you know how easy it is to dry basil in the microwave, there is no reason not to try it. Your next fresh bunch of basil deserves to be preserved rather than wasted. Give it a try and enjoy the convenience of having flavorful dried basil ready whenever you need it.