How To Clean Air Fryer Before First Use Complete Guide
Learn how to clean air fryer before first use to remove factory oils, chemical residues, and loose manufacturing particles. This complete guide covers everything from washing the basket to wiping the heating element for a safe and fresh start.
Key Takeaways
- Always wash all removable parts: The basket, tray, and pan often carry factory oils and dust that must be removed before cooking.
- Use warm soapy water: Mild dish soap and warm water are the safest way to clean a new air fryer without damaging the non-stick coating.
- Wipe the interior thoroughly: Food-safe wipes or damp cloths help remove residue from the heating element and walls.
- Run a blank cycle: Heating the air fryer empty for 10-15 minutes helps burn off any remaining residue and eliminates new-appliance odors.
- Never use harsh abrasives: Steel wool and abrasive cleaners can ruin the non-stick surface and void your warranty.
- Regular maintenance starts from day one: Establishing a cleaning routine after your first use keeps your air fryer performing at its best for years.
📑 Table of Contents
- Why Cleaning Your Air Fryer Before First Use Matters
- What You Will Need Before Cleaning
- Step-by-Step Guide To Clean Air Fryer Before First Use
- Common Mistakes When Cleaning a New Air Fryer
- Maintaining Your Air Fryer After the First Clean
- Quick Tips for a Fresh-Start Cooking Experience
- Frequently Asked Questions
- Conclusion
Why Cleaning Your Air Fryer Before First Use Matters
You just unboxed a brand-new air fryer. It looks sleek, modern, and ready to cook. But before you plug it in and start making your favorite crispy snacks, there is an important step you cannot skip. How to clean air fryer before first use is a question that many new owners overlook, and it can make a real difference in both taste and safety.
Air fryers are fantastic kitchen tools. They use rapid hot air to cook food with little to no oil, giving you that satisfying crunch without the guilt. But like any new appliance, your air fryer comes with factory residue. During manufacturing, tiny amounts of oil, dust, and chemical coatings can settle on the cooking surfaces. If you skip the cleaning step, these residues can transfer to your food and affect the flavor.
Food safety is the main reason you should never skip this step. Nobody wants to eat food that has been sitting on surfaces coated with manufacturing byproducts. A proper pre-use cleaning also helps remove any strong chemical smells that come with a new kitchen gadget. Taking just 20 to 30 minutes to clean your air fryer the right way sets you up for healthier cooking and better results every single time.
If you are wondering whether this step is truly necessary, think of it like washing a new pot before your first meal. You would never cook in a brand-new pan without rinsing it first. The same logic applies here. Whether you own a Farberware model or a Breville smart oven, the principle remains the same. For more details on getting started with your device, check out our guide on how to use Farberware air fryer toaster oven for practical tips on setup and operation.
What You Will Need Before Cleaning
Before diving into the cleaning process, gather your supplies. Having everything ready makes the job faster and prevents you from scrambling mid-cleaning. The good news is that you probably already own most of these items in your kitchen.
Essential Cleaning Supplies
- Warm water — the foundation of any good rinse.
- Mild dish soap — avoid harsh chemicals that could damage surfaces.
- Soft sponge or microfiber cloth — gentle on non-stick coatings.
- Baking soda — a natural deodorizer and mild abrasive.
- White vinegar — helps cut through residue and neutralize odors.
- Dry clean towel — for wiping parts dry after washing.
- Food-safe cleaning wipes — handy for wiping the exterior and interior walls.
What to Avoid
Not all cleaning products are safe for air fryer components. Stay away from steel wool pads, abrasive scouring powders, and bleach-based cleaners. These can scratch the non-stick coating on the basket and tray. Once that coating is damaged, food will stick more easily and cleanup becomes a bigger chore. Also avoid submerging the main heating unit in water. Only removable parts should be washed.
Think of your air fryer like a delicate piece of cookware. You want to protect its surfaces so they last for years. If you need help understanding what makes a good air fryer design, our article on what is an air fryer toaster oven explains the key components and how they work together.
Step-by-Step Guide To Clean Air Fryer Before First Use
Now let us walk through the actual cleaning process. This how to clean air fryer before first use guide covers every step from disassembly to that first blank run. Follow these steps carefully for the best results.
Step 1: Unplug and Disassemble
Start by making sure your air fryer is unplugged. Never work on an appliance that is still connected to power. Next, remove all detachable parts. This typically includes the cooking basket, the drip tray, and sometimes the crumb drawer. Refer to your user manual if you are unsure which parts come out. Each piece should lift out smoothly. Set them aside on a clean towel.
Step 2: Wash All Removable Parts
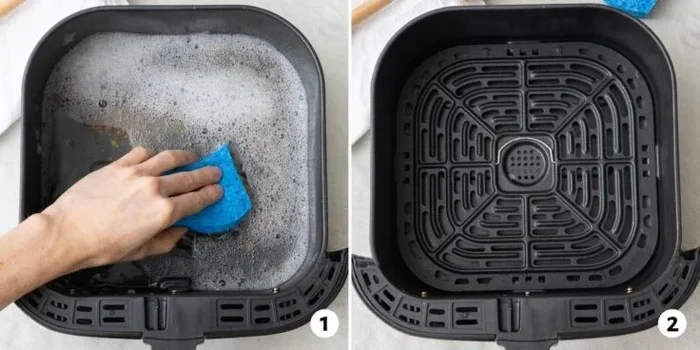
Fill a sink or basin with warm water and add a few drops of mild dish soap. Submerge the basket, tray, and any other removable components. Let them soak for about 10 to 15 minutes. This softens any factory oils or residue sitting on the surface.
After soaking, use a soft sponge to gently scrub each part. Focus on corners and edges where residue tends to collect. The basket cleaning process is especially important because this is where food直接接触加热表面. Rinse everything thoroughly under clean running water to remove all soap traces.
Dry each piece with a clean towel or let them air dry completely before reassembling. Moisture trapped inside the unit can lead to mold or unpleasant smells. If you want a deeper level of appliance care, you can also look into techniques similar to how to clean bottom tray of toaster oven for stubborn residue removal tips.
Step 3: Wipe Down the Interior
The inside of your air fryer needs attention too. Use a damp microfiber cloth or food-safe wipe to clean the interior walls and ceiling. Pay close attention to the area around the heating element. This is where dust and fine particles from manufacturing often settle.
Do not use excessive water here. Simply dampen the cloth and wring it out well. Wipe in gentle circular motions. If you notice any sticky or greasy spots, make a paste from baking soda and a small amount of water. Apply it to the spot, let it sit for a few minutes, then wipe clean. This natural approach works wonderfully without risking damage to sensitive surfaces.
Step 4: Clean the Exterior
The outside of your air fryer deserves care as well. Wipe the front panel, handle, and top vent with a slightly damp cloth. Remove any packaging stickers or adhesive residue using a bit of vinegar on the cloth. The exterior may seem less important, but keeping it clean contributes to overall kitchen hygiene and keeps your countertop free from transferred grime.
Step 5: Run a Blank Preheating Cycle
This is the step many people forget. After washing and wiping everything, plug the air fryer back in. Set it to the highest temperature setting and run it empty for 10 to 20 minutes. This blank cycle serves several purposes:
- It burns off any remaining microscopic residue inside the cavity.
- It removes new-appliance odors that come from factory materials.
- It helps the heating element settle into its operating range.
Open a window or turn on the fan during this step. The first heating cycle may release a slight plastic or metallic smell. This is completely normal and should fade quickly. If the smell persists after two blank cycles, contact the manufacturer. Once the cycle finishes, let the unit cool completely before wiping the interior one more time with a dry cloth.
Common Mistakes When Cleaning a New Air Fryer
Even with the best intentions, people make mistakes during their first cleaning attempt. Avoiding these common errors protects your investment and ensures safe cooking from day one.
Using Harsh Chemical Cleaners
Some people reach for heavy-duty oven cleaners or bleach sprays. These products are far too strong for an air fryer. They can corrode metal parts, strip away protective coatings, and leave behind toxic residues that contaminate food. Stick with mild soap, baking soda, and vinegar. These natural options are powerful enough without the risks.
Skipping the Blank Heating Cycle
Washing alone does not address everything. Heat reaches spots that cloths and sponges cannot. The empty heating cycle acts as a final deep cleaning step. Without it, you may still have invisible residues lurking near the heating element. Never skip this part if you want a truly fresh start.
Forgetting the Drip Tray
The drip tray or pan sits at the bottom of most air fryer models. It catches oils and moisture during cooking. Many users forget to wash this small piece before first use. Even though it looks clean, it can harbor factory dust and oils. Always include it in your full washing routine.
Reassembling While Parts Are Still Wet
Patience matters here. Putting wet parts back together traps moisture inside the unit. This creates a breeding ground for bacteria and can cause rust on metal components. Let everything dry fully, whether by towel or air drying, before putting your air fryer back together.
Maintaining Your Air Fryer After the First Clean
Once you have completed the initial how to clean air fryer before first use process, the job is not done. Ongoing maintenance keeps your appliance running efficiently and your food tasting great. Think of it as part of a healthy cooking routine.
Clean After Every Use
The best habit you can build is cleaning the basket and tray after every cooking session. Wait for the unit to cool, then wash the removable parts with warm soapy water. Wipe the interior with a damp cloth. This prevents oil buildup and stops food particles from burning onto surfaces during the next cook.
Deep Clean Weekly
For those who use their air fryer frequently, a weekly deep clean works well. Remove the heating element cover if your model allows it. Wash it gently with soap and water. Use a toothbrush to clean tight spaces around the fan area. This level of tray maintenance extends the life of your appliance significantly.
Store Properly
If your kitchen counter is crowded, store your air fryer in a cool, dry place. Cover it with a cloth or original box to keep dust from settling on the heating element. Proper storage is an underrated form of appliance care that many people ignore.
Check the Manual for Model-Specific Advice
Every air fryer model has unique features. Some baskets are dishwasher-safe while others are not. Some units have removable heating covers and some do not. If you own a Breville model, for instance, specific care instructions may differ from other brands. You can explore setup and care guidance in our article on how to use Breville smart oven air fryer for brand-specific recommendations that apply to maintenance routines as well.
Quick Tips for a Fresh-Start Cooking Experience
Here are some bonus tips to make your first cooking session even better after you finish cleaning:
- Season the basket: Lightly coat the basket with a thin layer of high-smoke-point oil like avocado oil. Run one cycle at 400 degrees Fahrenheit. This adds a protective layer and improves food release.
- Start with simple recipes: Try easy items like fries or roasted vegetables for your first real meal. They help you learn your new appliance without the pressure of a complex dish.
- Keep a spray bottle of water handy: Spritzing water into the basket before cooking sticky foods helps with cleanup later.
- Use parchment paper liners: These catch drips and save you time during the cleaning process.
- Never overfill the basket: Crowding the basket blocks airflow and leads to uneven cooking plus harder cleanup.
Frequently Asked Questions
Can I put the air fryer basket in the dishwasher before first use?
Yes, many air fryer baskets are dishwasher-safe, but always check your user manual first. If the manufacturer says it is safe, running it through a gentle dishwasher cycle works well. However, hand washing with mild soap is always the safer option to protect the non-stick coating. After dishwasher cleaning, rinse and dry thoroughly before reassembling.
Is it safe to use vinegar to clean a new air fryer?
White vinegar is a safe and natural cleaning agent for air fryers. Mix equal parts vinegar and water, dip a cloth in the solution, and wipe the interior surfaces. Vinegar cuts through residue effectively and neutralizes odors. Just make sure you rinse with plain water afterward so no vinegar taste lingers. This is a great method for kitchen appliance cleaning without harsh chemicals.
How long should I run the blank heating cycle?
Most experts recommend running the empty cycle for 10 to 20 minutes at the highest temperature setting. If the smell is strong, run a second cycle. The goal is to burn off all factory residues and eliminate any chemical odors. Always ventilate the room by opening a window or turning on the exhaust fan during this process.
What if my new air fryer has a strong plastic smell?
A slight plastic smell during the first few uses is completely normal. It comes from the heating element and internal plastic components warming up for the first time. Running two to three blank cycles with proper ventilation usually removes this completely. If the smell does not fade, let the unit air out for 24 hours before trying again. Contact the manufacturer if the smell is extremely strong or does not go away.
Do I need to remove the heating element before cleaning?
In most cases, no. The heating element sits behind a protective cover and should not be removed unless your manual specifically says to do so. Simply wipe around it carefully with a damp cloth. Using water directly on the heating element is never a good idea. If you want to learn more about proper internal cleaning techniques, our detailed guide on how to use Farberware air fryer toaster oven includes helpful tips on handling internal components safely.
How often should I deep clean my air fryer after the initial cleaning?
A thorough deep clean once a week is ideal for regular users. If you use your air fryer daily, consider deep cleaning every three to four days. Light cleaning after each use keeps heavy buildup from forming. Consistent air fryer maintenance means fewer stubborn stains, better-tasting food, and a longer-lasting appliance. Make it a habit and your air fryer will reward you with delicious meals for years to come.
Conclusion
Learning how to clean air fryer before first use is one of the simplest yet most important things you can do as a new air fryer owner. From washing the basket and tray with warm soapy water to running that crucial blank heating cycle, each step plays a role in ensuring food safety and optimal performance. The process takes only about 30 minutes but protects you from factory residues, chemical odors, and potential flavor issues down the line.
Remember to use gentle cleaning supplies, avoid harsh abrasives, and never skip the empty preheating run. Once your air fryer is properly cleaned and seasoned, you are ready to enjoy everything from crispy fries to roasted vegetables with confidence. Keep up with regular after-use cleaning and weekly deep cleans to maintain that fresh, ready-to-cook feeling every single day.
Your new air fryer is an investment in healthy cooking and delicious meals. Treat it well from the very beginning, and it will deliver amazing results every time you press that start button. Now go ahead, give it a proper wash, run a blank cycle, and get ready to make something tasty. Your kitchen is about to become your favorite place to be.